Howdy All!!
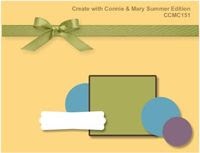
I can't believe I finally got some time to stamp this week! I gotta tell you - I am going to start scheduling it in my calendar! Anyway - You know how it is - The Create with Connie and Mary Challenge rolls around every week.......and I love to participate in their challenges ;) So - of course when I get the chance to stamp and I haven't doen their challenge yet I must start there, right? hehehe...... This week was no exception. They are hosting a color challenge ove rthere this week - check it out:
Wow - that looks like summer, right? Summery flowers........bright summery flowers......I bet you know where I am headed here. ;) Wanna see?
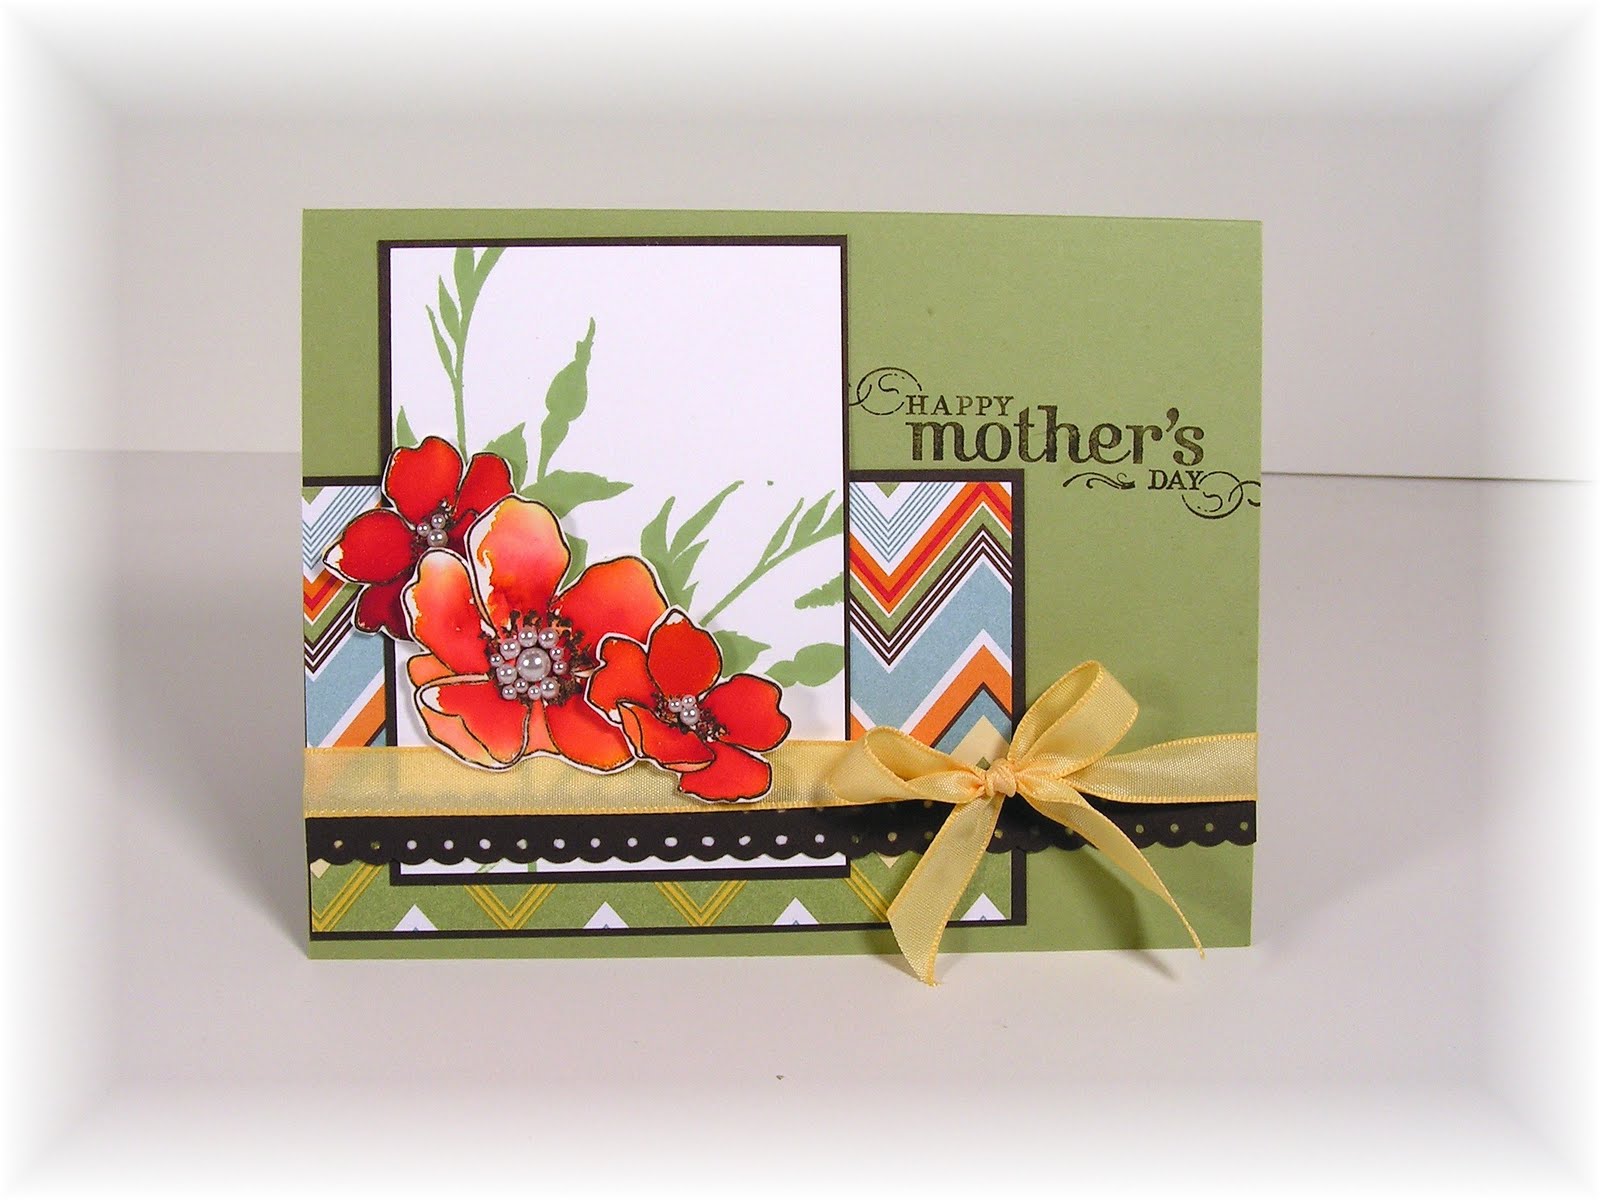
Well? How did I do with that one? I had to add the accent of black - it just seemed to fit and it is a neutral, right? lol. Don't you just love that sentiment????? It is from the upcoming hostess set Happiest Brithday Wishes. Just wait until you check out the new hostess program starting with the new catalog - can I say - "Anyone want a BIG SHOT FOR HALF PRICE??????" Really - you just wait ;)
Sorry - off in dream land again......
Back to the task at hand. The flowers from Awash with Flowers were stamped with tangerine tango and tempting turquoise and then I stamped their outlines with black staz on. Hence - the addition of basic black :). The bottom strip of old olive was also stamped with a leaf image from the same set. I felt the bottom was missing a little pizzzazz - so I added three tempting turquois brads from the brights brad pack and lined them up with the mat pack and paper piercer - A STAPLE IN MY STUFF - lol. Wrap basic black satin ribbon around the panel and tie a simple knot and there you go - a birthday card front.
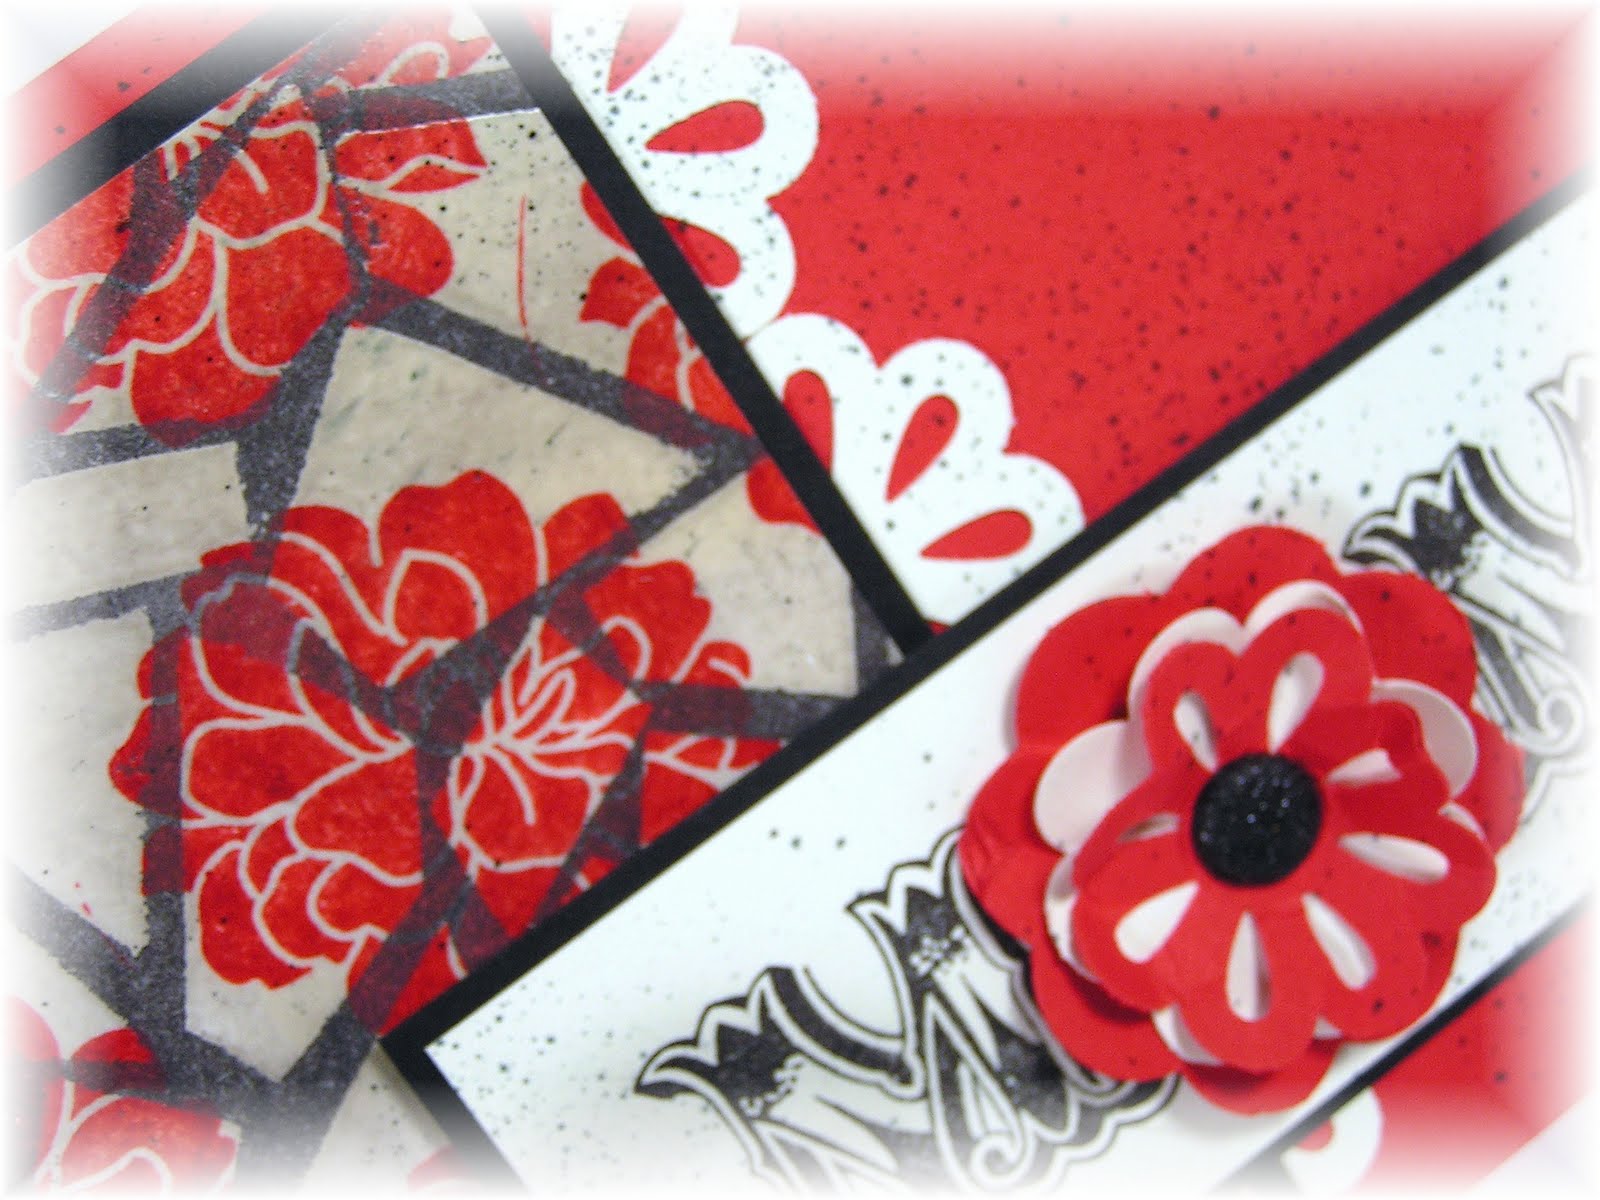
HOLD ON - I still think is is missing a little something........a little more blingage, perhaps???? Ok - take a closer look:
I added smooch ink to the flowers to bring them to sparkly life. you like?
Well - that about sums it up today. I have a full day of this and that to accomplish. lol Now, GO STAMP. ;)
Tuesday, June 28, 2011
Thursday, June 23, 2011
Winner - Winner -
Chicken Dinner! LOL!!!
just wanted to drop in and let you all know the card from the last post was selected as a winner of the Create with Connie and Mary Challenge this past week :) Scroll down for the deets.
Tuesday, June 21, 2011
Happiest Wishes!!
Hi All! wow - it has been a while, huh? Sorry about that - I have been busy getting things ready for my retirement party Wednesday and with life in general. I have really been neglecting the challenges over at Create with Connie and Mary - and boy have I missed doing them - so when I had a little time today to create - I headed straight over there. :) And this week, they are hosting a sketch challenge - take a peeky:
And I had to pull out my preorder goodies for the new catalog......I just had to.......hehehe...... Wanna see what I came up with today? Well - If you don't want to see - turn your head ;)
Don't you just {luv}} that new designer series paper???? It is from a new set called "Just Add Cake." There are some awesome patterns in that pack - I can't wait to get the chance to play some more with that. You recognize the cupcake stack on the tag element, right? It is from one of my favorites - Crazy for Cupcakes. The tag itself is from the Two Tags Die - another favorite and must have item in the 'ol collection. (I bet you are seeing a pattern forming here......lol!) And the blingage - yummo on the glimmer brads returning to the New Idea Book and Catalog!!! I added my two little somethings in the upper left hand corner instead of the lower right. like the picture, because I really felt my card needed some balance in that upper corner......let's call that - creative liberty ;) I love the little flowers adorned with a simple brad - cute, huh?
Oh - you are wondering where that stamp for the main sentiment and in the lower portion of the card are from????? Sorry - I was getting to that..... Both of those stamps are from a new upcoming hostess set, Happiest Birthday Wishes. Oh - the NEW hostess program - you are going to love it....that is all I am going to say - check back when the new catalog goes live to check it out....trust me, it is sooooo worth the wait. ;) Anyway, getting back to those stamps....the main one was stamped with poppy parade ink and punched with the 1 3/4 inch circle punch. And the scallop circle mat - that is from the pennant die.....so sad to see this retire - just for that scallop circle alone.......so get it while you can. The bottom of the card looks like it has been wheeled with a wheel, doesn't it??? Well, it hasn't. It is one stamp that I stamped repeatedly across the bottom with wild wasabi classic ink. This is one of the awesome benefits of the clear mount stamps - I was able to stamp that without having to use my stamp a ma jig. Of course, the same effect could be achieved with wood mount stamps and the stamp a ma jig - I just got to skip that step. A simple bow of poppy parade ribbon completes the front of the card.
I also had to pretty up the inside, as well. I had to....... hehehe
I started with a whisper white base and then added some stamps, designer series paper and voila - a cute card center. well, at least I think it is cute - nothing like tooting my own horn, huh? lol!!!
Let me know what you think. I honestly had a hard time not ripping, tearing, sponging, distressing, etc.....but I think I pulled it off.....or maybe not ;)
Labels:
big shot,
birthday,
cards,
ccmc,
sneak peeks
Tuesday, June 14, 2011
You Say Goodbye.....
......and I'll say hello. Hello. Hello.
I don't know why you say good bye and I say hello.
Ok - I will stop there. Of course I can't imagine that you aren't ALL Beatle fans.......
Wondering where I am going with this - aren't you??? I know I would be wondering if I weren't on this end? lol!
WELL........I needed a baby card to welcome a special little girl (congrats Jennifer!) into this world and I pulled out a retiring favorite of mine - Animal Stories. Get - good bye - hello???? retiring - baby???? get it??? hehe.......
Wanna see what I made? If you know me and it is a brand new little baby girl - it is going to be pink, right? All pink - all the time.
I started with a crumb cake card base...yummo...... I then stamped the animals from animal story in pink pirouette, pretty in pink and regal rose onto whisper white card stock and then matted them with their corresponding colors of card stock. Before adhering them down I tied a knot of wide striped grosgrain ribbon around it - this ribbon makes such a statement!
I then stamped a couple of tiny tags before punching them and adhering them to the ribbon with a piece of white baker's twine. simple baby love.
I used some new sneak peek items for the new grandma.......but that will have to wait for another day ;)
Thursday, June 2, 2011
I'm sailing away.......
Set an open course for the Virgin Sea.
'Cause I've got to be free......
Free to face the life that's ahead of me.
That has to be one of my ALL time favorite Styx songs - ever! If you are familiar with it -keep humming away as you read along. :)
I have a little goodnesss to share with you today......and it all began with a sketch. I know - shocked, right? Me starting with a sketch or color challenge.....I can't help myself....that is what inspires me. you should try it out sometime......hehe
Anyway - back to my little creation for the day. The sketch originated with the Create with Connie and Mary Summer Edition. They offer up the best challenges. Head over and check it out. Here is the sketch:
Now I know you are probably wondering what stamp set I used for this little baby.....When I saw the sketch - I IMMEDIATELY thought to use Open Sea......but all of you are probably tired of my obsession with the nautical stuff.....so I sat on the sketch for a few days and couldn't get my mind to bend from my original vision.....so I stopped fighting it and went for it. What do you think?
I adore "dirty" cards. do you? The stamps are all from Open Sea except the sentiment with is from All Holidays, which is on the retirement list.....WHAT??? I love this set - it covers just about All Holidays.....get it? i couldn't help myself...... I just can't believe it is retiring :( The designer series paper is from the mini catalog as well - Nautical Expedition and the baker's twine....oh how I love the baker's twine........ wanna take a closer look at the ship? If you don't, turn your head because I am about to show you:
And I just couldn't resist the inside:
Well- that about sums it up for the day - let me know what you think - i {{luv}} comment love.....lol!!
Labels:
birthday,
cards,
ccmc,
challenges,
masculine
Wednesday, June 1, 2011
It's so hard to say good bye........
Well - the day has come - the retirement lists are released.
CLICK HERE FOR THE RETIRING STAMP LIST
CLICK HERE FOR THE RETIRING ACCESSORIES LIST
CLICK HERE FOR THE RETIRING DEFINITELY DECORATIVE LIST
The definitely decorative line is being greatly reduced next catalog year - don't let these goodies get away :)
Have a great day!
CLICK HERE FOR THE RETIRING STAMP LIST
CLICK HERE FOR THE RETIRING ACCESSORIES LIST
CLICK HERE FOR THE RETIRING DEFINITELY DECORATIVE LIST
The definitely decorative line is being greatly reduced next catalog year - don't let these goodies get away :)
Have a great day!
Tuesday, May 31, 2011
My Sweet Peach Parfait.......
Hi All! Did you miss me? I sure have missed you!!! I have been feverishly cleaning - I am on a throw out mission......our garbage collector probably isn't too happy with me.....oh well. ;)
I have finally taken the time to complete my Create with Connie and Mary Challenge this week....just under the wire....lol. This week was a color challenge - yummo.
Riding hood red was my absolute favorite red back when it was an in color - but I reach for cherry cobbler all of the time now.....so it was real nice getting the "hood" out this week. hehehehe.....
Wanna see what I came up with? Well - of course you do...that's why you are here, huh?
Well - you like? I pulled out this set because I was thinking - of all the sets I own in the current catalog - which would have been easier to say "of all the sets I do not own....." (but that is another story.....) which set would I feel really bad if ti were on the retired list????? Fifth Avenue Floral - hands down. I have used this set for so many different techniques.....and I {luv} to watercolor.....so That is why I pulled out this beauty this week. I thought that peach parfait combined with riding hood red would blend well together for water coloring this rose - did I do my idea justice? I hope so. I stamped the rose and the lily (?) onto watercolor paper with black staz on ink. I water colored the rose with peach parfait and riding hood red and the lily with pear pizzazz and old olive - sorry to sneak some green in on the challenge - I just thought the flower needed that extra "pop." lol.
I accented the corners of the rose background panel with the basic pearl accents - how sweet is that tiny detail??? I then matted that with riding hood red. Take a closer peek:
The card base is baha blue. I cut two strips of very vanilla and embossed them with the big shot and the coordinating manhattan flower embossing folder. I put those two panels onto a piece of very vanilla before adhering it to the card base.
The sentiment is stamped with black staz on also. I folded the strip to resemble a banner. The entire card is sponged with crumb cake. I also did up the inside:
Well - I would love to know how you feel about this little creation of mine. Don't forget that the RETIREMENT LIST comes out tomorrow - I can't believe it!!!!
Have a great day!
Labels:
big shot,
cards,
ccmc,
challenges
Monday, May 30, 2011
Happy Memorial Day
I wanted to hop on here and say thank you to all who have served for our country and all of the families who have sacrificed for our safety.......thank you.
Also - I wanted to mention that the RETIREMENT LIST comes out in two days - June 1st. I can't believe we are so close to a new catalog!!!!!
Tuesday, May 24, 2011
Step into my Enchanted Gardens
HI All!!
I have a little scrapbook layout to share with you today. I am working at getting our Disney trip all done......and we went to Disney World last May.....argh!!! I am so far behind, I really thought I was in first place.....really. Any way....I did a layout last week for some of the beautiful topiaries that were in Epcot. They really do amazing stuff with food and shrubs. awesome.
Here is what I came up with:
Life size princesses and princes......astounding.
Let's get to the dirt.......lol. I wanted to use floral paper that had pink tones in it.....so I pulled out Fabulous Florettes and made my own!! The flowers are stamped onto whisper white card stock and then I felt it lacked depth.....so I sponged the flower centers with daffodil delight ink......still a little "off" to me......so I pulled out my spritzer tool and regal rose stampin write marker and went to town. :D And I couldn't resist using the triple layer flower punch for a border.....again. :) Doesn't it make the sweetest border?? I think so. And then to ground it to my background page, I added a strip of always artichoke designer series paper from the regals pack. Take a closer look:
I cut the title with my big shot and the timeless type alphabet sizzlets. yummo..... And to give them a little depth, I accented highlight marks with a stampin' write marker. And I ha to cut some flowers out for accents. see?
That is the greatest thing about stamping your papers and accents......you can have perfectly coordinated pieces to match your "designer series paper." Well - how did I do? I would love to hear your feedback.
Labels:
big shot,
scrapbooking,
spring
Sunday, May 22, 2011
grunge rock, baby
Well.....wouldn't you know?????
I was working on a card for the Create with Connie and Mary challenge this week - a sketch challenge......and I also won a subscription to the Create with Connie and Mary Summer Edition - GREAT ideas on there....by the way :).......and they host a challenge for all subscribers on Saturdays....it was a color challenge. KNOW WHAT???? The colors I was working with were the same exact colors that were in the Summer Edition challenge!!!! It was meant to be.....inky fate, so to say ;)
Wanna see both challenges??
Sweet on both, huh? I bet you are wondering where I went with those......Well - even if you aren't - I will still show you - lol!!!
One thing to note - the color challenge said we could add any neutrals - I added crumb cake and basic black. I challenged myself not to use whisper white or very vanilla.....how did I do? The card base is basic grey - I think it looks a little bluish here - but trust me, it is grey....hehe
I did take the creative liberty of enlarging the main image panel of the sketch - please don't stone me for it.....I really wanted to use a combination of Extreme Elements and Grunge Rock - which is on sale this month. I think Grunge Rock is essential if you make teen cards - or if you make any cards for people that are in video game rock bands ;) And at the sale price - who could resist????
Take a closer look at the dirtiness of those panels and all of the layering of stamps.
I would love to know what you think of my grunge rock, baby.
Have a great day!
Labels:
cards,
ccmc,
challenges,
masculine
Thursday, May 19, 2011
I was in the top 3!!
whoooohooooo......Create with Connie and Mary chose my card as one of their top 3 picks from last week's color challenge. scroll down for the post , if you missed it :)
Wednesday, May 18, 2011
My dear friend.....
Hi stampers! Did you miss me?? I missed you! I have been doing some things behind the scenes, so to speak :) Not a lot to post here, unfortunately. But I did get to create some goodness for the Create with Connie and Mary challenge this week....... {smile} This week was a color challenge....wanna see?
Have you ever sat down to do something....and had a stamp set in mind that you were going to use.....I mean wanted to use - no mind changing....just dying to ink up?????? Well I had that this week. I was going to use Flower Fest......I love this set and haven't had a chance to give ti any love.....even though the colors kept pulling me towards the new nautical stuff......i mean pulling. But I really wanted to use Flower Fest. really. So Here is what I came up with:
I sure hope the fact that I used old olive leaves doesn't get me banned from the challenge- I just couldn't make it work for this card without them. Did you get a close look at those flowers and that ribbon???? Oh - the ribbon.............Let me tell you - I will be making more of this type of ribbon in the future........ Here - look closer:
ooooo....did you see that cajun craze wrinkled seam binding ribbon? I know, Stampin' Up! doesn't carry that in their catalog...or in the mini catalog.....I made it out of very vanilla seam binding ribbon. OH HOW YUMMY!!! It was easy peasy lemon squeezy!
Wanna know how to do it?
I want you to be warned.......If I tell you how to do it.......You can't blame me for the impulses you will have to do it on your own. If you can't resist peer pressure -I suggest you stop reading this right now.
All I did was I took a length of very vanilla seam binding ribbon and colored it with my cajun craze marker. I suppose you could have dyed it with reinker and a cup of water......but I couldn't be bothered with all of that extra time. {{lol}} After I had it colored with the marker.....I placed it on an old towel and sprayed it with water. I used a spray bottle that sprays similarly to the stamp cleaner spray bottle. Next I balled it up in the towel to get the excess water and ink color off and then waded it up into a paper towel to dry over night. Now - here is the IMPORTANT part.....don't mistake your wads of paper towels for garbage - that would be a sad, sad day........
Well - there you have it - total stampin' pressure to go create some wrinkled seam binding ribbon for yourself. Just don't say I didn't warn you ;)
Labels:
ccmc,
challenges,
tips,
tutorials
Wednesday, May 11, 2011
You are SNOW CUTE!!!!
HI all!
This layout is a bitter sweet reminder of our winter this past year. My hubby fell out of his truck before thanksgiving and ended up with surgery and a winter off and totally out of commission. It was a long winter here in western Pa......a long - cold - snowy winter. And my little one loves to play in the snow - but that is daddy's thing. I don't do cold physically well at all.....I mean at. all. So, needless to say - our daughter really suffered in the playing in the snow department.....and she really likes it. So - this day the winter moons finally aligned. lol!! It was finally warm enough when we had snow when it wasn't windy......you know all of the normal winter stuff finally took a break, so to say. So after school, I told her we could play out for a short while......she ran with it.....she did everything she could do with the snow in a short time......including mowing it. Yep - you read that right - she pushed her little plastic mower through the snow like she was mowing the lawn.....that was super cute. lol!!!
Well- that was alot of information - huh? Sorry - my fingers are feeling rather chatty tonight - haha!!! Wanna see the layout????
Get it? Snow cute???? lol! Here is a peek at the left hand side:
I used the splatter stamp from extreme elements to represent a snow ball splatter. I stamped it with whisper white craft ink and let it dry instead of embossing it.
The title was cut with my big shot and the serif essentials bigz dies and the timeless type sizzlets. {{luv}} it!
Here is a look at the right hand layout:
The designer series paper is from the subtles designer series paper packs. I ran a strip of early espresso 5/8th inch grosgrain ribbon along the edge. And - I had to add a layer of the tinsel trim form the holiday mini - I would love to see this come back to the regular cattie........it is so cute and sparkly!!!
I also used the snowflake die and northern frost sizzlet strip die to cut my snowflakes for the vertical panel. I added dazzling diamonds to the snowflakes randomly with a 2 way glue pen. And then, I accented some of the flakes with designer buttons and the brand new white bakers twine. A strip of whisper white card stock with some journaling rounds up the layout.
I would love to read your thoughts on my layout.....happy stampin'!
Labels:
big shot,
scrapbooking,
winter
Tuesday, May 10, 2011
Happy Mother's Day
ETA: this post was supposed to post itself before the last post.....sometimes scheduling posts with blogger doesn't post when it should.....sorry about the wonky wording between the last two posts. knowing that this one was supposed to post before the last one should make the hinting about fabulous florettes make sense :)
HI All! Happy Mather's Day to all the mommas and grandmas out there in blog land!!!
I wasn't able to share today's card with you until I saw my mom, since she follows my blog. Her favorite color combo is black, white and red. So - with those colors in mind - here is what I came up with:
I really wanted to use the new stamp set, Fabulous Florets. I absolutely love this new set in the Summer Mini!!! I used it for my Mom's card and one of my grandma's cards - that one will come later this week. I also had to squeeze in using one of the new triple layer punches - I can't get enough of them :) I used it two different ways in this card - did you catch that???
I used it to make the layered flower in the word MOM and I also used it for the boarder of the flower panel. Clever, huh? I thought so ;) A pretty black satin bow brings it all together - after using the spritzer tool with a basic grey marker......I had to distress it out a little........lol
Well.....I better get back to blog surfing....hehehe!!!
Sunday, May 8, 2011
The Florets ARE Fabulous!!!
Hi All!
I promised you in the last post more of Fabulous Florets......I won't let you down, I hope :) I really, really, really love this new set. I started today's eye candy with a sketch challenge from Create with Connie and Mary. see?
This one was for one of my Grandmas for Mother's Day. The base is pear pizazz. The designer series paper is greenhouse gala - still lovin' it!!!! I stamped the silhouette stamp from fabulous florets in pear pizazz onto whisper white. It, and the designer series paper, is matted with early espresso. I also made a horizontal panel with the ribbon edge border punch and a bow tied from daffodil delight taffeta ribbon. sooooo sweeeeeeeet!
Did you get a close look at those flowers?
I used pumpkin pie and real red classic ink refills to flood their color in. I cut them out adhered them down in a natural fashion with a combination of stampin dimensionals and snail on each flower - making parts of the flowers stand up while other parts are adhered straight to the card. And then I had to add some adhesive backed pearls in all different sizes to create the flower centers.
Well - that about sums it up :)
Subscribe to:
Posts (Atom)