Wednesday, September 30, 2009

There's no place like home.....

There's no place like home.....


There's no place like home.....


Do you ever wonder where in the world my thoughts take me??? I know if I were you, I would really wonder about me sometimes! lol!!!

Yesterday was the re-release of an upgraded, better color, better sound, digitally remastered of the digitally remastered version already out for sale of "The Wizard of Oz." So....we have been seeing a lot of commercials for it lately. My daughter really loves that movie, but we do limit her watching times. We noticed, well....I noticed....that if she watched it right before bed time, she had screaming nightmares in her sleep. So, when I put two and two together and finally came up with four...I put a stop to that right quick. Not that I want my daughter to have nightmares...but I do NOT like my sleep interrupted by an unconscious scream fit that she doesn't realize she is even having. :)


So...with "The Wizard of Oz" being prevalent in my mind because of the relentless commercials I made this:


The designer series paper is retired...boo hoo....sorry. But I wanted bashful blue (Dorothy's dress) and real red (hello.....ruby slippers) designer series paper and I don't think I have anything current....I will have to do something about that! ;) The card base is real red. The stamps come from Humor in High Heels. I also got the sketch idea from this week's mojo monday sketch challenge.


I absolutely had to bling up the shoes with a two way glue pen and real red fine glitter. I really love Stampin' Up!'s glitters...they are so fine and luxurious. I also had to bling up the real red mats of the sentiment and the shoes with the versamark ink and iridescent ice embossing powder - {luv} it!


We're off to see the Wizard.....The wonderful wizard of Oz....because, because, because, because, becaaaaause.....of all the wonderful things He does!

Tuesday, September 29, 2009

Were you there?

Hi Stampers!! If you were an attendee at my two waterfall scrapbook classes, you had the chance to win this:
Do you want to see what is in the cello bag?
I had so much fun putting these together. And YES....I intentionally left the ribbon extra long so the recipient could use it for another project. hehe!

I will do a tutorial for this if there is interest....so if you would like to see a step by step tutorial of how to make this....leave me a comment below.

Monday, September 28, 2009

Ever wonder what it is that I do in a day??

LOL!!! If you do...you would -probably be disappointed. :) I have a few things to share with you today. One is not at all paper related....but became paper related....and started as paper related.

Are you confused yet??? I think I am!

Ok...here is what I mean. My cousin came to me a few weeks ago and said - "Can you make a cake that looks like this?" and handed me this:

(began as paper....see where I am going with this????)

I said sure! Do you want the color sprayed on or all in icing? Icing won, hands down.....she {luvs} my icing. If you know me personally, you know I also dabble in cake decorating on the side. I took a series of classes after I had my daughter because I wanted to learn something new. I know...that sounds crazy but here is something even crazier...I went to college and then went to beauty school because I wanted to learn something new... I ended up totally loving it and made a pretty lucrative career out of it for 12 years before I had my little one. That is way off base, though, huh? hehehe!! But you see my desire to keep learning new things....lol!

So....here is the cake:
She also brought me some little army vehicles and men, so I made two roads on the cake. yum.

I had a card made with build a bear on it for him....and about an hour before we had to go to his party....I thought to myself...."self....he wanted an army party - give him an army card" But I do not have any stamps military related - none. So I was sitting in my studio....what to do, what to do? I pulled out always artichoke....yep - looks like military green. Then I pulled out artichoke's counter part, mellow moss - ooooo I am liking this. So, I needed a brown - pulled out creamy caramel....NO WAY!...that wasn't working for me.....how about close to cocoa? Oh Yeah...perfecto! Black, that is a no brainer!

And I started to cut....and cut....cut a little here....cut a little there.....snail some here....snail some there....cut more....ooooooo......me likey......pull out sentiment set, on your birthday, stamped it in basic black on very vanilla. Mount that on basic black. ooooooo....I am going to like this.....Adhere the sentiment panel with stampin dimensionals.

Oh my word.....too cute!


Wanna see?


So there you have it....an invitation that inspired a cake that inspired a card. I would love to know what you think of it all. Leave me a comment below to taste the cake :)

Tuesday, September 22, 2009

has it really been a whole week!??!?!?!

I can't believe it has been a week since I posted any eye candy for you! What is up with that?

Well....I have an excuse....really, I do. I am still trying to find my groove with adding preschool and dance classes to my mix. Wonder how my daughter feels? lol!

Well....I did stamp this morning. Housework will have to wait....it will still be there, trust me, it will still be there. You know my motto is....and almost everyone who knows me personally has heard me say that "If I were to find out tomorrow that I was going to die....I would never think to myself....Boy - I wish I would have run that vacuum just one more time." Right??

So anyway...here is my card today

I based it on the mojo monday sketch for this week. I couldn't get the two rows of circles to work out right....So I trashed the second row of circles. How liberating that was!

All of the stamps except the sentiment are from the level 2 hostess stamp set in the mini catalog, snow buddies. There are so many adorable add on things to the snowmen in this set....LOVE IT!


I masked the larger snowman off to stamp the second one. I added their hats and arms. I colored the main image with my blender pen and watercolor crayons. I sparkled up the snowmen with my two way glue pen and dazzling diamonds, can you see that? That main image panel is mounted up on stampin dimensionals. The card base is old olive and I stamped it with two of the snowflakes in whisper white craft ink and old olive. The bashful blue layer got its bling on by using versamark and iridescent ice embossing powder. **I have been trying to stand my ground people...you do not need to buy preglittered paper at $4 a sheet - make your own with the stuff you already have in your stash. Ok...enough of my bossiness! The real red circles were stamped with another snowflake from the set and embossed with iridescent ice embossing powder also. I punched them with the 1 3/8 circle punch. My sentiment is from - you guessed it - teeny tiny wishes. Oh yeah...the ribbon is striped grosgrain red ribbon.


What do you think?

Tuesday, September 15, 2009

Is this Dirty enough????

Are you wondering where I am going with this???? LOL!!!!

I was just wondering if this is "dirty" enough to give to my hubby for our anniversary? Today's color challenge was pretty in pink, whisper white, and soft suede.....I don't know why but the stamp set Always just jumped into my head. So I went to see what the MOJO sketch is this week....and I immediately thought of exchanging the one circle for 2 hearts. hmmmm......

Here is the original sketch:
Everyone that attends my classes, camps or clubs knows I like to "dirty" things up a bit.....aka - sponge the edges with a shade of brown.....get it?? dirty??? sponge???? I know, lame :) hehe!!

I sponged all edges with creamy caramel and then soft suede to give it a bit more dimension.

I started with a card base of pretty in pink. The main panel is whisper white. I stamped it with sanded background that had been stamped off in creamy caramel. The bird was stamped in soft suede that was stamped off twice. I embossed the hearts with versamark and white embossing powder and then sponged spots of them to deepen them a little. The sentiments are stamped in soft suede. The always sentiment has a berry branch stamped in the background with pretty in pink. I punched it with the 1 1/4 inch circle punch. Matted that with the 1 3/8 inch circle and then the scallop circle punch. I wrapped the soft suede polka dot grosgrain ribbon around and tied it in a knot and then used kraft taffeta ribbon below it.

Wanna see the hearts a bit closer? If not....scroll down really fast! lol!

There is lots of dimension here:
What do you think? My hubby is NO way a pink frilly guy...but I think I can get away with this....what do you think?

Sunday, September 13, 2009

I couldn't leave out the bears......

It wouldn't be a tour of the mini catalog without some Build A Bear. Today is the last day of the tour so be sure to strap on your seat belt and take the ride :)


This really isn't "holiday" per say...but the build a bear is released in the holiday mini - so that counts, right? I made a two page layout for today. I had tons of fun with the bears!!!!
First, if you have never been here before on a scrapbook day....I don't put my little one's face online so she is covered up for a reason. I have had people wonder why I took pictures with scraps on my pages before :)
The background page is regal rose. The designer series paper is from tall tales. Each photo was matted with rose red. I cut out flowers from the designer series paper for the sequence of events. I then stamped the numbers from calendar numbers and letters with brilliant blue onto whisper white and punched them out with the 1/2 inch circle punch. They are mounted with stampin dimensionals. The "BUILD A BEAR" title was cut with my big shot and the billboard sizzlet strip die.

I cut the bears with my big shot as well. There is one main Build a Bear Stampin' Up Bigz Bear die and then I used the Stampin' Up Beary Essentials die to cut out the clothes. It doesn't get any easier than that folks ;)

Here are the bears up close. I think sponging their edges really brought them to life :)


Leave me some love to let me know what you think. If you have enjoyed my blog as part of your tour, please book mark my site, I would love to have you back.

Any products used here can be bought through your Stampin' Up! demonstrator. If you don't already have a demonstrator, contact me. I would be happy to help you out.

Don't leave just yet.....you need to hop on over to Becky's Blog, she is the next stop on the tour. :)

Saturday, September 12, 2009

A Chilly Wally

HI stampers!!!!
Today is the third day of the RemARKable Holiday Blog tour!! You should have just came from Deanna's Blog. If not...don't worry....keep following the links back to the beginning and wrap up your tour that way.

We will be showing you lots of good stuff showcasing the Holiday Mini. It is awesome, huh????

Today, I will show you a little goodie using Cold & Cuddly. I have got to tell you, I just can't keep my hands off of these little cuties!!!

The card base is soft suede. The background panel along the bottom is from Christmas Cocoa Specialty designer series paper - It is soooo gorgeous!!! There are flocked pages...oh my!!!! The top panel was made by running a piece of real red card stock through the big shot with the new Stampin' Up! Textured Impressions Folder, Petals A Plenty. What a beautiful design it makes....perfect!! I next took some platinum shimmer paint on a sponge dauber and rubbed it around lightly to highlight the poinsettia design. It makes such a pretty sheen in real life. The ribbon around the panel is soft suede polka dot grosgrain ribbon - delish!!!

The sentiment, from teeny tiny wishes, is stamped in real red and punched with the word window punch. I matted it with a real red punch from the modern label punch....adorned it with two brads from the vintage brad collection and adhered it with stampin' dimensionals.

Now the main panel.... :)

I stamped the iceberg in soft suede, but I did stamp off twice before stamping here. I stamped the north pole sign with stampin' write markers. I then blinged up the ice with a two way glue pen and dazzling diamonds. Wally and his hat are mounted up on stampin' dimensionals as well. I cut that main panel leaving the sign stick out the top to create a little interest...did it interest you??? LOL!!!! I matted that with real red. The vertical panels are also from Christmas Cocoa Specialty designer series paper. I rolled up the bottom edges just for fun! I then took a regular needle and red thread and sewed some red glass seed beads across the top. I love Stampin' Up!'s collections of seed beads....there are so many different shapes in one package. Did you know Stampin' Up sold bead duos??? They do.....check your Idea Book and Catalog :)

Now, before I go....I would love to show you the beading and the shimmer paint up close:
Be sure to leave me some love at the end of this post and let me know what you think.....and right after you do that....scoot on over to Becky's place.

Friday, September 11, 2009

I'm Falling For You

HI Stampers!!!

Today is the second day of the RemARKable Holiday Tour!!! Did you enjoy the ride yesterday???

Today, I have a gate fold card that uses the new Autumn Splendor. I think these leaves are absolutely gorgeous!!!!

The card base is dusty durango. I cut it at 5 1/2 x 8 1/2. Along the 8 1/2 side score in at 2 1/8 on both ends. I stamped the entire outside of the card with the 5 petal leaf in dusty durango randomly. I then randomly stamped the acorns in close to cocoa. I sponged all of the edges in close to cocoa to "dirty" it up a bit. :)

For my main image panel I stamped the oak leaf and the maple leaf onto scraps of very vanilla card stock with close to cocoa craft ink and embossed them with clear embossing powder and my heat tool. After they cool for a few seconds, I sponged color all over them. The colors I used were crushed curry, tempting turquoise, dusty durango and close to cocoa. I then cut them out and adhered them to my main image panel that had been stamped with my sentiment from teeny tiny wishes. I matted that onto chocolate chip.

Here is a closer look at those leaves:

Now....here is the important part!!!!! Only put adhesive on HALF of the panel before adhering it to the card front.

Leave me some love here in the comment section and then head right over to Becky's place and see what she cooked up for today.

I'll see you tomorrow for day three of the tour :)

Thursday, September 10, 2009

Upcoming Stamp Camp

**Note: This will remain at the top of my blog until the registration deadline, please scroll down for latest posts :)

HI Stampers!!!

Here is some information on the next Stamp Camp:


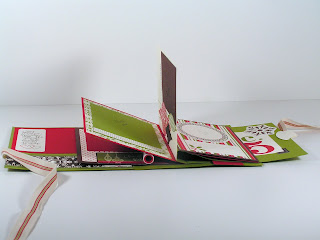
We will be making this awesome Scrapbook!!! There are more pages than what you are seeing here - I want to keep a few things a surprise ;)


You pull a tab and the pages flip open - I {luv} it!!!


I have two dates reserved for this camp. Sunday, September 27th at 2:00 pm or Monday, September 28th at 6:30 pm. I am limiting the registrants to 8 each day so DO NOT DELAY in reserving your spot. The cost is $25.00. The last day for registration is THIRSDAY, SEPTEMBER 10th.


You can also order a kit for the same price, shipping will be extra if needed to send it out to you.

Email me for details, regcorn@zoominternet.net

A Patch of Smiles

HI everyone!!!


It is day One of the RemARKable Holiday Tour!!! We will all be show casing some awesome products from the Holiday Mini - Isn't it A.W.E.S.O.M.E.????? This is the best mini I have ever seen....but it isn't too mini with it's 40 pages!!! Holiday Medium sounds kind of silly though....so Mini it is! You should have come here from Deanna's Blog....but if you didn't, don't worry. Just follow along to the end and link up the beginning blog and make your route.

Here is my piece of goodness for the day:
I don't even know where to begin....I had so much fun making this card!!! The card base is rich razzleberry. The black background panel is embossed with the big shot using the perfect details embossing plate. Here is a closer look, I'm not sure how well it photographed. argh!!


The multicolored panel is a piece of designer series paper from the Holiday Mini, Night and Day. The entire package is black and white, so I sponged rich razzleberry, pumpkin pie, and old olive with stampin' sponges. Instant coordinating designer series paper - does it get any better then that??? I don't think so, my dear stampers :)


The main image panel is whisper white. All of the stamps on this card are from Pumpkin Patch. I stamped the two oval pumpkins directly on the front and the round one in the middle was stamped onto scrap card stock. I embossed all of the faces on the pumpkins with basic black craft ink and irredescent ice embossing powder. {luv} it! I then stamped the grass along the bottom. I then sponged the grass with old olive and the sky with pumpkin pie and rich razzleberry. The stems and curlies were also stamped with old olive. I punched the circle pumpkin with the 1 inch circle punch and adhered it down with stampin' dimensionals. That layer was matted with rich razzleberry. I punched the right hand side of the panel with the horizontal slot punch to run some rich razzleberry polka dotted grosgrain ribbon that had been turned over to cover the dots through. I then folded it back and adhered an orange rhinestone brad, from round fire rhinestone brads, through and adhered it to the front of the card.

I stamped my sentiment in rich razzleberry and sponged the ends lightly before punching it with the modern label punch.

Don't forget to come back tomorrow - There will be more "touring" going on.

Before you leave, leave me a comment letting me know what you think. And then click on over to Becky's Blog for you next stop on the tour.

Wednesday, September 9, 2009

All That Glitters is......Red????

HI Stampers!!!
I took some time this morning to stamp while the little one is at school....I have to go get her soon so this has to be relatively quick. :)


This is for today's scs sketch challenge. I used tree trimmings from the Idea Book and Catalog for my main image.....i love these little ornaments!! I then blinged then up with my two way glue pen and the red fine glitter. The front ornament is glittered with heat and stick powder and fine red glitter. My sentiment is from teeny tiny wishes. My ink colors are soft suede, real red and versamark ( the heat and stick powder). My designer series paper is the Christmas Cocoa Specialty from the mini - I'm telling you .....you need several packs of this gorgeous paper!!! I used the 5/16th inch white brads to accent the soft suede layer. The ribbon is from the mistletoe collection....luv it!!! I used tons of stampin' dimensionals all over the place on this card - no big surprise there.

Can I get on my soap box for a sec??? If you are creating cards with out using stampin dimensionals....you are missing the boat. They add soooo much to the card by adding a little dimension. Don't be afraid....USE 'EM! LOl! well...I will step down now.... Back to the show already in progress.

Here is a glimpse of the bling up close.

Oh yeah...could leave the inside out on this one :)


So...what do you think?

Don't forget.....COME BACK TOMORROW FOR THE RemARKable Blog Tour....YOU WILL NOT WANT TO MISS THE TRIP - No passport required! ;)

Thursday, September 3, 2009

Thank You for your patience.

HI Stampers!
Sorry it has been a while....things have been spinning around here lately! lol! My little one has started preschool and dance classes this week....let the taxi-ing around begin!!!

So the title is appropriate for two reasons....1.) thank YOU for your patience with me and 2.) the card I made today will contain the tuition for my daughter's preschool next month - thanking the teacher and assistant for their patience with preschool age children and making learning for them fun! Now I have MANY Thank You cards in my stash that I could use...but I got a delivery of some more new stuff today, so I had to use one of my new hostess sets - country morning.
Wanna see it??

I am in super busy mode still today.....so I can't get into too many details, but I will hit some highlights :)

I watercolored the image with ink refills and an aquapainter. I ruffled the double stitched bashful blue ribbon on one end before adhering it down to the card's front panel. I then adhered 1/4 inch black grosgrain ribbon across the top so the gather wouldn't show. The sentiment is from teeny tiny wishes - no surprise there, huh? lol! The buttons are summer sun corduroy and sherbet designer buttons. The designer series paper is from night and day in the holiday mini. But "it is all black and white" you say......I sponged it with so saffron ( card base) and crushed curry (mat for front).

Oh yeah! I put crystal effects on the glass jars - fun touch!!!!!

Here is a closer look at the coloring and the ribbon:

Did you notice that I used so saffron, crushed curry card stocks but the summer sun button looks great with it??? Get out your goods....and use 'em! hehe!!!


BY the way...this will tickle your funny bone, maybe. When I sat down to make this card I had it in my mind that I was going to do a black/cream/red type of theme.....the yellows would not leave me alone!!!!!!


spread your love....let me know what you think by leaving me a comment below ;)