Showing posts with label scrappin' saturday. Show all posts

Friday, July 9, 2010

There is a Greenhouse Gala at The Crystal Palace!!

I gotta tell you - if you hadn't figured it out already....lol! - I am totally smitten with the new Greenhouse Gala Designer Series paper!  It has so many awesome designs all in one package..........oh to be in {luv}

We recently took a trip to Walt Disney World for eight days....so I have plenty....and when I say plenty.....I mean P.L.E.N.T.Y.!  I think I had about 1000 pictures printed...and I didn't print near all I had taken.  Gotta love digital :)  Even my four year old said on the third day at breakfast...."mom, you don't have to take pictures of me eating everyday....."  I was like...REALLY?????  Even she has me figured out!  I did not leave the room for ANY reason without the camera.....you never know!  hehehe!!!!  Oh well..someday she will appreciate me taking a picture of her eating a chocolate crown with chocolate all over her face, dressed to the nines in princess garb, eating a $140 meal in Cinderella's castle....right????  LOL!!!

Oh well....back to today's post!  I am plugging away slowly at our vacation photos and I had to incorporate Greenhouse Gala in there somewhere!  There are so many pictures of beautiful gardens, scenery, etc to scrap.  Immediately I thought of our character meal we had at the Crystal Palace in Magic Kingdom.  So I got to scrappin'!  I still have another two page spread of the Crystal Palace with my little one and the characters....but that will have to wait for another day :)

Here is my two page spread:

The base page is textured baja blue.  All of the designer series paper is from Greenhouse Gala.  The three flower along the top of the right hand side are stamped using Friends Never Fade set, as are the two tangerine tango flowers that are on the journaling block - top note die - (what would I do without the top note die????)  and in the center of the picture block.

My title was cut with the Timeless Type Junior Alphabet set and the big shot

I cut the entire title out twice, once in baja blue and then again in daffodil delight.  I layered them off set and adhered them together with a two way glue pen.  I then took my white gel pen and gave the letters dimension by adding reflection marks.  I then adhered them to the page with my two way glue pen

Did you ever put something in place and think.....that just looks "flat."  I don't mean flat as in not "puffy"....just flat.  Do you know what I mean?  So I thought...What else can I do to those letters once they are glued down?????  Crystal Palace.....Crystal......Hmmm......Crystal......CRYSTAL EFFECTS!!!!  Yes!  I will put crystal effects over the letters - that will give them a glassy look.  The Crystal Palace is almost all glass.....that will work.  Then it hit me!!!!  Sprinkle the letters lightly with dazzling diamonds!!!  Dazzling diamonds will fix anything!!!

WELL????  How did I do?  I would love for you to let me know, leave me a comment below and then click on the "next" icon to continue on the tour.  Today is the last day - You won't want to miss the ride!!!

Saturday, June 20, 2009

Scrappin' with new goodies!!!

Oh yummmmm........that is all I can say about the raspberry lemonade designer series paper!!!

I was able to get this page done while my hubby was bathing our little one. He is so good to me like that, mostly! ;)


The background page is a new in color - crushed curry. The designer series paper is raspberry lemonade, of course {wink}. The pink layer is actually regal rose. I stamped on the bottom of the page with a flower from a new level 2 hostess stamp set, kind and caring thoughts. Wait until you see the new hostess sets....they are awesome!! My journaling block is crushed curry and the journaling is done with my rich razzleberry stampin write marker - OH YEAH - there are new in color markers!!!!! Thank You Stampin' Up!!!!


Did you see that adorable coffee cup?? Well, actually it is hot chocolate here.... :) A while back, I was strolling along in a grocery store and a representative was handing out coupons for maxwell house coffee - they were inside the coffee cup shaped folder! I about jumped for joy to get that folder!!! I hate coffee but my hubby drinks it, so the coupons did not go to waste, but that cup template was mine....all mine!!!! I traced it onto a new in color rich razzleberry and then stamped it with a viney type flower from the same hostess set. I did stamp the cup with a retired sale a bration set, yummy, in whisper white craft ink and embossed it with clear embossing powder. And the steam....don't you love it??? I stamped the flourish from baroque motifs onto window sheets with white staz on ink. When stampig the window sheets with white, it is important to use the white staz on - it will dry a lot better for you.

See the little ribbon detail?? The top piece is a piece of double stitched rose red layered with the new polka dot crushed curry grosgrain ribbon. See the rich razzleberry piece under it??? The ribbon is only polka dotted on one side so you have the option of dots or no dots - genius!!! I love how Stampin' Up is really paying attention to detail with the new accessories.
leave me a little word about how you like this page....and the new in color stuff. I am really excited about them!!

Saturday, June 13, 2009

Scrappin' Saturday is back, Baby!!

This morning, I went into my craft room because my little one wanted to "cut." And I thought....Well, I have been working on getting my desk in order...I will sit there and do that while she goes to town with decorative scissors and old card stock. Wouldn't you know it....my pictures files were sitting there, all innocent, and the pictures on top were her glitter art pictures. I usually only do 2 page spreads...I like the look in my albums much better than one pagers....so I had been struggling with what to do with these pictures. So I picked up my stack and the next set of pictures were also better appropriate with a one page spread. It was meant to be....make 2 one page spreads...they will still be in chronological order (which I am a nut about) and I won't drive myself crazy anymore.....

So, here is the fruit of my morning labor.....


Now, mind you, this is about glitter art...so I had to include some glitter, right???? See the little orange glitter edge of my "focal point" photo....
It is hard to see in these pictures, but the chipboard letters are glittered up with chocolate chip glitter....yummo.....

And do you see the paper at the bottom of the page? Are you wondering when Stampin' Up started to make glittered papers??? Well, they don't..... You know you could go into a scrapbook store and spend a couple of dollars on a preglittered page???? But using the supplies you already have....you can make your own for PENNIES!!!! I took the striped designer series paper and used a 2 way glue pen do draw in lines, I did use a ruler (well, actually it was a popcicle stick - i couldn't find the ruler.....) to keep the lines straight. I drew in a couple of lines and blinged them up with dazzling diamonds. I only did a couple at a time, I wanted my glue to be nice and wet when I glittered it up. Wanna see that up close???


Did you see the jumbo grommet?? I love those.... :D

card stamps: define your life
stock: regal rose, pink pirouette, chocolate chip, pumpkin pie, whisper white, sweet always designer series paper
ink: versamark, regal rose
accessories: scallop edge punch, jumbo grommet, lots of letters chipboard alphabet, 2 way glue pen, dazzling diamonds, stampin' up fine glitters

Monday, December 8, 2008

Scrappin' Saturday 9 (on monday....)

Hi all!


The retirement list comes out tomorrow....and I am going to offer a ONE DAY SALE!!!! It will be tomorrow only so be sure to check back here to see the list and what the sale is!!!!


First off...let me say I had this Scrappin' Saturday done to the point it is now early last week....but I need to pull out my cd's to get the date for these pictures and haven't had the time to do that. I remember exactly that we took these pictures before church one day...she was in such a good mood...but I don't recall the exact date. So I will post this and do the journaling later. I have millions of things to do today so I will give brief details. sorry :(


The base is very vanilla. The solid paper is pink pirouette. The designer series papers are parisian summer. (so elegant) I cut the four large scallops on the left had side with the colluzzle ( a little measuring, a little pencil marking...and voila! scallops!). The flowers are cut with the flower layers die and the big shot. Their centers are buttons from the designer series buttons pack. I tied a piece of linen thread through the centers of the buttons and actually through the entire flower before adhering them to the page with pop up glue dots. The scallop circles around the pictures were made with the 3/16th inch corner rounder with the guard taken off after a circle is cut from the colluzzle. I also used my scalloped edge punch for the straight scalloped edges. My title was cut with my VERY neglected cricut machine. I have had mine for over 2 years and used it a handful of times...what a waste of money! I just don't get it out. oh well...here are the shots of these pages:


Saturday, November 15, 2008

Scrappin' Saturday 8

It is still Saturday, right??? So this still counts! lol!!! This week has kicked my tuckus...so it felt good to get a scrappin' saturday in, that's for sure!

I'll get right to it.

This is the double page spread. The bases are more mustard. I stamped the grass stamp from Inspired by Nature. This stamp set is so versatile!! I just love it! Anyway, I stamped it with creamy caramel ink. The designer series paper here is from autumn vine.


On this side, I used the slit punch to add scallops to the chocolate layer. It is in pumpkin pie. I really love the scallop edge punch...but sometimes I want a larger scallop...know what I mean? This was one of those times...so I pulled out my slit punch! My journaling block is the Stampin' Up! exclusive die, top note. I cut it with whisper white card stock. After I journaled on it with the chocolate chip stampin' write marker....it looked too stark. So I took my creamy caramel ink and a stampin sponge and just pounced it around the edges to soften it a little. It is hard to see in the pictures, but in real life it makes a big difference. It is one of those things someone would never notice....but if you laid the two side by side...there is a definite difference.

The right hand page was fun to put together. It all sort of evolved really...while I was making the page. Not very often do things go how I have them in my head while scrap booking. I'm not sure why....when I sit down to make a card...mostly it goes exactly how I had it layed out or envisioned...but scrap booking....another story! The three pumpkin elements were so much fun!!! For each one, I cut a square of autumn vine designer series paper for the background. I wanted to pull the chocolate designer series paper from the other side, so that is how I picked the background paper. For each pumpkin I punched five ovals with the small oval punch out of pumpkin pie card stock. I stamped each oval with the small flourish from priceless before sponging all of the edges. The curlies coming out of the top of the pumpkins are cut with the big shot and the swirls scribbles sizzlet. I cut it with sage shadow card stock and pounced the sponge with creamy caramel ink to soften the color a bit. The pumpkins are mounted up on stampin' dimensionals. The title was also cut with the big shot using the go-go boots alphabet die set. I adhered it to the page with a 2 way glue pen.


Here is a closer look at those pumpkins. I think they are soooo cute!


Doing these scrappin' saturdays sure have upped my creative outlet...and I sure am enjoying it!!!

Saturday, November 8, 2008

Scrappin' Saturday 7

ETA: i have added the info about these pages now....
Ok...here is the run down....

I have two million things to accomplish in the time that you could do 1/2 of a million things....so I am posting the pictures and I will update the info later this weekend. I didn't want to "cash in" my overpayment of a scrapbook layout just yet....lol!!! I am not going to let you forget I have over payed you....lol!!!

There are some details that I want to share with you on this layout...I just can't do it right now...gotta dash!

Here it is:

The page bases are bashful blue. The designer series papers are from frosty day with accents of close to cocoa, whisper white and tangerine tango.
The title is cut with my big shot and the go go boots alphabet dies in tangerine tango. The snowflakes aren't felt flurries....they are also cut from the snowflake dies and the big shot. You will have to pull the big shot from my cold dying hands to get me to let go of it!! I love it!! The close to cocoa strip is pierced with the matt pack and piercer and then I put in stitch lines with my white gel pen.

See those brackets around the snowflake??? I made those with the curvy label punch. I punched a label out and moved my punch over slightly and punched it out...a perfect little bracket!!! Our punched are sooo versatile! I mean...brackets out of a label punch?? Who knew???

I really am having fun with scrappin' saturday, are you? leave me comments when I do a page that wow's you...let me know what you enjoy seeing.

Saturday, November 1, 2008

Scrappin' Saturday 6

Week 6??? Wow...I am impressed!!! lol!
I sure hope you aren't tired of Felt Flurries....because I can't stop using them!! As a matter of fact, I got these pictures reprinted in black and white because I wanted to scrap with the flurries....do you think I have a sickness???? lol!

Here is the spread:


The base is baja breeze textured card stock....Now....If you aren't using our textured card stock in scrapping or card making, you don't know what you are missing! I didn't warm up to it when Stampin' Up! first released it....but now....I {luv} it!!! The designer series paper is from Ski Slope...beautiful!!!! And of course, the felt flurries from the holiday mini catalog. I used both the Big Felt Flurries and layered them with the largest flake in the Little Felt Flurries. There are three different sizes in the little Felt Flurries....can't go wrong with these!!


This is the left hand page. I matted the pictures with riding hood red card stock. I also stamped "winter" from everyday flexible phrases in whisper white craft ink across the top of my designer series paper panel.


You have to get a better picture at the felt flurries layer....
I adhered them together with the large clear rhinestone brads from the pretties kit...love this!!! this gives you a closer look at the "winter" also. What a cute little way to add color in a small way! There are so many phrases in that set...I will definitely do this a lot more!!! Why hadn't I thought of this in the past????


Now....The right hand page. I double matted the larger picture with riding hood red and baja blue. This is one of my most favorite pictures of her that I have taken. I don't know why.....I just love this picture....her little facial expression is just priceless. Sorry you can't see it....I am paranoid that way. Call me old fashioned....lol!! I also stamped "winter" down the right hand side of the page like I did on the other side. My journaling block is whisper white. It is butted up against the inner edge of this page. My hand writing isn't the best but I am an "old school scrapper" I guess. Someday, I hope my daughter can appreciate my hand writing in her scrapbooks and in my recipe box. More felt flurries....surprise, surprise! lol!
See my title? It is so sparkly in real life. These are chipboard letters from On Board Lots of Letters. I sure hope that Stampin' Up! gives us a letter die set this size. Are you reading this Stampin' Up!???? lol!!! I took a sponge dauber and inked the letters up with whisper white craft ink and embossed them with irredescent ice embossing powder and my heat tool. I then adhered them with tombo mono multi adhesive.
Well....another day in my daughter's album and out of my "box." I do have a terrible fear that I will meet my demise and be so far behind in her scrapbooks. To me, this is one of the best material gifts I can ever give her....I want her to realize her simple day to day things as well as holidays and birthdays. Now...if I would just remember to get the camera out when she is sassing me or screaming about something....LOL!!!


Saturday, October 25, 2008

Scrappin' Saturday 5

Hey Stampers!!
I have been cranking out scrapbook pages this week amidst all my other prepping for last night's stamp camp. Well....2 2-page spreads actually...but that is "cranking out" to me. I am a slow scrapper. I do too much fussing I guess, but it probably doesn't show that I work hours on a spread to the common person. I will show you both 2 page spreads this week....and if I have to skip a week...consider yourself paid in advance! LOL!!!!!

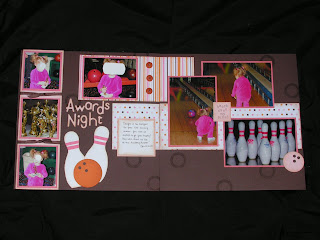
Here is the first spread that I completed this week....I am really happy with it!!! Most of you are full into football season, cheer leading, soccer....we are in full swing with my daughter's bowling league. This layout uses pictures from January ( it was her banquet for the first season - Oct-Dec 2007). We put her into bowling for several reasons....but my main reasons, personally, was I wanted her to have something that made her learn to take turns with their kids, and to have more interaction with kids. The first season was pretty painful for me...I must admit. She really didn't get it - how to roll the ball down the lane. Almost every ball had to be pushed down for her...she really was all over the place with her thoughts, it was hard to keep her focused on the bowling lanes. But she is in her third session (2nd year) this year and so far, it has been so much better. She was only two her first two sessions....so I shouldn't have expected too much. Let me tell you..this year is so much better, we don't even have to walk up to the alley with her...she takes her ball and walks up there and gives it a heave. Now, it isn't the fastest ball that rolls down the alley, but it gets there on its own, mostly. Well, I am getting really off track here....I wanted to keep this post short because there are so many pictures to share.


It is hard to see in these pictures...the base is textured chocolate chip. I guess I shouldn't have taken it on a black background. Also hard to see in the pictures are what I stamped on the background. I wanted a round element...you know to "roll" with the bowling ball thing. I don't have any circle stamps...I have lots of flowers....but I didn't really want a flower. And then, like it was meant to be, my eyes went down to my big deal alphabet and the "O" stamp was the first thing I saw. PERFECT!!! The O in that alphabet is a perfect circle!!! I stamped it a few times randomly on the bases with chocolate chip ink. The patterned paper is from the designer series pack, Sweet Always. What is not to like about pink, brown and orange????

Here is a closer look at the left hand side:
I made the bowling pins and bowling balls myself. I was going to buy some "J-Boutique 3 Dimensional" bowling pins a few weeks ago at Mike's...but then thought for $4 I can make my own...they will match my project and I can make them any size I want to...and for pennies!!!


How did I do? I hand drew one bowling pin and cut it out and used it as a stencil to cut these out. The bowling ball was cut with the colluzzle and I punched three holes in it with my 1/4 inch circle punch and backed it with chocolate chip card stock to fill the finger holes. The title was cut with my big shot and the go-go boots alphabet. I accented the left panel with two knots of chocolate chip ribbon. The pumpkin pie buttons are "threaded" with slivers of chocolate chip card stock. Everything on both pages is sponged with creamy carmel ink.

Here is the right hand page:

One thing she and I have always said towards the ball while bowling is "knock down my pins!!!" So I stamped that out with a retired mini alphabet set, rough edges alphabet, and put it in the center of her bowling.

Ok....Now onto the next layout....my "paying you in advance" layout! LOL!!!

The whole family, practically, camped where my Grandma and Aunt camp during the summer one weekend. It was a real nice family get together weekend. . It happened to be the weekend that the campground was celebrating Halloween. So all of the kids dressed up and went trick or treating around the camp sites. My daughter loved it!! We were the last ones back to the camp site...she didn't want to quit!

The bases are tangerine twist textured card stock. The upper panels of designer series paper is from ghostly greetings. Kiwi kiss and tangerine twist couldn't have been a better match for my daughter's clown suit! I stamped along the bottom with the trio of stars from just jawing. Let's get right to it...
Here is the left hand page:

The date is adhered to a key tag punch of confetti cream. The date is cut from go-go boots alphabet die set and the big shot. I punched holes in it to thread my 1/4 inch basic black grosgrain ribbon through it. The candies, from tasty sweet, are stamped with lavender lace, tangerine twist and kiwi kiss. I embossed the candy centers with iridescent ice embossing powder...it gives them just a hint or sparkle.
the right hand page:
I used the same candy as I did on the other side. I adhered a piece of tangerine twist striped grosgrain ribbon to the picture with a black brad from the vintage brad set. See that adorable skull and cross bones??? I don't know what it is about the set just jawing....but I love it!! I stamped it with basic black onto whisper white and cut it out. I then took tombo mono multi adhesive and filled in the eyes and one tooth and then poured on the clear chunky glitter. A skeleton must have a blinged sweet tooth on Halloween, I think. To "girl" it up a little....I stamped the bow, also from just jawing, with tangerine twist. I cut it out and adhered it with stampin dimensionals.
Well, tell me...have I out done myself this week? lol!


Saturday, October 18, 2008

Scrappin' Saturday 4

Wow....I am four 2 page layouts further in my daughter's scrapbook than I would have been if I weren't doing this challenge to myself!!! I couldn't get a good 2 page spread picture, so I will have to show it to you in left and right pages.

You know.....I am all over the place with my scrap booking lately. I used to scrap chronologically...ONLY....but lately...I scrap what ever I feel like. lol!! A lot of times when I transfer my memory cards to my computer, I usually get around 100 pictures printed out from various events. So needless to say...I have dates all over the place to scrap. I have resolved to myself not to get any more printed until I get the ones scrapped that I have printed out already.

How do you scrap?

You know...."they" say that if you are really behind, you should scrap current and then go back to the past as you have time. I should take that approach...but then that would go against my resolve....lol!!!

Anyway...with that off my chest...I come to you with Easter pages! Easter Egg hunt pages, actually....not even real Easter day pages!

Here is the left hand side:

The base is so saffron. The designer series paper is the same retired package I used on week 1, flowers for you. These papers are so girly that I have to use them for her scrapbook...that is why I bought them actually. Remember....I did say that I might use retired goodies here...but you can definitely substitute current papers for your layouts. This is the problem with not scrapping current....in the next catalog there will be heaps of springy things, I'm sure....that is why we have two catalogs per year....but I am a free spirit of sorts, so I make do! lol!!!


I matted all of the pictures with whisper white. The main picture on this side of the page also is matted with pixie pink. The designer series paper strips on both sides along the top is adorned with whisper white punched with the scallop edge punch. Along the bottom, between the two rows, I spaced out holes with my mat pack and piercer and adhered pixie pink flowers punched with the three for you punch with "altered brads." Remember when I told you how to make white brads...since Stampin' Up! doesn't sell them.....wonder why not???? Anyway....click here to learn how to make your own white brads.

See that adorable flower accent with the chick???
I pulled out the largest flower from the pretties kit and dyed it to match my project with lavender lace ink and a sponge dauber. I just pulled the dauber from the center outward. I wanted a flower that still had some white in it...not completely one color. I love this about the pretties kit flowers...we can totally customize them to our project. I adhered it to the page with a brad. The little chick is from A Good Egg. I jumped on this set right away because it is definitely a good one for card making and scrap booking.....cute!


I stamped the chick onto whisper white with jet black staz on. I colored in the egg shell with my pretty in pink stampin' write marker. The chick was colored with barely banana and his little beak was colored with apricot appeal. I cut him out with my hobby blade and cutting mat. Now the fun part....blinging him up!!! I used my 2 way glue pen and dazzling diamonds to spruce him up! He was adhered to the center of the flower with a pop up glue dot ( one of the thick gooey ones....) You like?

Now the title.
I was going to use my new sizzix dies but then decided to do something a little different. I pulled out more paper from that same pack and stamped the word "hunt" with versamark ink and embossed it with clear embossing powder and the heat tool. I then cut the letters out. It is hard to see in this picture, but it is a cool look in real life. I accented it with a little flower like the ones along the bottom of the pages.


I can see myself doing this type of stamping lots more in the future. It really adds visual interest to the usual solid color titles, don't you think?

Now onto the right hand side of the 2 page spread.

It is pretty much all the same as the other side color wise except one main photo is matted in pixie pink and one is matted with lavender lace.

This color scheme went so well with my daughter's dress even though there wasn't a bit of yellow in it.

See the egg accents? Those were so fun to create!!!


The stamp set has a large open image egg with lots of different stamps to adorn it with.


I stamped two eggs onto whisper white with jet
black staz on.


For the one, I stamped the zig zag band in the middle. For the other, I stamped the flower/open circle stamp multiple times. I colored them in with stampin' write markers - barely banana, pretty in pink and lavender lace. They had to be blinged up too! I used my 2 way glue pen on the lavender lace part of the right egg and covered it with dazzling diamonds. The left egg, I just put dazzling diamonds on the pink flowers. The lavender lace egg is mounted on stampin' dimensionals.
Boy....I type alot, huh??? I hope you are enjoying Scrappin' Saturdays. I sure am enjoying doing them. If you are behind in your scrap booking, I urge you to try to tackle it just like I am. One week at a time....one layout at a time. It is very liberating to be getting some pages done.
Now, Go Scrap!

Saturday, October 11, 2008

Scrappin' Saturday 3

....was almost Scrappin' Sunday! lol!! I am sorry about the late post tonight, but time just gets away from me. Is it the same for all of you? I used a demonstrator online sketch challenge for my basic layout.
These pictures were from a day at Kennywood Park 2 years ago.....I am soooooo behind!!! You guys keep after me to keep Scrappin' Saturday going so I can at least keep my daughter's scrapbook caught up! As you can see, I need a kick in the "tukus!"
Here is the 2 page spread.


Sorry about the poor photo....the picture was taken at 8:30 at night....not good light! lol!!


Here is a close up of the left hand page:

The bases are pumpkin pie. The horizontal panels are regal rose. The printed paper is from Sweet Always Designer Series Paper - it is a beautiful pack of paper. All of the photos are matted with chocolate chip. The title is stamped with chocolate chip craft ink. The stamp set is contempo alphabet. I did emboss it with clear embossing powder. My journaling block is pink pirouette. the ribbon adorning the lower picture is striped ribbon in pink pirouette adhered with a brad from the vintage brads. See that flower in the bottom left hand corner. It was made with the 5 petal flower punch. Wanna see it up close???


I can tell you this is not the last time you will see this flower coming from me.....I love them!!! I was inspired by rebel inker. The flower is pink pirouette. The center of the top flower is sponged with apricot appeal. The next layer is sponged with pretty in pink. the rest of the layers are sponged with regal rose. The flower center is a build a brad that has a stamped image from Always in close to cocoa. The leaves are kiwi kiss punches with the wide oval punch. I folded them in half and put vein lines in them with my stylus and then trimmed then to a point.


Here is the right hand page:
The tab on the vertical picture in the round tab punch in pink pirouette. I accented it with a pumpkin pie felt fusion flower and a brad. Both pages are accented with build a brads. And last, but certainly not least, my date was cut with my big shot and the go go boots alphabet! I can't get enough of these alphabets!!!! I sure hope we get a few more in the next catalog!!!
So, tell me.....What are you thinking of my Scrappin' Saturday? Leave me a comment below and share your {luv}. lol!

Saturday, October 4, 2008

Scrappin' Saturday 2

Well....I fulfilled my second week of Scrappin' Saturday! WhoooHoooo!!!! I also completed the second side to last week's Scrappin' Saturday post.

Before I go into this week's pages....I have a question for all of you. Do you scrap in a 2 page spread layout or 1 page??? I start out thinking...I am only doing a 1 page layout with these pictures and then I can't seem to commit to a single page. This will sound silly but.....I hate the thoughts of my two facing pages not coordinating in my scrapbooks! What is the matter with me?????? Leave me a comment below letting me know how you do it.....please. Help me over this...or make me feel better that I am not the only one! lol!!!

Anyway.....here are my pages for today:

The bases are textured card stock in pink pirouette.....our textured card stock is so yummy!!!!! The designer series paper is from the Holiday Mini - Ski Slope. I love this paper pack!!! It has so many papers in it that could be used other than holidays.....did I mention it has chocolate chip printed papers in it???? You gotta get some!!! Yummmmmm.......

Oh...my color scheme...that's right! I accented it with baja breeze, regal rose and whisper white.

Here is a close up of the left hand page:

Do you see those snowflakes??? They are from the felt flurries sets. both in the holiday mini!! I love them!! They are a must have for scrap booking and card making alike! I adhered them together as well as the page with pink rhinestone brads from the fire rhinestone brads. Gotta have bling!!!

Did you notice the stitching down the regal rose panel??? I did not pull out the old sewing machine....I pierced it with my mat pack and piercer and then drew in stitches with the white gel pen...love it!

Oh yeah...did you notice the title???? That is cut with my big shot!!!!! First, I stamped whisper white card stock with the snowflake from Season of Friendship and the adhered it to chipboard with my anywhere glue stick. I ran it through my big shot with the Serif Essentials Alphabet die set.....I am in love.......Stampin' Up!....If you are reading this....give us more fonts!!!!! I love being able to customize my own chipboard!!!!!! I'll give you a closer lookie:

Not much left to talk about for the right hand side.....lol!!! But here it is:
I was really happy with how these pages turned out. We really had fun that day in the snow. This is just a fraction of the pictures I took...gotta love digital!!! I take hundreds of pictures of things....then pick my favorites....love it!!!!!

Saturday, September 27, 2008

Scrappin' Saturday

Well....I am going to try something new to get me caught up on my scrapbooking....God knows, I need something to help me get caught up! lol!! I am going to try to post a scrapbook page here every Saturday. Now, don't beat me 50 lashes with a wet lasagna noodle if I don't get to it...but, I am going to give it an honest try. Thanks goes out to Colleen F. for the little boost I needed.... ;) First of all....let me get my confessions out of the way....

1. I will try to post all pages that are SU! only....but occasionally I might slip in contraband....I have as many scrappin' supplies as any local Mike's...that is no lie!

2. If it is SU! only...it might use retired designer series paper - when I buy it, I have my scrapbooks in mind...and since I am behind....well - you get the picture ;)

3. I never used to post pages with pictures on them...just empty mats...so if it is a page on my little one...her face will be blocked. Call me old fashioned....

So, with all of that out of the way....I will tell you about this page:

My daughter has always like to just "play toys..." I don't know what it is...but she loves to sit among a mess of toys and play.....and play....and play.... I like to capture everyday things in her scrapbook, especially. There is more to life than "events," right?

The base page is whisper white, obvious, right? The designer series paper is from a retired pack - Flowers for You. This layout could be scrap lifted with any current paper though....

I scalloped the edge of the pink printed paper with my scalloped edge punch and tore one edge of the white printed paper. My title was stamped onto regal rose with white craft ink using the big deal alphabet and mounted up on stampin dimensionals. The two pictures are just as they were taken - 4x6 butted against each other. My journaling is done on 1/2 inch strips of lovely lilac with the white gel pen. I did accent the journaling panels with flowers punched with the three for you punch adhered down with white brads. NO...STAMPIN' UP DOES NOT SELL WHITE BRADS....BUT HERE IS HOW YOU MAKE 'EM.....hold a silver or gold brad with tweezers by the prongs. Push the brad end into your versamark ink pad and dip into white embossing powder. Emboss with heat tool, let cool and there you have it....WHITE BRADS! :)

Here is a closer look at my corners....when you are covering two of your four scalloped corners, they don't have to work out perfect. {hint...hint}

I just punched out various circles from regal rose, lovely lilac, and pretty in pink card stock. I stamped some flowers from ginormous flowers onto whisper white with lavender lace, regal rose, pretty in pink...and yes...I know I used all lovely lilac card stock and then stamped lavender lace flowers....that wasn't a type error. :) Some circles and all of the flowers were mounted up on stampin dimensionals. The stamped flowers all have "bling" centers of rhinestone brads from both the fire and ice round rhinestone brads.

That about sums us up here.....Let me know what you think of my first Scrappin' Saturday.....