come sail away......come sail away with me...... Any Styx fans out there singing along with me?????
Oh Boy Oh Boy - Stampin' Up! has really out done themselves with the nautical collection in the new Summer Mini that starts May1st - I don't live on the ocean or even own as much as a row boat.....but I am really drawn to nautical stuff. This is THE collection to own for go to stamps for men, that's for sure. I started with the Mojo Monday sketch - no shock huh? I am so addicted to sketches....... {{sigh}}
Here is the sketch goodness:
Looks great like it is, huh???? Well - I rotated it to fit my needs :) Wanna see what I did with it???
Okay - here is my sailing goodness:
Do you see the new goodies??? The designer series paper - Nautical Expedition, The stamp set - The Open Sea, punch - Postage Stamp Punch, and finally......Cherry Cobbler/ White baker's Twine - Hello!!! These are some drop dead gorgeous things!!!
I also used a game spinner hand on my compass.....{luv} it :)
take a closer look at the water colored sail boat and compass:
The ship and compass were stamped onto watercolor paper and water colored with my aquapainter and ink refills....ba da bup ba da.....i'm lovin' it!!!! ;)
What do you think of The Open Sea? I am totally smitten with the new collection......makes me yearn to see what the New Idea Book and Catalog will have in store for us....... {{sigh}}
Showing posts with label bloggers challenge. Show all posts
Wednesday, April 13, 2011
Friday, February 12, 2010
My Sweet Valentine.....
Do, Do, Dooo......
Now, go back and read that title again, singing "My Sweet Caroline....." with my words.....
No? ok....
Today is my daughter's Valentine exchange at her preschool, she was so excited today! She wanted to buy premade Valentine's from the store that were Toy Story - I Know!!!!! Right!??!??!? Well, I let her - but we disguised them in these:
LOL!!!! I was so proud of her, she hand wrote each child's name on the front and wrote from her on the back. (She writes too big to put the to and from on the front where it goes :) ) Hey, she's 4! you know?
The two buckets are for her two teachers. They are filled with a bag of Lindor Truffles.....Oh sweet Mother of chocolates!!!! You know I appreciate you when the truffles have been pried out of my hands to give to you :) hehehe!!! I got the buckets half off at a dollar spot after Christmas.....Hello red Christmas stuff on sale that can be used for Valentine's Day!!! {luv} it! But they had an ugly wrinkled up red bow tied on the front, so I had to take care of that! I cut it right off!! There were two holes already in the bucket so I threaded some vanilla satin ribbon through and tied a nice, new, beautiful, satinny, smooth, luxurious (getting the picture that I love the new satin ribbon????) bow. I put the truffles into a large cello bag and tied it shut with the same (I won't go into the details....)satin ribbon. I made a tag by cutting a heart with the new embosslit, Stampin' Up Heart of Hearts, and my big shot and backed it with a heart cut from one of the heart sizzlets. The stamped heart was the three heart stamp from I (Heart) Hearts and it coordinates with the Heart to Heart punch. I put a small rhinestone brad through that heart and adhered it to the die cut heart with a stampin' dimensional.
I used the same heart dies to make the kid's valentine clips for their treat bags. I started by puttting their candy treats and my daughter's valentine in a new glassine bag from the Occasions Mini.....I love these!!! The clips are made from clothes pins that I picked up at a dollar store. I covered the front of the clothes pin with the sending love specialty designer series paper. I then adhered the heart to the clothes pin with mini glue dots. Their names were added by taking strips of very vanilla and stamping the neames with my calendar alphabet and number stamp set. I adhered them to the heart my layering dimensionals in the middle and gluing the ends to the heart with tombo mono multi.
I then added a magent to the back, with the thought that the parents could put them on the refridgerator and clip their school papers or artwork to them.
What do youthink of these? I am happy with them....they were easy but cute. I think ;)
Now, go back and read that title again, singing "My Sweet Caroline....." with my words.....
No? ok....
Today is my daughter's Valentine exchange at her preschool, she was so excited today! She wanted to buy premade Valentine's from the store that were Toy Story - I Know!!!!! Right!??!??!? Well, I let her - but we disguised them in these:
LOL!!!! I was so proud of her, she hand wrote each child's name on the front and wrote from her on the back. (She writes too big to put the to and from on the front where it goes :) ) Hey, she's 4! you know?
The two buckets are for her two teachers. They are filled with a bag of Lindor Truffles.....Oh sweet Mother of chocolates!!!! You know I appreciate you when the truffles have been pried out of my hands to give to you :) hehehe!!! I got the buckets half off at a dollar spot after Christmas.....Hello red Christmas stuff on sale that can be used for Valentine's Day!!! {luv} it! But they had an ugly wrinkled up red bow tied on the front, so I had to take care of that! I cut it right off!! There were two holes already in the bucket so I threaded some vanilla satin ribbon through and tied a nice, new, beautiful, satinny, smooth, luxurious (getting the picture that I love the new satin ribbon????) bow. I put the truffles into a large cello bag and tied it shut with the same (I won't go into the details....)satin ribbon. I made a tag by cutting a heart with the new embosslit, Stampin' Up Heart of Hearts, and my big shot and backed it with a heart cut from one of the heart sizzlets. The stamped heart was the three heart stamp from I (Heart) Hearts and it coordinates with the Heart to Heart punch. I put a small rhinestone brad through that heart and adhered it to the die cut heart with a stampin' dimensional.
I used the same heart dies to make the kid's valentine clips for their treat bags. I started by puttting their candy treats and my daughter's valentine in a new glassine bag from the Occasions Mini.....I love these!!! The clips are made from clothes pins that I picked up at a dollar store. I covered the front of the clothes pin with the sending love specialty designer series paper. I then adhered the heart to the clothes pin with mini glue dots. Their names were added by taking strips of very vanilla and stamping the neames with my calendar alphabet and number stamp set. I adhered them to the heart my layering dimensionals in the middle and gluing the ends to the heart with tombo mono multi.
I then added a magent to the back, with the thought that the parents could put them on the refridgerator and clip their school papers or artwork to them.
What do youthink of these? I am happy with them....they were easy but cute. I think ;)
Labels:
3 dimensional,
big shot,
bloggers challenge,
gifts,
tutorials,
valentine's
Friday, August 28, 2009
Polly wants some cocoa!
HI Stampers!!!
I'm not sure why it is so small.....I uploaded it on large setting.....argh!!!!
I'm in a hurry today...can't get into too much detail - I have a Stamp Camp tonight and I still need to make some goodies :)
Today is Blogger's Challenge Day! We were to do a sketch challenge this week. Our Challenge "mom, " Lisa, provided us with a great sketch that I will use again and again, I'm sure!
I'm not sure why it is so small.....I uploaded it on large setting.....argh!!!!Here is my take on it:
The designer series paper is from Christmas Cocoa Specialty paper in the mini catalog. This paper has a metallic sheen to it.....wait until you get your hands on some - it is divine!! The stamp set is my beloved cold and cuddly. I absolutely adore that set!!! Polly, the polar bear, is stamped with whisper white craft ink onto kraft card stock, as is the hat and cup of cocoa. Now that could be any hot drink you desire....but I am a hot chocolate girl, through and through! I blinged up her hat, steam and iceberg with dazzling diamonds and a two way glue pen. The ribbon is soft suede polka dot grosgrain ribbon.
For the brad placement, I used three white grommets and I placed large red rhinestone brads from fire round rhinestone brads in the center - more bling!!!!
Leave me some love, I would love to know what you think of Polly.
Make sure you check back - my next stamp camp is awesome - if I can toot my own horn ;)
Labels:
bloggers challenge,
cards,
christmas,
winter
Friday, August 21, 2009
Sweet Pea
HI stampers!!!

Did you see those flowers?? They are from the pretties kit. I colored the entire flower with pretty in pink and then used a sponge dauber to color one side with regal rose. I folded them up and adhered them down with mini glue dots. I then accented each flower with flat backed pearls from the pretties kit, also adhered down with mini glue dots.
Today's blogger's challenge was to focus on punches. I have to admit, though, that I made this card last week. One of my club girls became Grandma for the first time - Congrats Fran!! So I made this card for her. I cased it mostly from Andrea - I fell in love with this pod of peas as soon as I saw it, so I had to put my spin on it.
The card base is regal rose. The main panel is whisper white matted with pretty in pink. I stamped the flourish from baroque motifs in old olive. The pea pod is made from the wide oval and 3/4 inch circle punch. The edges of all of the punches are sponged. I accented it with my white gel pen. The rest of the background panel was sponged with bashful blue.
I stamped the sentiment, from teeny tiny wishes, in regal rose. I then punched it out with the word window punch. It is matted with the modern label punch, also regal rose. I punched a hole on the one side with my crop a dile and threaded retired ( boohoo) pink gingham ribbon through it and around the main panel and tied it into a bow. I then adhered the sentiment panel down with stampin' dimensionals.
I would love to know what you think :)
Labels:
baby,
bloggers challenge,
cards,
punch art
Friday, July 31, 2009
A fine day to be a pheasant
HI all!
Today is Blogger's Challenge day and it is a sketch challenge.
Here is what I came up with...I haven't stamped in two weeks, really - so my mojo is definitely not flowing.....I think we are back to semi-normal now so maybe I can get myself back in the swing of things :)
One thing I did change about the sketch was the sentiment placement. It was supposed to be on the lower panel, but I put it under the pheasant instead.
recipe:
stamps: woodgrain background, autumn days, teeny tiny sentiments
cards tock: kraft, very vanilla, soft suede, bermuda bay
ink: soft suede, bermuda bay, chocolate chip and bravo burgundy stampin' write markers
accessories: 5/8" vanilla grosgrain, latte buttons, playground buttons, stampin' dimensionals
I sure could use some love this week.....let me know what you think.
Labels:
bloggers challenge,
cards,
challenges,
fall,
masculine,
thanksgiving
Saturday, July 11, 2009
CASE of a CASE of a CASE.....
LOL!! This week's Blogger's Challenge was to CASE ( copy and share everything) a fellow blogger. Well, I knew right away which card I wanted to case. When I saw THIS CARD on Patti Cheski's blog - I fell in love with the colors and the layout. It has stuck out in my mind ever since I saw it. And you know what??? It was an older blogger's challenge to case herself....So I cased her case that she cased.....following me???? lol!

Aren't her cards darling!??!??!?! I didn't do the layers exactly like hers, my computer isn't in my stamping room...so I was going on memory but I did get the general gist of things. Here is what I came up with:
My card base is melon mambo. I stamped it with a circle ring from circle circus - I told you this was a versatile set!! I accented some dots with my white gel pen. My designer series squares are from razzleberry lemonade....I know, no surprise there :D. They are matted with whisper white squares before layering them on a piece of crushed curry that had been punched along the bottom with the scallop edge punch. I tied a bow with the polka dot rich razzleberry grosgrain ribbon. My sentiment came from teeny tiny sentiments - this is an absolute must have set!!!! I punched it with the word window punch and tied it around the ribbon with a piece of crochet thread.
My main image is the most adorable elephant - it is in the animal stories set. I stamped it with melon mambo and punched it with the 1 3/4 inch circle punch. Did you see the ruffled edge around it????? I cut a one inch strip of rich razleberry card stock and scalloped the one edge. I then ran it through the paper crimper. Then I generously applied snail adhesive to the back edges of the elephant panel. All you do is adhere the strip around, working with it to get it to bend in a circle pattern. It isn't hard to do....just takes some firm maneuvering of the card stock. The crimper puts the grooves in it, so it will bend a lot easier. I adhered that panel with stampin' dimensionals. Here is a closer look at that ruffle:
You can do that with any size circle, just keep in mind that the smaller the circle, the harder it will be to manipulate the card stock in a circular manner.
I would love to know what you think, spread your love :)
Labels:
birthday,
bloggers challenge,
cards,
challenges,
tips,
tutorials
Friday, June 19, 2009
Father's Day is upon us!
It is hard to believe that Father's Day is this weekend...before you know it it will be 4th of July - and that feels like summer is half over. unbelievable! Our little one goes to preschool this fall....so this feels like our "last summer"....know what I mean??? from now on, it will be a short summer in between school years. Wow!!! Where has the time gone?

The sea shells were watercolored with the reinker watercolor technique. The three ink colors I used were baja breeze, creamy caramel, and not quite navy. The one bottom shell looks a little coral-ish...but it was how creamy caramel dried with the baja breeze....that is the beauty of this technique...it always turns out differently, and beautiful if I might add. Those were also adhered with stampin dimensionals.
What do you think of this....I am so pleased with it - I hope my Dad likes it.
Well, before I get to deep on you......I will show you my Dad's Father's Day card. He isn't into computers at all...let alone a blog reader....so I am safe here ;)
This week's Blogger's challenge is masculine cards - perfect!
I wanted to pull out some F.A.V.O.R.I.T.E. retiring goods! I will miss baja breeze so much it will hurt....and the seaside stamp set - I am still in shock that is retiring!!! I have got a peek in the new cattie....if you are wanting a sea shell, beachy beautiful set - GET THIS ONE!!!!! There is nothing that will replace it in the new catalog......booohooo.......
The card base is creamy caramel. I swiped all edges of this card with a sponge dauber and whisper white craft ink. All of my baja breeze designer series paper wasn't doing anything for me to use for my Dad's card. So, I made my own printed paper! I took three sea shell stamps and stamped them randomly in baja breeze, not quite navy and creamy caramel onto the three baja breeze panels. They are mounted on whisper white card stock and then anchored in all corners with not quite navy brads from the earth elements brad collection. I used my mat pack and piercer to ensure that they would all line up perfectly. I then adhered the panels down with stampin' dimensionals.
My sentiment panel is stamped in baja breeze and not quite navy. It is from wonderful favorites, a must have stamp set for all family cards....it covers ALL relationships. I then stamped creamy caramel around the edges with itty bitty backgrounds to kind of simulate sand...did I do that? That is mounted onto creamy caramel and then not quite navy. It was adhered with stampin' dimensionals.
This card has so much dimension...i {luv} dimension!!!
Make sure you stop by tomorrow....I have a scrappin' Saturday page for you that is a sneeky peaky.....
Labels:
bloggers challenge,
cards,
masculine
Friday, May 22, 2009
A Patriotic Challenge
Can you believe it is Memorial Day weekend already!??!?!?!?! I sure can't!
Isn't it darling? The stamp sets I used her was big birthday candle (firecracker), priceless ( fire cracker sparks), nursery necessities ( stars in border piece). And I also used the classic stars jumbo wheel and the abc alphabet lower set. The designer series paper here is washington apple. I used the slit punch for the white scallops and the scallop edge punch for the blue scallops. The heart chipboard is from onboard essentials. I used heat and stick powder with red fine glitter on them. The buttons are from fresh favorites 2, button latte and bouquet buttons.


This week, for Blogger's Challenge, we were to do a patriotic theme. Sounds fun, huh?
But first, I have a question for you......What do you get when you cross a Birthday stamp set, a Baby stamp set and a boho style stamp set??????
Give up yet????
hmmmm......do you?????
Did you guess it????
You get this!!
Wanna see more detail?
Here is the left hand page:
Right hand page:
A closer look at the button details...they are actually stitched to the page with white crochet thread.
Here is the bottom border in more detail.....I wheeled it with the classic stars wheel and then stamped randomly stamped it with the star from nursery necessities in white craft ink. I think I have used nursery necessities for more themes than any other set. And to think, I kind of hesitated when I bought it.......what a doofus!!
Lets look closer at those firecrackers....in their sparkly glory!!!
Well, what do you think? I am pleased with the result....and you know what??? Got another spread done in my little one's album! Of course it is from 2007....but none the less, it is done :o)
Labels:
bloggers challenge,
scrapbooking
Friday, May 8, 2009
I wonder how I can get more hours in a day......
Don't we all wonder that??? I can not believe it is Friday already!!!! And to look back and see I posted nothing since Monday.....I am sorry! These past two or three weeks have gone so fast.....

I covered a target dollar spot frame I bought a while ago with paper from raspberry tart. It is adhered to the frame with mod podge. I then water colored a bunch of dogwood branches from summer soft using watercolor crayons and a blender pen. And then cut...and cut...and cut.....well, do you get the picture??? (pun intended ;) ) I layed them out in a similar fashion to the card and adhered them with stampin' dimensionals....you all know how I love dimension!!
Oh yeah...I forgot to mention why I covered their faces. I am super weird about my little one's face and name being on my blog - I hope that doesn't offend anyone. I know - I am weird.... but trust me, she is cute ;)
Anyway, since it is Friday....It is Blogger's Challenge day today!!!! I have missed the last couple of Blogger's Challenges. I won't make excuses, I'm sure everyone is just as busy as I am....my days just seem to get away!! Argh!!!
This week's challenge is anything Mother's Day. Since my grandma doesn't have a computer and doesn't look at my blog, I am posting a gift I made for her. We had a surprise 80th birthday for her this past January and I got a sweet picture of her and my daughter, so I thought it would be nice to make a frame for her. I like to try to make coordinating gifts and cards when I can, remember these Mother's Day gifts from last year? And this one for my Mom? Well, I posted the card for my grandma a while back for a sketch challenge and decided to make a coordinating frame.....wanna see?
Here is just the frame:
Here is a closer look at the dimension....did I capture it here???
Labels:
3 dimensional,
bloggers challenge,
challenges,
gifts
Saturday, April 18, 2009
Monday and Friday's challenges on Saturday???
HI stampers!! It felt sooooo good to get into my studio this afternoon. Hubby came home from work, mowed the grass and he and the little one are outside for play time so mommy can have some playtime!!! Truth be told, I was actually "working....." I have two water color workshops coming up this week...and I had to watercolor, right????? HEY! That is my story and I am sticking to it!!!!

What do you think? Think my hubby will like it? I will tell him that he should feel good about getting two of my corduroy buttons......I mean there are two of them, people?!?!?!??!?!
So, when my water coloring was done for class I figured....hey, why not get caught up on some things that I needed, well....wanted, to do for this past week. My hubby's birthday is next Friday and I wanted to crank him out a card. Sure, I have masculine samples in my box....tons of regular birthday samples......I could have taken one of those out.....but what would I have stamped today???? I have more excuses to stamp than anyone I know.
Truth is, I need to create. It makes me feel so good. Creating is something that is all mine. Not to sound like a selfish brat....but I kind of lost "myself" when I quit my job to stay at home to raise our little one. I am not complaining at all.....I would not want it any other way...and I know that there are many moms that would love to be in my position....but I still need "my thing." You know?
Anyway....I am rather chatty today. huh? Sorry...it is probably the morning filled with Handy Manny and singing along to an Alvin and the Chipmunk sing along movie with my little one. I keep telling myself to slow down and enjoy her.....before I know it she will be singing songs with her friends all holed up in their bedrooms practicing their make up applying skills and giggling about boys. Oh my...just to type that out makes me well up.....
Oh...off track again, huh? LOL!!!!
Anyway....I made a card today to combine two challenges. Monday's mojo challenge and Friday's blogger challenge.
When I sat down to stamp....this card wasn't what I had envisioned at all. I wanted to use two of the FREE stamps that Stampin' Up is giving away this month with the Get Connected Campaign, and I only ended up using one....texturz plates were flyin', brayers were a rollin', and accessories were jumpin' around.....
Here is the mojo monday challenge:

Blogger's challenge was a color challenge this week. We were to use sahara sand, always artichoke, chocolate chip, and sage shadow. Now, mind you I would have never put these colors together myself. The chocolate, sahara and one of the greens...yes, but not two.... Now I want all of you to turn to page 158 in your Stampin' bible.....Yes, that is your current Idea Book and Catalog. See the colors of the To the Nines Specialty designer series paper?????? Exactly what we were to use. Genius!!! I have been telling my club ladies to turn to these designer series color schemes. I get so many compliments on the colors I put together....and you know what??? I don't put them together...I let Stampin' Up do all of the work....that is what I LOVE about our catties. They are so much more than a place that merchandise is for sale from.....I use mine for alot of inspiration.
Ready to finally see the card??????
The base is sahara sand. The background panel is always artichoke ran through the big shot with stampin' up's exclusive texturz plates. LOVE that...but I wanted to add more to it....so I took out my brayer and went to town with chocolate chip ink. me like :) I tore the bottom edge instead of scalloping...doubt my hubby wanted scallops..... And then layered it with a mat of chocolate chip. Did you see my ribbon treatment??? It is the double stitched chocolate chip ribbon.....I pulled out the white stitches....luv it! And then my corduroy buttons.....did you see 'em???? Double stacked!!! Oh my!!!! Kraft on chip.....how darling!!! I mean, masculine!!!! The kraft buttons go very well with sahara sand as well as kraft. That is double dippin' in my eyes as far as accessories go!
My sentiment, birthday wish on page 208, was double stamped with always artichoke and sage shadow. I really love sage shadow, but I really thought that one main green was enough...I left sage to be a supporting green....lol! Maybe they are up for emmy awards.....main character and supporting character....Oh my....I need caffeine! The brads in the main image panel is from vintage brads. I used my matt pack and piercer to place the holes for them. That panel is mounted up on stampin' dimensionals.
Labels:
big shot,
birthday,
bloggers challenge,
challenges,
masculine,
mojo monday
Thursday, March 26, 2009
Blogger's Challenge
Hi All!
I have to be quick...I see Blogger is having an outage in about 15 minutes....argh!!
The butterflies were cut with my butterfly die. The bottom layer is pale plum and the upper layer is velum paper. I cut all four layers at once....that is what i {luv} about the big shot!!! Well...one of the things ;)
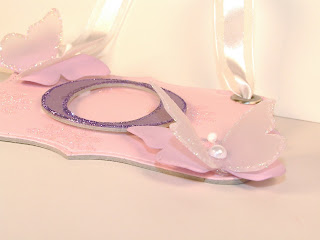
Look at all of this dimension!!!!!!
Oh yeah...the ribbon is white organdy ribbon....love that!!!
This week's blogger's challenge is to use dies/templates.....that is a no brainer for me...BIG SHOT BABY!!!!
My daughter's friend is having a birthday party next Sunday and I wanted to make something for her to hang in her new room or on her door. I will use this as a tag for the gift bag as well.
The panel is cut with on board long board that I covered with pink pirouette card stock. I ran it through my big shot with the top note die....gorgeous! I stamped it with a flower from petal pizzazz with versamark ink and embossed it with heat and stick powder and dazzling diamonds. You can't go wrong with bling and more bling!!!
The initial, "O," was made from on board long board and perfect plum card stock. I cut it with my serif essentials alphabet die set. I ran a 2 way glue pen along the edges and used some fine cosmo glitter to adorn it. That was adhered with stampin' dimensionals.
I punched holes in the top corners with my crop a dile and set jumbo pewter eyelets that I sanded with my sanding block to shine the eyelet up....it is hard to see the difference in these pictures...but in real life...it is a difference, believe me :)
I edged the velum layer with dazzling diamonds and a two way glue pen. I adhered a small flat backed pearl from the pretties kit to the body. See the antennas???? They are flower stamens from the pretties kit that I adhered to the back of the butterfly's body. I adhered the butterflies down with pop up glue dots.
Look at all of this dimension!!!!!!
What do you think????? I absolutely love this......I sure hope the recipient loves it as well!
Labels:
3 dimensional,
big shot,
bloggers challenge,
gifts,
tags
Friday, March 13, 2009
Blogger's Challenge - week 90
If you missed my card yesterday...please scroll down, I posted it late in the day :)
My brand new Manhattan Flower Textured Impression Die came yesterday afternoon....so I HAD to use it for today's challenge :) And I liked last week's color challenge so well, I decided to pull those colors out again :):):) I ran my card base through my big shot with the textured impressions die and the most beautiful embossing happened....right before my eyes! One thing I love about Stampin' Up!'s impression folders is that they are the actual size of a card front...unlike the cuttlebug folders, which are about a 1/4 of an inch too small......way to go Stampin' Up! Anyway...the base is sage shadow. I cut out the bottom portion of the card to accentuate the flowers. I then took my white craft pad and a sponge dauber and rubbed ink over the roses...it was completely experimental, but I really liked the results. Next I took a piece of close to cocoa and stamped the damask stamp from friends 24-7 along the bottom edge and adhered that to the card front. I then had to tie a bow with the white organdy ribbon - so delish!!!
What??
This week we were to create with texture......yummo!!!!
Here is a closer look at the texture...it is hard to capture on film... :(
You wonder where the entire sentiment panel came from??
Let me tell you....the Occasions mini - what a delight!
The "celebrate" sentiment is from matchbox messages. I just inked it up with my sage shadow stampin' write marker, omitting the frame that came with it. Then the oval border stamp is from Oval All - I inked it up with my chocolate chip stampin' write marker, omitting the rest of the stamp. I can really see myself mixing and matchig the borders and sentiments of these two sets alot! I then punched it out with the large oval punch...perfect fit! Then.........I punched a SCALLOPED OVAL from the upcoming scallop oval punch.....can you believe it???? I adhered that entire thing right under my bow.
What do you think??? I can't wait to get some more time to play with my new goods.....maybe later today.
Labels:
big shot,
bloggers challenge,
cards,
new goodies,
sneak peeks
Friday, March 6, 2009
Blogger's Challenge 89
Hi stampers!!!
Thoughts and prayers slid off my desk onto my foot.....there's your sign.....LOL!!!

I have been having a ton of fun in my stamp room the last few days!!! I wish I were a night person.....I could really have some fun in there :)
This week for Blogger's Challenge we were to create with brown, sage and choice of neutrals. I really like sage but don't use it very often. It isn't my "go to" color...but when I use it, I really like it. I need to use it more :)
I immediately thought of "trees" when I pulled out the colors. Trees.....I could use my beloved lovely as a tree.....I could use my brand spankin' new trendy trees.....I could use my new love - thoughts and prayers......hmmmm......
The base is kraft. The sage shadow panel is stamped with sanded background in chocolate chip - is there anyone out there that hasn't bought this stamp yet????? If you don't have it...you gotta get it....it better never retire.....please :) I inked the leaves with the sage shadow stampin write marker and then "thumped" the leaves with always artichoke ( I know...not in the color scheme...but I used such a tiny bit....). I then traced the branches and trunk with the chocolate chip stampin write marker. That was stamped onto confetti cream. I matted it with a top note die that I cut with my big shot. I put two 5/16th inch chocolate chip brads in the upper corner. Before adhering that panel down onto the card with stampin dimensionals, I tied a piece of stitched chocolate chip grosgrain ribbon around the card front. I then stitched a latte button to the knot with linen thread. My sentiment is also from thoughts and prayers. I stamped it onto confetti cream and punched it with the curly label punch. I cut the sage shadow curly label free hand to create a mat.
I will give you a closer look at my tree....when I stamped it and pulled the stamp off...I even gasped...and I don't do that very often...LOL!!!!
Here is a peek at the inside...pretty straight forward. I didn't stamp the inside...there are so many reasons that you might be praying for someone.
What do you think? I would love to read your thoughts.....Happy stampin'!
Labels:
big shot,
bloggers challenge,
cards,
sympathy
Monday, February 23, 2009
I wonder what it would cost
to mail my card for today???? Two of my club girls work for the postal service...I should have them guess for me and then have this puppy weighed! LOL!!! Are you up for this challenge Stephanie and Anisia?

And as if it weren't heavy enough...I went ahead and decorated the inside...LOL!! Let me tell you....I wanted to put that circle flower on a dimensional so bad I could hardly take it! I thought that putting stampin dimensionals on the inside of a card might be a little over the top....what do you think? lol!
I would love to hear what you think about this card....my "campers" will be making 4 cards Friday with this stamp set and designer series paper and will get to take the stamp set home with them!!!! This isn't one of the cards they will make, but I want to give them and you lots more inspiration!
I have been busy prepping for my "Send a Sweet Stem" Stamp Camp on Friday so I have (among LOTS of other stuff....;) ) the raspberry tart designer series paper and my sweet stems set along with all the coordinating goodies on my desk. My goal is to eventually have a neat desk top...but I am NOT a neat crafter...I usually have a square foot of work space on my huge desk....I need to get to work on that, huh? lol! Want to see the card???
I think all totaled, it is 16 layers plus dimensionals, brads and ribbon......I just could not stop!
I really can't get into what is on what layer.....that would make for a gigantic post...lol! But I can give you the recipe for this beauty, if I may say so myself!
The stamps I used were sweet stems and on your birthday (sentiment). All of the designer series paper is from raspberry tart. The card stock colors are kiwi kiss, real red, cameo coral and whisper white. Let's see...the accessories are earth elements brads, 1/16th handheld punch, crop a dile (to make brad washers - tutorial HERE, I used the larger hole punch on the crop a dile instead of the 1/4 inch circle punch - I think that punch is now retired... :( ), stampin dimensionals, blender pen, stampin write markers, scallop edge punch, 1 1/4 circle punch and 1 3/8 inch circle punch. Oh...I forgot about the kiwi double sided satin ribbon...oh how smooth it is!!!!
I will give you a better shot at all of that dimension.....
Labels:
birthday,
bloggers challenge,
cards,
mojo monday
Friday, February 13, 2009
Blogger's Chalenge
Happy Valentine's Day (eve)!!!


Today's Blogger's Challenge was to make something Valentine's. That is perfect....we are headed out to a Valentine Party for a play group we belong to this morning. We were to bring along a little valentine for the kiddos to exchange. It is going to be all toddlers there so I didn't really know what type of candy to give since it is a variety of ages, mostly 3 and under. So I bought some store mass produced valentines that had little red heart lollipops in them. The store valentine's went in the trash...I only wanted the lollipops.
I made them super simple since they were going to three year olds....lol!
I wanted to incorporate the Sale A Bration set, polka dot punches...I LOVE anything that goes with punches!!! I stamped the heart in whisper white craft ink and punched it out with my full heart punch. The sentiment is from Holidays and Wishes. The main panel is kraft, and I swiped the edges with the whisper white craft ink pad. The background is whisper white and I used the new eyelet border punch along the bottom.....I sure love that new punch!
Wanna see what I did with the back? VERY easy! I punched two holes with my crop a dile and slipped the lollipop stick through .....I didn't want the heart on the front to compete with the heart lollipop..... :)
**sorry for the poor pictures...I don't have time to edit this morning :)
Labels:
bloggers challenge,
gifts,
valentine's
Friday, January 30, 2009
A Birthday Celebration!!!
Well....I am on a roll here, huh? lol!! Maybe if I lived in the Antarctic and were snowed in all of the time...I would have more stamp time! hehehe!!!! The kiddo and I have been in our Jammies (different jammies....we have bathed....lol!) since Tuesday, I think! We have to get dressed tomorrow at the latest...we have a birthday party to go to....his birthday is today though...HAPPY BIRTHDAY LOGAN!!!!! We promise to be dressed tomorrow for your party! :)

It was perfect! This week's Blogger's Challenge is a theme - birthday. And I needed to make a birthday card! Logan is turning two and he looooves tractors, so he is having a John Deer party. I did score with a John Deer gift that I think he will love.....but I do not have any stamps that are remotely tractorish let alone John Deer. What is a person to do???? Pull the color scheme and go with it!??!??!? Here is what I did:
Isn't it cute? I did pull out some retired wild wasabi - it paired so great with garden green (or is the John Deer Green???) Here are the deets.... The main image panel is confetti white. I stamped the "happy" with my jumbo outline alphabet, overlapping the letters on purpose. I then colored them with a blender pen and ink refills. I used garden green and summer sun for the letters and where they overlapped, I used wild wasabi - I love the look of this!!! I then used the Birthday stamp from Hugs and Wishes and inked only the word "Birthday" with a basic black stampin write marker and stamped it below. Since he is turning two...I wanted a "2" or two of something on there....So I pulled out my crazy for cupcakes and stamped two balloons - love it! I then stamped then two more times on scraps of confetti white. I colored them in the a blender pen and summer sun and garden green ink. I wanted them to sparkle...a little boy can have a little glitter, right??? So, I took my versamark pen and colored the entire balloon and then embossed with heat and stick powder and then dazzling diamonds....perfect!! I cut them out and then adhered them down with stampin dimensionals. I matted that entire panel onto summer sun and then onto the card base, wild wasabi. I felt like it was still missing something....ribbon! I had to add ribbon....I tied a bow with my black gingham ribbon.
I think it still looks boyish....don't you? What do you think?
Labels:
birthday,
bloggers challenge,
cards
Friday, January 9, 2009
Blogger's Challenge - week 81
HI Stampers!
Here is a closer look at some of the details:

This week we were to use designer series paper. I knew right away that I wanted to use the items in my Love You Much bundle - I love the Candy Lane designer series paper...it is so yummy!!!!! I wanted to use an assortment of the paper and really wanted to do another quilt card like I made HERE and HERE but I thought that maybe you were tired of that type of card....I love it though!! So anyway, lots of ideas ran through my head and I decided on a technique that my upline, Pam, shared with me. Thanks Pam!!! I am very pleased with the results!
The buttons are retiring....so sad....I just ordered a ton of them....lol!!!! Better stock up!!
I can't get into too lengthy of a post today...my little one has walking pneumonia and her steroids have kicked in big time...if you know what I mean! ;) Now I have an understanding when they say athletes are on "the juice." LOL!!!! I am not sure I can keep up with her today...but I am giving it my all! My hubby better watch out when he gets home...I am likely to punch out for the day...that will be our little secret! ;)
I would love to hear what you think of this card.....
Labels:
bloggers challenge,
cards,
challenges,
valentine's
Subscribe to:
Posts (Atom)


