Boo who?
You!
Yes, You! ;)
I have a sneak peek of a project that I made for this month's Paper Crafter's Sampler to share with you......And BOY - did I ever have fun putting it together!!!!
Do you want to take a sneaky peeky? Ok...... :)
Head on over to Paper Crafter's Sampler if you would like to join up in the fun - and if you decide to subscribe, be sure to tell Mel that Regina sent you - use the code PCSRC.
Toodles Stamping Friends!!!
Showing posts with label halloween. Show all posts
Monday, September 24, 2012
Amidst Autumn
Hey Everybody!!!!
Guess what? It is that time again!!! Time for another Sneeky Peeky of The Paper Crafters Sampler!!!!
I had a TON of fun whipping up my project this month!!! Wanna take a peek?
Head on over to The Paper Crafters Sampler and check it out - if you decide to sign up and join the fun, be sure to tell Melanie that Regina sent you. Use the code PCSRC please :)
Have a wonderful day!
Labels:
3 dimensional,
big shot,
fall,
halloween,
PCS
Saturday, September 3, 2011
Let's back things up a bit, shall we?
Hi All!!!
I gave you a taste of Christmas last week with the stockings - but I feel like I needed to back it up a bit - maybe back to the season at hand. Well - back to school plus one......how about some halloween eye candy? LOL!!!
Guess What!?!?!?!? I finally got to bring an idea to fruition this morning.......it has been a busy week so this was the first time I got to sit down in my studio to get inky. You know where I went first for inspiration, right??? Oh yeah - the Create with Connie and Mary challenge!!! This week it was a color challenge. Wanna see?
What did you immediately think of when you saw it??? I mean - the "first thing" you thought of???? I immediately thought - Greeting Card Kids. Really - that is what I first thought of.......honestly - pinky swear ;) Want to see what I cooked up this week? Well, if you don't turn your head.....you are about to see it- LOL!!
Isn't she the sweetest little witch? We will start with the card and move up to her, shall we? You know me - I always have to add a bit of creative liberty - and add a neutral or two......so I went with a basic black card base and cut a panel from First Edition - an absolute MUST have pack of designer series paper - just sayin'. ;) I then stamped it with the flourish from Creative Elements in pumpkin pie. I'm gonna LOVE that stamp - I am just warning you now - I can see it being on everything - e.v.e.r.y.t.h.i.n.g.
And when you think of halloween - you immediately think of a "baby themed" pack of designer series paper, right? Of course you do - so I pulled out Nursery Nest for the addition of pear pizazz. The rich razzleberry panel is from the brights designer paper pack. Did you notice the same flourish stamped on those panels with basic black ink??? I warned you ;) I sewed the rich razzleberry, pumpkin pie and basic black buttons right onto the panel with linen thread before adhering it to the card - that way - you do not have to worry that the adhesive will allow the buttons to come off - and it only takes a second to pierce holes where the button holes are and tie linen thread through them. easy peasy - i swear.
Now onto that adorable little witch - wanna see her a little closer???
I stamped her onto watercolor paper with black staz on ink. She was then colored in with ink refills and an aquapainter. I did have to add a small glow of so saffron ink around her - if I have said it once, I have said it a million times - watercolored images need some sort of "grounding" - in my opinion - for what I know....which isn't much - lol!!! It is very subtle looking at the card, but it really does make the image pop out. Did you see her hat buckle??? No? - go back up and look - I colored it with gold smooch ink. She was then punched with the 2 1/2 inch circle punch. And see that scalloped circle around her???? It is from the NEW Perfect Pennants Bigz L die - LOVE that there are two scallop circle dies on there - YAY!!!!!! The sentiment is from Teeny Tiny Wishes (no shock there from me, huh? lol) If you look closely enough - the flourish from Creative Elements is also stamped there in pumpkin pie, it is stamped off so it is subtle - but it is there :) All edges of the card are sponged with basic black ink - I had to dirty it up a bit.........had to.
Wait!! There is more - I did up the inside as well. Wanna see?
The sentiment there is from Grateful Greetings -
Well - what do you think of this little sweetie? She sure was fun to bring to life. Now - go stamp some goodness, it is good for your mental stability, really...........
I gave you a taste of Christmas last week with the stockings - but I feel like I needed to back it up a bit - maybe back to the season at hand. Well - back to school plus one......how about some halloween eye candy? LOL!!!
Guess What!?!?!?!? I finally got to bring an idea to fruition this morning.......it has been a busy week so this was the first time I got to sit down in my studio to get inky. You know where I went first for inspiration, right??? Oh yeah - the Create with Connie and Mary challenge!!! This week it was a color challenge. Wanna see?
What did you immediately think of when you saw it??? I mean - the "first thing" you thought of???? I immediately thought - Greeting Card Kids. Really - that is what I first thought of.......honestly - pinky swear ;) Want to see what I cooked up this week? Well, if you don't turn your head.....you are about to see it- LOL!!
Isn't she the sweetest little witch? We will start with the card and move up to her, shall we? You know me - I always have to add a bit of creative liberty - and add a neutral or two......so I went with a basic black card base and cut a panel from First Edition - an absolute MUST have pack of designer series paper - just sayin'. ;) I then stamped it with the flourish from Creative Elements in pumpkin pie. I'm gonna LOVE that stamp - I am just warning you now - I can see it being on everything - e.v.e.r.y.t.h.i.n.g.
And when you think of halloween - you immediately think of a "baby themed" pack of designer series paper, right? Of course you do - so I pulled out Nursery Nest for the addition of pear pizazz. The rich razzleberry panel is from the brights designer paper pack. Did you notice the same flourish stamped on those panels with basic black ink??? I warned you ;) I sewed the rich razzleberry, pumpkin pie and basic black buttons right onto the panel with linen thread before adhering it to the card - that way - you do not have to worry that the adhesive will allow the buttons to come off - and it only takes a second to pierce holes where the button holes are and tie linen thread through them. easy peasy - i swear.
Now onto that adorable little witch - wanna see her a little closer???
I stamped her onto watercolor paper with black staz on ink. She was then colored in with ink refills and an aquapainter. I did have to add a small glow of so saffron ink around her - if I have said it once, I have said it a million times - watercolored images need some sort of "grounding" - in my opinion - for what I know....which isn't much - lol!!! It is very subtle looking at the card, but it really does make the image pop out. Did you see her hat buckle??? No? - go back up and look - I colored it with gold smooch ink. She was then punched with the 2 1/2 inch circle punch. And see that scalloped circle around her???? It is from the NEW Perfect Pennants Bigz L die - LOVE that there are two scallop circle dies on there - YAY!!!!!! The sentiment is from Teeny Tiny Wishes (no shock there from me, huh? lol) If you look closely enough - the flourish from Creative Elements is also stamped there in pumpkin pie, it is stamped off so it is subtle - but it is there :) All edges of the card are sponged with basic black ink - I had to dirty it up a bit.........had to.
Wait!! There is more - I did up the inside as well. Wanna see?
The sentiment there is from Grateful Greetings -
Well - what do you think of this little sweetie? She sure was fun to bring to life. Now - go stamp some goodness, it is good for your mental stability, really...........
Saturday, October 30, 2010
Out of Retirement :)
LOL!!!!
Did you think I meant me being out of stamping retirement??
No silly - I meant I have used some retired stuff on this project. I wanted to make a little something special for my daughter and her DIVA friends as the moms call them. We all met last night for dinner - kid's choice - McDonald's......they really need to start selling "drinks" if you know what I mean....hehehe!!! ( I don't even drink - but it does sound appealing on trick or treat night.....) After the girls ate, we headed out for the local parade and some door to door begging for a tootsie roll. lol!
So, I made these for the girls - hopefully they are DIVAish enough :)
The purse was made of the top note die and the scallop oval frame die and the big shot. The designer series paper is retired- I forget what the name of it is off the top of my head. I also used the big shot and the sans serif alphabet dies to make their purses monogrammed. :) It is hard to see in the picture, but the letters are outlined with black glitter. Gotta start them out early, right ??? hehehe!!
We are going to see my daughter's step cousins tonight,so I wanted to make them a treat bag too. More retirees here, but there are some fun new things also.
Well, I better run....2 1/2 million more thing to accomplish this morning. Hubby would be proud, I am already doing laundry....lol!!!
Did you think I meant me being out of stamping retirement??
No silly - I meant I have used some retired stuff on this project. I wanted to make a little something special for my daughter and her DIVA friends as the moms call them. We all met last night for dinner - kid's choice - McDonald's......they really need to start selling "drinks" if you know what I mean....hehehe!!! ( I don't even drink - but it does sound appealing on trick or treat night.....) After the girls ate, we headed out for the local parade and some door to door begging for a tootsie roll. lol!
So, I made these for the girls - hopefully they are DIVAish enough :)
The purse was made of the top note die and the scallop oval frame die and the big shot. The designer series paper is retired- I forget what the name of it is off the top of my head. I also used the big shot and the sans serif alphabet dies to make their purses monogrammed. :) It is hard to see in the picture, but the letters are outlined with black glitter. Gotta start them out early, right ??? hehehe!!
We are going to see my daughter's step cousins tonight,so I wanted to make them a treat bag too. More retirees here, but there are some fun new things also.
The bag itself is made from the fancy favor box die and the big shot. The skull stamp (just jawing) is also retired, but I still love it.... :) But, here are some fun things I did to the skulls:
I used dazzling diamonds on both skull's eyes....but this one I used the smooch accent ink to give him a gold tooth. Hae you ever seen The Bee Movie??? One of my favorite lines of it is when Barry Benson ( the main bee in the movie) says "I think I'll get a gold tooth and everybody can start callin' me dawg." Guess you ahd to be (or BEE) there - but I can't get that quote out of my head since I made this.....argh!!
And this little cutie has a "pearl" tooth - I used the illuminate top coat smooch accent ink on this one. Can you see it in the picture????
Labels:
3 dimensional,
big shot,
fall,
gifts,
halloween
Wednesday, October 6, 2010
Too Cute to Spook!
HI Stampers!!
I have some sample cards to chare with you from last weekend's Baltimore Regional event. One of the best benefits of being able to attend a Stampin' Up! event is getting fresh ideas from the sample boards. It is sooooo much fun to look at all of the cards and discover uses for product that you might not have thoguht of before.
I will share some Halloween samples with you today. I didn't have access to the creators of these beauties, but if you see your sample please let me know and I will credit you to the wonderful creation.
Oh My - aren't those some great ideas????? Now GO STAMP! lol! ;)
I have some sample cards to chare with you from last weekend's Baltimore Regional event. One of the best benefits of being able to attend a Stampin' Up! event is getting fresh ideas from the sample boards. It is sooooo much fun to look at all of the cards and discover uses for product that you might not have thoguht of before.
I will share some Halloween samples with you today. I didn't have access to the creators of these beauties, but if you see your sample please let me know and I will credit you to the wonderful creation.
Oh My - aren't those some great ideas????? Now GO STAMP! lol! ;)
Labels:
cards,
halloween,
stampin up events
Thursday, September 10, 2009
A Patch of Smiles
HI everyone!!!

I don't even know where to begin....I had so much fun making this card!!! The card base is rich razzleberry. The black background panel is embossed with the big shot using the perfect details embossing plate. Here is a closer look, I'm not sure how well it photographed. argh!!

It is day One of the RemARKable Holiday Tour!!! We will all be show casing some awesome products from the Holiday Mini - Isn't it A.W.E.S.O.M.E.????? This is the best mini I have ever seen....but it isn't too mini with it's 40 pages!!! Holiday Medium sounds kind of silly though....so Mini it is! You should have come here from Deanna's Blog....but if you didn't, don't worry. Just follow along to the end and link up the beginning blog and make your route.
Here is my piece of goodness for the day:
The multicolored panel is a piece of designer series paper from the Holiday Mini, Night and Day. The entire package is black and white, so I sponged rich razzleberry, pumpkin pie, and old olive with stampin' sponges. Instant coordinating designer series paper - does it get any better then that??? I don't think so, my dear stampers :)
The main image panel is whisper white. All of the stamps on this card are from Pumpkin Patch. I stamped the two oval pumpkins directly on the front and the round one in the middle was stamped onto scrap card stock. I embossed all of the faces on the pumpkins with basic black craft ink and irredescent ice embossing powder. {luv} it! I then stamped the grass along the bottom. I then sponged the grass with old olive and the sky with pumpkin pie and rich razzleberry. The stems and curlies were also stamped with old olive. I punched the circle pumpkin with the 1 inch circle punch and adhered it down with stampin' dimensionals. That layer was matted with rich razzleberry. I punched the right hand side of the panel with the horizontal slot punch to run some rich razzleberry polka dotted grosgrain ribbon that had been turned over to cover the dots through. I then folded it back and adhered an orange rhinestone brad, from round fire rhinestone brads, through and adhered it to the front of the card.
I stamped my sentiment in rich razzleberry and sponged the ends lightly before punching it with the modern label punch.
Don't forget to come back tomorrow - There will be more "touring" going on.
Before you leave, leave me a comment letting me know what you think. And then click on over to Becky's Blog for you next stop on the tour.
Friday, October 31, 2008
Blogger's Challenge - week 71
Hi Stampers!!

I made that out of punches to coordinate with the little bats on the cup. The body is a 1 1/4 circle punch. The ears are one point from the large star punch. I colored the eyes on with a white gel pen. The wings are a large oval punch. I then punched one edge of the oval punch with the 1/2 inch circle punch to create the wings. I adhered it all together with tombo momo multi adhesive and mounted it on stampin' dimensionals to the tag. I punched a hole in the top of the tag with the 1/4 circle punch. The cup is in a cello bag. I wrapped black polka dot ribbon around it and through the hole in the tag to tie a bow. The ribbon isn't stampin' up....I have no idea who is the manufacturer....I had it in my ribbon box, off the spool.
This week's blogger's challenge was Halloween. Fitting, huh??? lol!
As I mentioned before, my daughter is on a pee-wee bowling league. Unlike regular bowling leagues, the kiddos do not rotate lanes or the teams they bowl with. It isn't that competitive, thank goodness! My little one has always bowled on lane 1, which is a good thing....a wall on one side makes half of the distractions. LOL!!! Anyway...wondering where I am going here???? I always try to make some kind of treat for her team on the team on lane 2 for the Holidays.
I found these little cups at wal-mart 5/$1.00....what???..... .20 cents each???? I had to get them! I was pondering many ways to give them a halloween treat...this solved that problem! So I bought these cups and filled them with candies. The one little boy on lane 2 has a little brother that doesn't bowl. I doubt he eats candy yet, my daughter didn't at that age....so I made him a treat cup with animal crackers and stuff like that.
Aren't they cute? I was happy how they turned out. I made a personalized tag for each one.
I started with a layer on whisper white and stamped "to: from:" from the Holiday Collection Artwork stamp set that will be in the Country Living Promotion beginning in November. I stamped it in pumpkin pie. I also stamped Happy Halloween from All Holidays in pumpkin pie. I layered the tag with pumpkin pie as well. I punched the two top corners with the tag corner punch. Did you happen to see the bat on the tag????
Happy Halloween to each of you!!!!
Labels:
3 dimensional,
bloggers challenge,
gifts,
halloween,
punch art,
tags
Saturday, October 25, 2008
Scrappin' Saturday 5
Hey Stampers!!
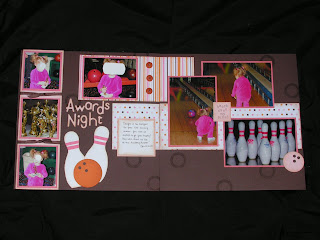
It is hard to see in these pictures...the base is textured chocolate chip. I guess I shouldn't have taken it on a black background. Also hard to see in the pictures are what I stamped on the background. I wanted a round element...you know to "roll" with the bowling ball thing. I don't have any circle stamps...I have lots of flowers....but I didn't really want a flower. And then, like it was meant to be, my eyes went down to my big deal alphabet and the "O" stamp was the first thing I saw. PERFECT!!! The O in that alphabet is a perfect circle!!! I stamped it a few times randomly on the bases with chocolate chip ink. The patterned paper is from the designer series pack, Sweet Always. What is not to like about pink, brown and orange????
I made the bowling pins and bowling balls myself. I was going to buy some "J-Boutique 3 Dimensional" bowling pins a few weeks ago at Mike's...but then thought for $4 I can make my own...they will match my project and I can make them any size I want to...and for pennies!!!
How did I do? I hand drew one bowling pin and cut it out and used it as a stencil to cut these out. The bowling ball was cut with the colluzzle and I punched three holes in it with my 1/4 inch circle punch and backed it with chocolate chip card stock to fill the finger holes. The title was cut with my big shot and the go-go boots alphabet. I accented the left panel with two knots of chocolate chip ribbon. The pumpkin pie buttons are "threaded" with slivers of chocolate chip card stock. Everything on both pages is sponged with creamy carmel ink.
Here is the right hand page:

One thing she and I have always said towards the ball while bowling is "knock down my pins!!!" So I stamped that out with a retired mini alphabet set, rough edges alphabet, and put it in the center of her bowling.
Ok....Now onto the next layout....my "paying you in advance" layout! LOL!!!
The whole family, practically, camped where my Grandma and Aunt camp during the summer one weekend. It was a real nice family get together weekend. . It happened to be the weekend that the campground was celebrating Halloween. So all of the kids dressed up and went trick or treating around the camp sites. My daughter loved it!! We were the last ones back to the camp site...she didn't want to quit!
The bases are tangerine twist textured card stock. The upper panels of designer series paper is from ghostly greetings. Kiwi kiss and tangerine twist couldn't have been a better match for my daughter's clown suit! I stamped along the bottom with the trio of stars from just jawing. Let's get right to it...
The date is adhered to a key tag punch of confetti cream. The date is cut from go-go boots alphabet die set and the big shot. I punched holes in it to thread my 1/4 inch basic black grosgrain ribbon through it. The candies, from tasty sweet, are stamped with lavender lace, tangerine twist and kiwi kiss. I embossed the candy centers with iridescent ice embossing powder...it gives them just a hint or sparkle.
I have been cranking out scrapbook pages this week amidst all my other prepping for last night's stamp camp. Well....2 2-page spreads actually...but that is "cranking out" to me. I am a slow scrapper. I do too much fussing I guess, but it probably doesn't show that I work hours on a spread to the common person. I will show you both 2 page spreads this week....and if I have to skip a week...consider yourself paid in advance! LOL!!!!!
Here is the first spread that I completed this week....I am really happy with it!!! Most of you are full into football season, cheer leading, soccer....we are in full swing with my daughter's bowling league. This layout uses pictures from January ( it was her banquet for the first season - Oct-Dec 2007). We put her into bowling for several reasons....but my main reasons, personally, was I wanted her to have something that made her learn to take turns with their kids, and to have more interaction with kids. The first season was pretty painful for me...I must admit. She really didn't get it - how to roll the ball down the lane. Almost every ball had to be pushed down for her...she really was all over the place with her thoughts, it was hard to keep her focused on the bowling lanes. But she is in her third session (2nd year) this year and so far, it has been so much better. She was only two her first two sessions....so I shouldn't have expected too much. Let me tell you..this year is so much better, we don't even have to walk up to the alley with her...she takes her ball and walks up there and gives it a heave. Now, it isn't the fastest ball that rolls down the alley, but it gets there on its own, mostly. Well, I am getting really off track here....I wanted to keep this post short because there are so many pictures to share.
Here is a closer look at the left hand side:
How did I do? I hand drew one bowling pin and cut it out and used it as a stencil to cut these out. The bowling ball was cut with the colluzzle and I punched three holes in it with my 1/4 inch circle punch and backed it with chocolate chip card stock to fill the finger holes. The title was cut with my big shot and the go-go boots alphabet. I accented the left panel with two knots of chocolate chip ribbon. The pumpkin pie buttons are "threaded" with slivers of chocolate chip card stock. Everything on both pages is sponged with creamy carmel ink.
Here is the right hand page:
One thing she and I have always said towards the ball while bowling is "knock down my pins!!!" So I stamped that out with a retired mini alphabet set, rough edges alphabet, and put it in the center of her bowling.
Ok....Now onto the next layout....my "paying you in advance" layout! LOL!!!
The whole family, practically, camped where my Grandma and Aunt camp during the summer one weekend. It was a real nice family get together weekend. . It happened to be the weekend that the campground was celebrating Halloween. So all of the kids dressed up and went trick or treating around the camp sites. My daughter loved it!! We were the last ones back to the camp site...she didn't want to quit!
Here is the left hand page:
The date is adhered to a key tag punch of confetti cream. The date is cut from go-go boots alphabet die set and the big shot. I punched holes in it to thread my 1/4 inch basic black grosgrain ribbon through it. The candies, from tasty sweet, are stamped with lavender lace, tangerine twist and kiwi kiss. I embossed the candy centers with iridescent ice embossing powder...it gives them just a hint or sparkle.
the right hand page:
I used the same candy as I did on the other side. I adhered a piece of tangerine twist striped grosgrain ribbon to the picture with a black brad from the vintage brad set. See that adorable skull and cross bones??? I don't know what it is about the set just jawing....but I love it!! I stamped it with basic black onto whisper white and cut it out. I then took tombo mono multi adhesive and filled in the eyes and one tooth and then poured on the clear chunky glitter. A skeleton must have a blinged sweet tooth on Halloween, I think. To "girl" it up a little....I stamped the bow, also from just jawing, with tangerine twist. I cut it out and adhered it with stampin dimensionals.
Well, tell me...have I out done myself this week? lol!
Labels:
big shot,
halloween,
scrapbooking,
scrappin' saturday
Tuesday, October 21, 2008
A bag of candy and a sneaky peeky.....
Hi Stampers!

What stamp set do you think this could be????
Is that more bligy - blingy????
What ever could this be???
lol!!!
But what I really have to show you is a bag of candy. Did you notice in the Holiday Mini Catalog that we have rope twine??? If you didn't...get your copy back out and study!!! now!!! hehehe!!! Anyway....When I ordered it, I'll be honest, I thought it would be stiff...but it is not, at all. I had a gift bag in my head when I took my first look at it. You know the kind of bag...with rope like handles.
Wanna see it yet?
Let's get the boring ho-hums out of the way first thing....
The card base is tangerine tango. The background panel is kiwi kiss. The bag was made out of kraft card stock. See the little points on the top??? I did that by just punching one point of the small star punch along the top. I stamped the large circle stamp from tasty sweet in kiwi kiss and the small swirl with tangerine tango on the bag front. I stamped the sentiment in basic black. I then inked my candy stamp with tangerine tango and lovely lilac. Seperately, of course. lol! But before I stamped each of those onto whisper white, I stamped off. I stamped the candy centers with the same colors, not stamping off. The candy corn stamp was inked up with old olive, pumpkin pie and summer sun stampin' write markers.
Before cutting the candies out, I inked them once more with my versamarker and embossed them with irredescent ice embossing powder. I cut each of them out and adhered them in the bag with both snail and some on stampin' dimensionals. But wait...I didn't tell you how I adhered the bag, huh???
I used sticky strip for this one.... I placed sticky strip along all three sides and used a pice of left over stamp rubber for a dimensional in the middle of the bag...I wanted it fuller than regular dimensionals.
I had lots of fun putting this together. I wonder what else could come out of my shopping bag?? We'll have to see what I can come up with. In the mean time...if you make a bag and fill it with soemthing..post a link here, I would love to see it!
Labels:
cards,
halloween,
sneak peeks
Monday, October 20, 2008
I have more halloween fun to show you!
HI, again, Stampers!!!!

First off, if you are reading this and this is the first time you have stopped by today...be sure to scroll down...this is my second post today! Can you believe it????
Well, I started this card the other night. It is a totally simple card...let me tell you....it is simple!!!! But...I did use Tombo mono multi adhesive and chunky glitter, so I wanted it to sit overnight...my overnight turned into a few days. lol!!!! I made this with my niece in mind...she has an older brother so she loves anything creepy crawly. I did her creepy crawly...but "girled" it up a little. What do you think???
I drew the spiderweb free hand with a pencil onto lovely lilac card stock. I, then, traced it with the small tip of my tombo mono multi adhesive and then poured on the black chunky glitter. I didn't dump it...I left it sit there over night. You don't want to dump the mono multi with glitter unless it is dry. So set it out of your way and let it dry.
Then this morning...I thought I need to get that card done before glitter goes everywhere....and I mean everywhere!!! lol! So......I pulled out some punches....i {luv} my punches! {blush}
I punched four photo corners out of basic black and lavender lace. I only used the four large lavender lace corners and the four small black corners. The punch a basic black scallop circle. I adhered it all together....and viola....spider body! I punched two 1/4 inch circles with whisper white and drew in the black pupils and then accented that with my white gel pen. I hand drew on the little mouth. I wanted to "girl" it up a bit more....so I pulled out a scrap of wide organdy ribbon that came around a pair of pajamas. I'm telling you....throw nothing away!!! There are ribbons on more things than you think...lol!!! I put it in between a little purple flower brad that I had in my stash and adhered it to the spider head. so girly....don't you think???
My sentiment in from All Holidays, I stamped it in basic black. The card base is pumpkin pie.
Now, before I leave you today....I want to give you a little reminder of sorts.....
The scallop circle punch fits perfectly onto a small peppermint patty....so You could do this little spider thingy onto Halloween candy!!!!! Don't you love it?????
Paris.....you were looking for a backup plan for your brownies.....would this fit the bill???
Thursday, October 16, 2008
Ever wonder what I do when.......
.....my tools collide?

Well.....It happened so innocently.....a crank of the big shot......a squeeze of a few punches.....a tiny inking of a background stamp....a few swipes of a stamping sponge......
Are you wondering where I am going here??? lol!!!
Well....remember Frankie???? He has a new friend!!!
I vant to suck your bloooood.........
what do you think????
I ran going gray and a small piece of basic black through the big shot using the top note die...both colors at the same time. I took my 1 3/4 inch circle punch and punched out his hairline. His eyes are 1 inch circles punched in whisper white. I stamped these with my sanded background with real red ink. The pupils are 1 /2 inch circles punched with basic black. I added highlights with my white gel pen. His nose is the small oval punch. I sponged the edges of his head and nose with basic gray. Did you see his fangs??? That is two points of the small star punch snipped off. I hand drew his mouth on with my basic black stampin' write journaler. The card base is elegant eggplant. I stamped the Happy Halloween sentiment from All Holidays in basic black. The vampire is mounted up on Stampin Dimensionals.
I wonder who else will join my top note family??? Hmmmm.....I wonder?????
Wednesday, October 8, 2008
Want something tasty???
HI Stampers!
My card base is pumpkin pie. The background panel is designer series paper, Ghostly Greetings...it is really a nice paper pack! I broke down and finally ordered, well earned for free, Just Jawing. I can't wait for it to get here to pair up with some more of this paper! Did you read I "earned it free?" That's right....if you host a show/workshop/club/order that totals $350 or more, you can select a stamp set out of the catalog sampler, FREE!!!!! I have been eyeing up Just Jawing since the new cattie came out.....I think it will make sweet embellishments for scrap booking, great Halloween gift bags, gift tags for teens, great card fronts, the list can go on and on...skulls are very hot right now.....not just for Halloween!!!!


Sorry for the lack of posting.....I just can't seem to get into "my time." Now I did get to get a card, or two, stamped today. I pulled the inspiration from a layout challenge for today. I really wanted to ink up my new set, Tasty Sweet. It is categorized as Halloween, but I have some visions of candy for any reason with this stamp set.....now to get them out of my little head! lol!!
Oh, back to the card....lol!!!
That background panel was accented by layering two photo corners from the photo corner punch in basic black and kiwi kiss. i {luv} kiwi kiss ;) The sentiment, from tasty sweet, was inked with kiwi kiss and then inked with stampin' write markers in basic black and pumpkin pie. I stamped that onto whisper white. It was matted onto kiwi kiss stamped with a circle stamp from tasty sweet in kiwi kiss. I matted that entire panel onto basic black and tied a simple knot with black gingham ribbon.
Did you see my candies????
The candy corn was inked up with kiwi kiss, pumpkin pie, and apricot appeal. The two wrapped candies are inked up with pumpkin pie and kiwi kiss. the edges are sponged with tangerine tango and old olive, respectively before stamping. The center swirl was stamped with tangerine tango and old olive. I wanted them to shine......so........I took out my versamark pen and colored in the image and embossed them with clear embossing powder! cute, huh? I adhered them with stampin' dimensionals....and that about sums it up!
Thanks for stopping by today, I appreciate it more than you know.
Monday, September 29, 2008
Another Punch Riddle for you......
Remember way back in March when I gave you a punch "quiz" of sorts.....THIS post.....Well, I have another for you today.

What does the top note exclusive big shot die, word window punch, 1 inch circle punch, 1 1/4 circle punch, 3/4 inch circle punch, card stock, fun foam, white gel pen and black stampin' write marker have in common????
Any guesses yet?
I can tell you that when I showed this to my hubby...he said "that's cute." To get a compliment out of him is miraculous....and he was sick with a bad cold...so I really took it as a compliment.
Guess yet???
My little on said " I want to have that...." But, she is three...she wants everything.....
Got it yet???
Anyway, last night I went to the movies with a friend and we saw "Nights in Rodanthe." It was such a great movie!!! Richard Gere is my luv hero! Has been since the 80's when he starred in the modern day "My Fair Lady," other wise known as "Pretty Woman." I can't go into too much detail about the movie...I don't want to give anything away...but if you are a chick that likes chick flicks...it is a must see!!! Go with another chick...you might shed a tear. I didn't....it takes something earth moving for me to cry over a movie, but there were a lot of sniffles in the theater!
Any guesses yet?
There is one movie that to this day in the same part, I well up with tears. Ever see "Armagedon?" It is a Bruce Willis/Liv Tyler movie from a way back.... Now that gets to me every time! It is at the end where he (Bruce Willis) is doing a deadly "blow up mission" on a meteor. If he doesn't blow up the meteor manually, it will hit earth and kill a very large area. The space head quarters communicate with him via satellite and in their head quarters there is a wall sized television that they see him on.
Have you figured out your "quiz" for the day yet???
So before he does his bomb detonation, his daughter, Liv Tyler, gets to communicate with him via jumbo tv. It gives me chills when they say their good bye's...anyway...that is my tear jerker movie...almost every time.
Did you guess yet????
what are you waiting for?????
What about "Titanic" you ask???? Nope...I knew the boat was going to sink when I went to the theater.... Not sure what the crying was all about there....
Well, if you aren't going to guess...I'll have to show you:
OMGosh!!! Did you guess this??? Now, be truthful!!!
The hair is fun foam cut with the big shot....cute, huh? My sentiment came from All Holidays....the rest is probably self explanatory.
Subscribe to:
Posts (Atom)