Showing posts with label tips. Show all posts

Wednesday, May 18, 2011

My dear friend.....

Hi stampers!  Did you miss me??  I missed you!  I have been doing some things behind the scenes, so to speak :)  Not a lot to post here, unfortunately.  But I did get to create some goodness for the Create with Connie and Mary challenge this week.......  {smile}  This week was a color challenge....wanna see?


Have you ever sat down to do something....and had a stamp set in mind that you were going to use.....I mean wanted to use - no mind changing....just dying to ink up??????  Well I had that this week.  I was going to use Flower Fest......I love this set and haven't had a chance to give ti any love.....even though the colors kept pulling me towards the new nautical stuff......i mean pulling.  But I really wanted to use Flower Fest.  really.  So Here is what I came up with:


I sure hope the fact that I used old olive leaves doesn't get me banned from the challenge- I just couldn't make it work for this card without them.   Did you get a close look at those flowers and that ribbon????  Oh - the ribbon.............Let me tell you - I will be making more of this type of ribbon in the future........  Here - look closer:


ooooo....did you see that cajun craze wrinkled seam binding ribbon?  I know, Stampin' Up! doesn't carry that in their catalog...or in the mini catalog.....I made it out of very vanilla seam binding ribbon.  OH HOW YUMMY!!!  It was easy peasy lemon squeezy! 


Wanna know how to do it?


I want you to be warned.......If I tell you how to do it.......You can't blame me for the impulses you will have to do it on your own.  If you can't resist peer pressure -I suggest you stop reading this right now.

All I did was I took a length of very vanilla seam binding ribbon and colored it with my cajun craze marker.  I suppose you could have dyed it with reinker and a cup of water......but I couldn't be bothered with all of that extra time.  {{lol}}  After I had it colored with the marker.....I placed it on an old towel and sprayed it with water.  I used a spray bottle that sprays similarly to the stamp cleaner spray bottle.  Next I balled it up in the towel to get the excess water and ink color off and then waded it up into a paper towel to dry over night.  Now - here is the IMPORTANT part.....don't mistake your wads of paper towels for garbage - that would be a sad, sad day........

Well - there you have it - total stampin' pressure to go create some wrinkled seam binding ribbon for yourself.  Just don't say I didn't warn you ;)

Monday, February 28, 2011

I will try to demistify........

I have had a couple of ladies that are sewers that didn't follow my direction on how to cut the fabric to keep it in one long piece to wrap a candle.  Well........I will try to spell it out another way.  I will warn you though....I usually just talk in circles and make things more confusing :)

First - cut your fabric a couple off inches longer than the circumfrence of your candle jar.  You will need to cut a piece of inner fabric (I used el cheapo muslin) and a piece of fabric for the outer cover - pretty stuff :)  Now - lay them on top of each other - left to right being the long way.  (a rectangle with the longest side being the top and bottom)

Take that fabric sandwich to your scallop square clear die.  Lay the die face up.  Place the left hand short edge just over the scallop cutting edge.  Fold the rest of the sandwich back and forth - NOT LETTING THE FABRIC CROSS THE LEFT OR RIGHT HAND SIDE OF THE DIE.  The folds must allow the right hand side of the rectangle of fabric to cross the cutting die.  Sandwich that between two cutting plates and run that baby through the big shot.  Now, i didn't worry about the scallops lining up when folding the fabric because I was planning on snipping the edges and washing it to shabby it up a bit.  Here is a look at that die again - Hopefully I have cleared some things up for you.......


Did I help you?  Please let me know in the comment section so I know I didn't do it in vein ;)

Now - Do  you want to see the candle that came out of that sandwich????

There you have it.  I sewed a strip of velcro on it to keep it wrapped around the candle and embellished it with a few jumbo buttons.

Thursday, February 24, 2011

Wanna Know How?

Do ya?  Do ya?  Do ya?

Would you like to know how I cut that fabric with my big shot to create a one piece scalloped edge wrap for the candle in the last post?  You remember - this one??


Well.....I have a quick picture for you.  I decided ot make one for a gift I need for this weekend.....this might just become my "go to" gift for a while.....lol!!!

First - measure the candle jar circumfrence.  The candle I bought is approximately 15 inches.  I cut my fabric roughly 17 inches.  I also cut a piece of el cheapo muslin for the inside about the same size.  I am really particular with measurements, huh?  hehehe!!!

Lay your two pieces of fabric together.  Lay on your scallop square clear die, being careful to only let the outer edges cross the die's cutting edge on the left and right.  You will have to fold your fabric back and forth something like this:

Make sense?  Don't mind the candyland game box in the background.....I was in a super hurry to take the picture....so I just whipped it onto my chair and snapped the picture - throwing caution to the wind of what was in the background.  lol!!!!

I will then cut a piece of felt by the yard instead of using quilt batting.  For craft items like this, the felt is heavy enough.  I will quilt it by machine and then attach the velcro strips to create a wrap.  Don't forget to snip into your scalloped edges and wash and dry it to create a raggy look.  When I get it finished - I will share that with you too.

Well.....I better run, I have two days worth of stuff I want to accomplish in one day.  What else is new, huh?

Monday, January 10, 2011

Because I Care.....

Hi All!!


Guess What?????  I got to stamp again!!!   Whooohoooooo!!!!!!!  I have a whole basket of new goodies from the Occasions Mini that cry out to me.  I have to say one of the first sets I was drawn to in the new mini was Nature Walk.  I absolutley love the artsy-ness of it....the realistic images...the delicate beauty of nature.  I just love it!!!!  I started this one with the sketch from Stamping 411.

I really liked the wide open space at the top of the sketch....perfect for a linen technique I have been wanting to do with this set.  Wanna see what I did with it?


The card base is soft suede.  I stamped the egg stamp along the bottom stamping off with soft suede ink.  The no.147 stamp if regular soft suede.  Don't you love the text page???  I sure do!  It is from First Edition in the Occasions Mini - this paper is so awesome - it is thinner, more like regular old text pages.

The sentiment is from the level one hostess set, Because I care.  The main image is where the fun begins.  I stamped the images randomly all over tissue paper.  I then balled it all up in a wad....then carefully smoothed it out.  It is adhered to a piece of very vanilla with stampin up's glue stick. After the glue dried, I ran the image through my big shot with the new Framed Tulips Embossing Folder.

Before adhering the card together, I used the tea stain ink pad from the distressing kit to age my papers and card stock.  I then accented it with some seam binding ribbon in cherry cobbler and a button from the neutrals button collection.

Wednesday, August 25, 2010

Live, Laugh & Love......

......Love me do!  You know I {luv} u!.....I'll always be true......so, pleeeeeeease......Love THIS too!!!

Oh my....with all of the Beetle talk yesterday on a show I was watching about their top 100 songs.....I just could not resist!

****warning!!!!  This is a very long post.......

GUESS WHAT?!?!??!

Did you guess yet???

I have a tutorial for you today!!!  And a cute card to show you - if I may toot my own horn........lol!

Let's start with the card, shall we? 

The starting point for this was a sketch challenge.  The area that has my sentiment in it is actually supposed to be a separate panel....but.....I went my own way.....surprised? 

I didn't think so!  lol!!! 

The card base is tempting turquoise.  The main panel is whisper white, that I embossed with the square lattice embossing folder....and then there is that area that I didn't emboss.......we'll get to that later in this post :)
The whisper white is matted with old olive.  The Island Oasis designer series paper really popped against the whisper white.  I layered it with a torn panel of daffodil delight - not afternoon delight.....my head keeps going into song with every paragraph I type.....what in the H$!) is wrong with me?????  I have a splitting head ache that I can't take anything for because of another medicine I am on.......maybe the rheumatologist doesn't get it that I need a handful of ibuprofen every now and then!?!?!?!?!???!?!!!!!

Oh - I got off track there a bit, huh?  Sorry :)

Here is a closer look at some of the sweet goodness.....

The sentiment is from On Your Birthday.  I inked it up with Stampin' Write Markers and used my stamp a ma jig to line it up exactly where I wanted it.  I made a "frame" around the sentiment with a rose red stampin' write marker to break up the embossed/not embossed areas.  And that cone - Isn't it the sweetest thing you have seen since your morning cereal??  The stamp set Sweet Scoops and the designer series paper, Island Oasis, will be RETIRING at the end of this month......do NOT let these babies slip right past you!  The cone was inked up with crumb cake and then I edged it up with soft suede.  This is what you get from the second stamping of it without reinking.  The ice cream is also the second stamping of peach parfait edged up with tangerine tango.  And the dazzling diamonds just adds the right amount of pizzazz to it, don't you think?  Boy - I sure am big headed today, uh????  And then an accent of a bright button tied with white crochet thread off sets the cone a bit.

And then there is the inside to deal with......

Simple, but enough to add a cohesive feel to the card.

ALL RIGHT ALREADY!!!!  I will get to the tutorial now.......
Here is what you will need to gather up: big shot, embossing folder, one cutting plate, the multipurpose platform, a piece of longboard chipboard, cutting mat, hobby blade, ruler, pen....and of course a piece of card stock.

First, cut a piece of longboard chipboard to 4 1/4 x 5 1/2.  (this will create a template that is the same size as a card front, making it easier to line up)


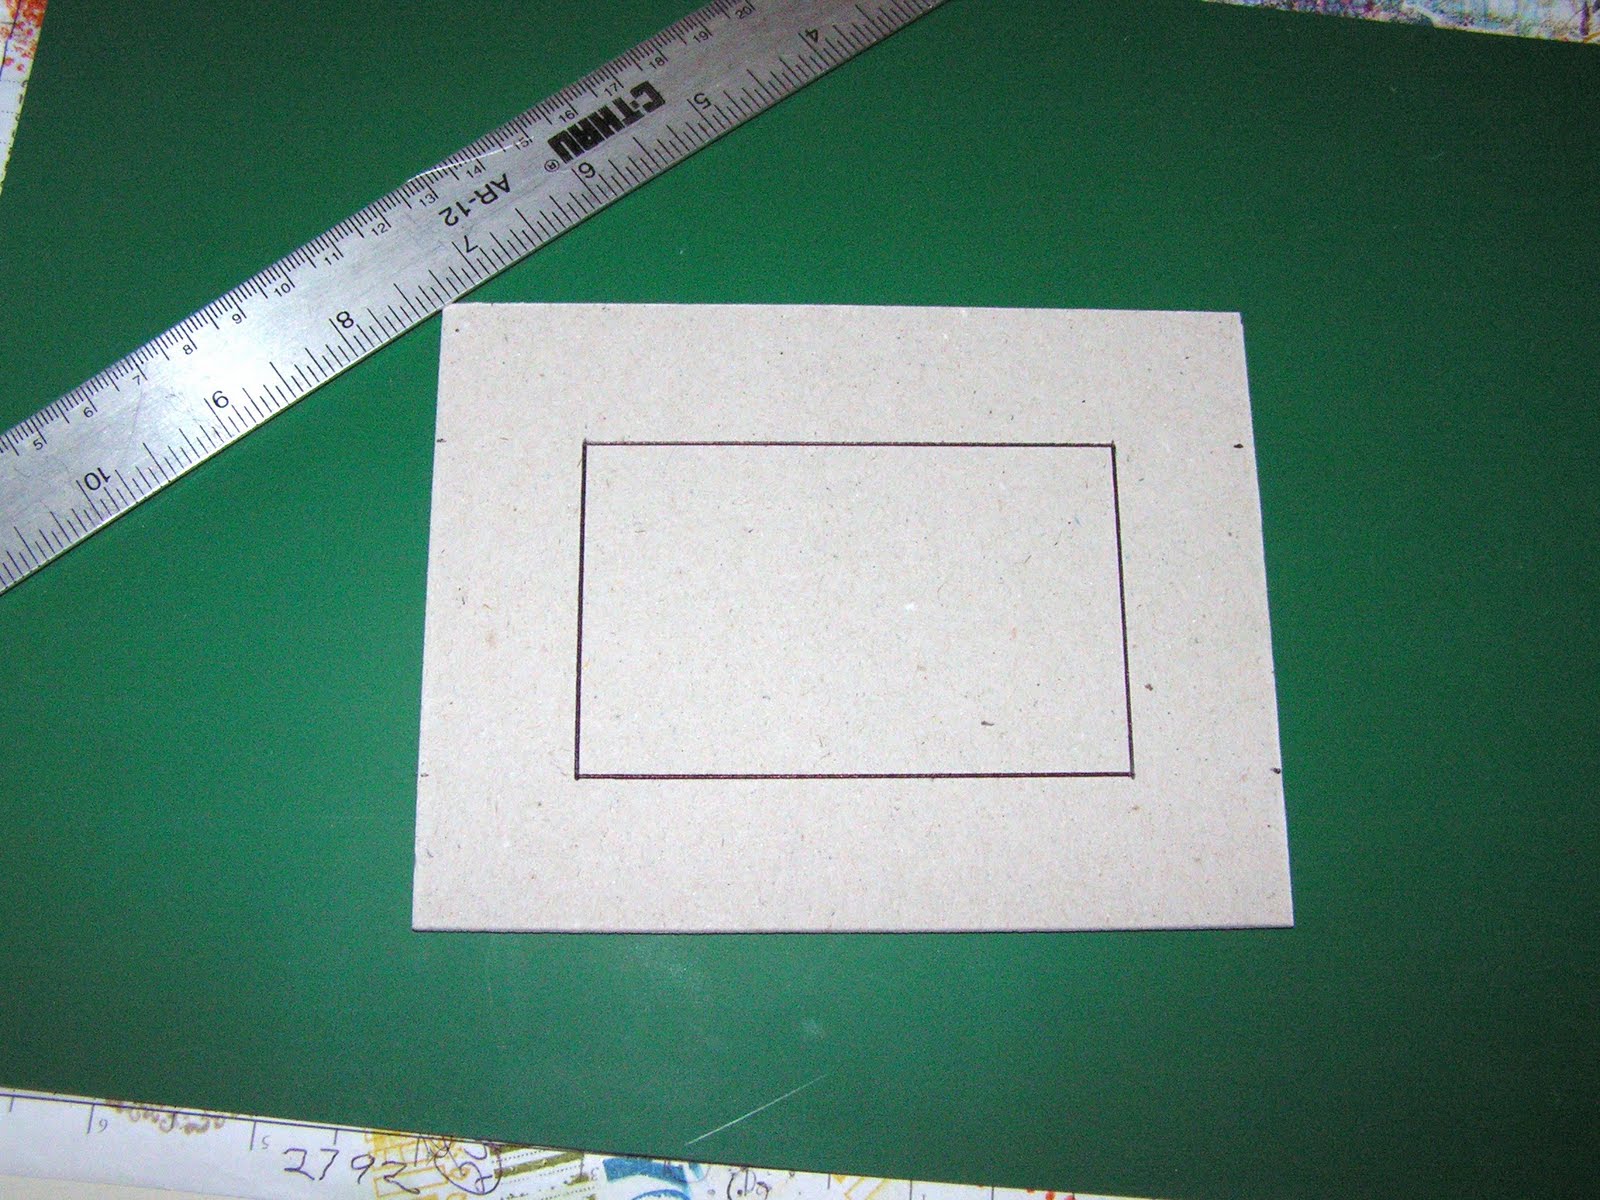
Second, draw out a window in the center of the chipboard piece.  (I made a rectangle one inch smaller than the template - being careful to center it)


Third, cut out the window with your hobby blade.  And do not throw this piece of chipboard away - you will be able to use it for something else :)


Now what is cool about this embossing template is you can lay your stamps in the window to see how they will fit :)


Now you are ready to be a big shot!!!  {hit me with your big shot......come on - hit me with you big shot......} - told you!!


The sandwich layer from bottom to top is:
multipurpose platform on tab 2 (nothing open)   -  chipboard template  -  embossing folder with card stock in it, centered onto the chipboard template   -  cutting plate.

Run that baby through the big shot and you get this!!!!

Well??????  How did I do?


If you liked this tutorial - let me know......leave some love in the comment section.....i won't bite ;)


Tuesday, August 3, 2010

Whooooooo hooooooo has seen Regina??

LOL!!!

Sorry it has been SO long!  My little one turned five - that means two parties to get ready for.  One big party with a hall and the nine and then a little party just for the three of us.  She has been in swimming lessons - which it is hard to believe that two hours of swimming could throw me off so much!  lol!!  Well - maybe it isn't that hard????  Anyway......I have come back today with two posts in one.  Does that make up for anything??  I sure hope so.  I will be posting more regularly, I pinkie swear!

I have this weeks Mojo Monday sketch card to share with you.  I have been itching to get together with the new owl punch since it arrived at my door step.  So, here is what I came up with:

Aren't those little owls adorable????  If you haven't ordered this punch yet - you really do need it!!  The owls are super sweet, not to mention the sizes of circles that are included with the punch!!

The card base is pear pizzazz.  The designer series paper is from Sunny Garden.  The ribbon is the new 1/2 inch stitched poly ribbon in pear pizzazz.  {luv} that new ribbon!!!  The scallop circle behind the cutie owls is also new, it is the extra large 2 3/8 scallop circle.  The sentiment is from the Summer mini, In a Word.  I think this will be my anniversary card for my hubby.  I punched the branches out with the extra large two step bird punch.
Did you see the brads in the upper left corner???  The white punches were punched out with a punch from the itty bitty shapes punch pack made into brad washers using my TUTORIAL HERE.  I then adhered them down with brand new neutrals brads after I aligned up the holes with the mat pack and paper piercer.

Those owls are cute, I don't care who you are....that's cute right there.  That was a quote from Larry the Cable Guy....well - he would have made that quote if he had seen these owls!!  lol!
the bodies are soft suede.  The bellies are from Sunny Garden.  I added white gel pen accents to the eyes to brighten them up a little :)


ALL RIGHT.......Now I have a Tipsy Tuesday for you!
Are your ribbon spools out of control?  Mine sure were!!  So I bought a bunch of Stampin' Up!'s ribbon keepers and then, my mom gave me hers because they weren't working for her.  (mom- you will be sorry you gave yours up when you see this tipsy tuesday :)  )  The problem I had was I didn't have a lot of table space for them....so I had to stack them - high.  Well....high stacks of ribbon keepers really aren't conducive to my desk area - if you know what I mean ;)

One day, I was sitting at my desk working or sorting or something.....and I had a HUGE duh! moment. 
Let me back up a moment....My towers of ribbon keepers kept falling over on my desk, so I had tied them up to a nail in the wall, but still sitting on my desk.  Ok....fast forward back to my duh! moment....  I looked over at my stamp shelf behind my door and the music began to play a light was shining on the wall behind my door......are you picturing it???  And I thought....if I have these ribbon keepers hanging on my desk....why couldn't I hang them there????  So I did this:

Don't look at the fact that the two strips of ribbon keepers do not line up - I was so excited, I just pounded nails and tied a couple of ribbons!!!  My retired ribbon is on the right and my current ribbon is on the left....I KNOW!!!  I have a slight ribbon hoarding problem......It isn't that I really "hoard" it per say.....because I do use it......I just buy soooo much of it.  lol!!! And don't even say a word about the tote of retired ribbon here:

LOL!!! 
Let me know what you think of the card and my storage solution......and maybe there is a number for a ribbon rehab in beverly hills you could refer me too ;)

Friday, March 12, 2010

Border and Corner punches

HI All!

Sorry I have been so quiet on here this week....it hasn't been quiet in real life :)

I wanted to share a video made by Stampin' Up! showing how to use the new corner and border punches:


Find more videos like this on Stampin' Up!

Sunday, March 7, 2010

A tutorial, as promised :)

HI stampers!!

Did you enjoy the Going Green Blog tour over the weekend?  I sure did - and I also gained many more green ideas for paper crafting!!  Can I get a "whoo whoo!!!"?  lol!

Anyway, I promised to post a tutorial for the flower I used on the project I made on Friday.  I ahd made the same flower (stamped differently though) for a card I made a few weeks ago.  Between the two postings, I received a lot of comments and emails for a tutorial....so here it goes!

Now, I will warn you....I am pretty thorough with pictures.....so long picture post today :)

First, you need to punch five scallop circles.  You can stamp them first or after you punch....what ever suits your fancy ;)

Take 4 of the scallop circles and stack then on each other - no need to line up here....we aren't looking for perfection - lol!!  Punch them with the 1/16th inch hole punch.

Now this is where I might lose some of you.....this is difficult for some people, lol!  Wrinkle up all five circles in as tight of a ball as you can make.  Just do it!  It is card stock - it can't wrinkle you back!

Unwrinkle, but don't smooth out.  Is this making you feel any better???  lol!  Sponge the edges.

Take the four that have been punched with a hole punch and adhere then together with a brad.  Any 'ol brad will do, you will never see this brad again.  Pick an ugly one :)

Pull up the scallops toward the center, smooshing and mooshing, all except the bottom scallop circle.

Push them away from the brad a little.

Put a pop up glue dot in the center, over that ugly brad.

Fold up the remaining scallop circle into fourths and snip the bottom point off.

Smoosh ( technical term, I know) the last scallop circle into the pop up glue dot and fluff out your petals.

Now, isn't that purty????
Adhere it to your project and hand deliver ;)

If you found this tutorial useful, I would love for you to leave me a comment below.  :)  If you make this flower, I would love for you to link back here so I can take a peek.  I am fishing for some love here, huh?  yeah, shamelessly!  lol!!!!

Monday, February 22, 2010

To wood or not to wood.....

THAT is the question.......to suffer the weight and space of precious shelves....
Did you ever think I would do a stamping title to Shakesphear's "to be or not to be" ????  yeah, me either!  lol!!

But what I come today with is a tutorial for you.....so sit back and be ready to wood or not to wood.....

I have tons....not really tons....but I have a crazy amount of stamps that are meant to be wood mounted that aren't mounted yet....so what is a a girl to do????  I must tell you....I LOVE the new unmounted option that Stampin' Up! is offering us now....but the sets in the regular idea book and catalog are still wood mount.  BUT - they don't come already mounted, so really - you do have an unmounted option.  following me??

hehe!!  I recently earned the "Just____" sets from sale a bration for free - just basketball, just tennis, just soccer....you get the picture.....  Well, they are all three stamp sets - three blocks, each in their own clam shell box....weighing down my shelves, taking up valuable space that I could be using for more new stamps....lol!!  So I decided to go unmounted, baby!
Ok, so I started with the Just Basketball set.

I will start with the ball/hoop stamp.  It is meant to be one stamp.  It has one block, one sticker.  Well, going unmoutned allows you to customize your stamps without worrying about not having any extra blocks. So i cut my stamp apart to have the ball and hoop separate images.  (this is how I would want to use them anyway, probably)


Next, I took the ball and layed it upside down over the sticker sheet, lining it up as best as I could.

Then, I took my craft and rubber scissors and trimmed around it, holding the rubber stamp in place.  You could trace on the sticker, but I thought this wouls be just as easy and would skip a step.

Next, peel the backing off the rubber stamp and lay it rubber side down on yoru work surface.  Then, peel the backing off of the sticker and put it on the back of the rubber stamp.  Now you have what looks exactly like a clear mount rubber stamp.....except - this is a sticker, NOT cling vinyl.  There is  big difference.  The sticker will NOT cling to the clear mount blocks like the cling vinyl that comes with the new clear mount rubber stamps.  So, what's a girl to do????

I pulled out my Tombo Mono Multi glue.  I rubbed a thin layer all over the sticker label and set aside to dry.  The Tombo Mono Multi is repositionable when it is allowed to dry - genius!!

After the glue layer is dry, you still need to tap it on yout hands to take some of the "stick" off - the tombo glue is very strong....so this just lessens the grip a bit.

Place the stamps in an empty stamp case available through Stampin' Up! and enjoy all of your extra space!!!


There are 6 stamp sets in this one case.  They are all the same theme, so finding them on my shelves will be easy as well as labeling them.  Can you believe that all of thee boxes now only take up the amount of space that a dvd case takes up?????  LOVE it!

This really isn't any harder than mounting onto wood, just a couple of extra steps, but they are well worth it, in my opinion.

well, that's all folks!

Wednesday, February 17, 2010

Pawsitively Praying for You

Hmmmm?????  Wonder where that title came from????  lol!  I am in desperate need of praying/thinking of you and sympathy cards lately.  Not good.  I pulled out this week's sketch challenge over at scs and immediately wanted to use the level one hostess set, Of the Earth for the square images.  But, I dug around looking for something else that might stike my fancy, just in case....no luck....I had my mind set on Of the Earth!  I really like this set....the bird images and the single stem flower are just gorgeous, in my opinion.  I also wanted to card to have a spring feel to it. 

wanna see????

I knew I wanted to use soft, springy colors.  I went to my store stash of designer series papers and pulled out the Pawsitively Prints pack.  It was designed to be used with the Build A Bear dies made exclusively for Stampin' Up!.  The delicate patterns lend thenselves well to the clothing prints.  I have also found that they are wonderful for so much more!!
The card came together pretty well.....just about exactly what I had in mind.  Here is a closer look at the goodness.

I even stamped the inside.....sorry this picture is fuzzy - for some reason, my camera would not focus right on it.  ARGH!!!!!!  I didn't stamp a sentiment, though, I may use this as a note card to send to a friend.  If not, I can always add the sentiment when I need to send it out.  Makes me feel that I made it just then.... ;)  hehehe!

Tip Alert**** One more thing!!!  If I weren't going to use a padded envelope to mail this card, I would definitely cut a piece of card stock 4 1/4 x 5 1/2 and run it through the paper crimper to lay over the front to protect the pearls from the postal service machines.

stamps: Of the Earth, Matchbox Messages, Thoughts and Prayers
card stock: certainly celery, blush blossom, very vanilla, pawsitively prints designer series paper
ink: pretty in pink, old olive ( both stamped off before stamping)
accessories: 5/8 inch vanilla satin ribbon, pretties kit flat backed pearls, stampin' dimensionals

What do you think?

Thursday, October 15, 2009

I am a sparkly dirty girl....and I have a TUTORIAL for you!!!!

HI Stampers!

I know it seems like I fell off the face of the blogosphere...but I haven't, really :) I am getting ready for the Christmas Card Stamp Camp among other things ;)

I have to be super quick today.....but I do have a tutorial.

I am going to show you how to use your shimmer paint from the Holiday Mini Catalog and make your own shimmer mist. Trust me.....when you use it once, you will be shimmering everything....I mean everything!!

Here are the supplies you need:
rubbing alcohol, small fine mist spray bottle, and shimmer paint.
Shake up your shimmer paint. Take an empty fine mist spray bottle and pour a little bit in.


Fill the rest of the way with rubbing alcohol....and shake....shake some more...keep shaking.... :)


Here is a card I made this morning with my shimmer spray:


It's hard to see any shimmer in the picture, but here is a closer look at some shimmer goodness:I even stamped the inside today:
Sorry....I can't go into extreme detail this morning - have to get the little one from school very soon - but I wanted to give you the shimmer spray tutorial.
It would make my day if you left some love here in the comment section....let me know what you think of the shimmer spray idea :)