
This will remain at the top of my blog, please scroll down for newer posts! :)
Hi All!
Are you wanting all of the Designer Series Paper in the new catalog???? There are soooo many gorgeous papers in there!
I am going to offer a 6x6 share. This is how it works: After I get 8 people to sign up and pay for their share, I will place the order for the paper and cut it up into 6x6 pieces - you will receive a 6x6 sheet of each paper in the new catalog on pages 158-161 (excluding the Patterns Designer Series Papers)! That is 120 6x6 sheets of designer series paper!!!!
If you were to buy each package of paper, it would cost you $207 plus shipping and tax! Sign up today for my 6x6 share for only $30 plus $5.00 shipping (if applicable). If you wish to buy multiple shares, I will work out the shipping for you.
Please email me right away to get your share! regcorn@zoominternet.net
Saturday, January 31, 2009
Friday, January 30, 2009
A Birthday Celebration!!!
Well....I am on a roll here, huh? lol!! Maybe if I lived in the Antarctic and were snowed in all of the time...I would have more stamp time! hehehe!!!! The kiddo and I have been in our Jammies (different jammies....we have bathed....lol!) since Tuesday, I think! We have to get dressed tomorrow at the latest...we have a birthday party to go to....his birthday is today though...HAPPY BIRTHDAY LOGAN!!!!! We promise to be dressed tomorrow for your party! :)

It was perfect! This week's Blogger's Challenge is a theme - birthday. And I needed to make a birthday card! Logan is turning two and he looooves tractors, so he is having a John Deer party. I did score with a John Deer gift that I think he will love.....but I do not have any stamps that are remotely tractorish let alone John Deer. What is a person to do???? Pull the color scheme and go with it!??!??!? Here is what I did:
Isn't it cute? I did pull out some retired wild wasabi - it paired so great with garden green (or is the John Deer Green???) Here are the deets.... The main image panel is confetti white. I stamped the "happy" with my jumbo outline alphabet, overlapping the letters on purpose. I then colored them with a blender pen and ink refills. I used garden green and summer sun for the letters and where they overlapped, I used wild wasabi - I love the look of this!!! I then used the Birthday stamp from Hugs and Wishes and inked only the word "Birthday" with a basic black stampin write marker and stamped it below. Since he is turning two...I wanted a "2" or two of something on there....So I pulled out my crazy for cupcakes and stamped two balloons - love it! I then stamped then two more times on scraps of confetti white. I colored them in the a blender pen and summer sun and garden green ink. I wanted them to sparkle...a little boy can have a little glitter, right??? So, I took my versamark pen and colored the entire balloon and then embossed with heat and stick powder and then dazzling diamonds....perfect!! I cut them out and then adhered them down with stampin dimensionals. I matted that entire panel onto summer sun and then onto the card base, wild wasabi. I felt like it was still missing something....ribbon! I had to add ribbon....I tied a bow with my black gingham ribbon.
I think it still looks boyish....don't you? What do you think?
Thursday, January 29, 2009
Sweet little birdie
HI All!


I have made the sweetest little birdie......speaking of birds.....I had 12 robins in my cherry tree two days ago!!! Do they not realize we have a foot of snow...they should be on the beaches of Florida??!??!?!?!? Anyway.....I digress......
Now before I get into this card.....BE FOREWARNED!!!!!! THE SIZZLET DIES AREN'T DESIGNED TO CUT ANYTHING OTHER THAN PAPER OR CARD STOCK......I DID THIS AT MY OWN RISK...AND IF YOU DO IT TOO....YOU HAVE BEEN WARNED.... :)
Isn't that bird the sweetest?? The card base is pink pirouette. I stamped it with En Francais background in pink pirouette. I sponged the edges with riding hood red. The top corner is stamped with the flourish from Baroque Motifs in chocolate chip. My sentiment is from Holidays and Wishes. The designer series paper is Candy Lane. I tore and rolled at the top edge a bit. I then tied a simple knot with the striped pink pirouette grosgrain ribbon.
Now for that bird.....remember, I said that cutting CORK is not an approved material for sizzlets....I cut thin cork with my bird die in the birds and blooms sizzlet set. I adhered the wing down with tombow mono multi glue and then punched out his eye with my 1/8th inch handheld punch. Before adhering the little guy down to my card, I put a piece of chocolate chip card stock behind his eye.
Want a closer look at his cuteness????
The card is very simple...I didn't want to take away from the bird.....what do you think?
Wednesday, January 28, 2009
I am in love......
with the Love You Much Bundle!! I think the images are so cute and the paper....well....I LOVE that...and the punch...what is not to love about a sweet heart to heart punch?!??!?!?

My little one has a fascination with Toy Story and Toy Story 2 so I had a little stamp time this morning....lol! (Good thing I bought tons of Disney movies before she was born for myself....she has since claimed them all for herself!) I sure hope I have, or can buy, the next movie that she wants to get into....hehehehe!!!!
This card has a lot going on...but I had a ton of fun making it!!!
The base is close to cocoa. I stamped Bella Toile background in chocolate chip. All of the edges in this card are sponged with chocolate chip. I then took a strip of the designer series paper from Candy Lane and stamped it with the three heart trio in chocolate chip randomly. The scallop panel is a stamp from the Love You Much stamp set stamped twice in chocolate chip, once onto pink pirouette and once onto white confetti. I punched the pink layer out with my scallop circle punch and the white layer with the 1 1/4 inch circle punch. The two heart are from the heart to heart punch, the littlest one adhered down with a half of a stampin dimensional. The main image is also from the Love You Much set. I stamped it in basic brown classic ink because I wanted to color it. I colored it with graduating color.....if you registered for the stamp camp on Friday, you will learn, or review, how to color images this way. I punched a flower from the three for you punch in riding hood red and adhered it down over the stamped flower. I then accented the center with a flat back pearl. I wanted to give a little more balance to the layout so I adhered three more flat back pearls from the pretties kit with mini glue dots on the lower left hand corner of the ds.
What do you think? I would love to hear from you....
Until later - Happy Stampin'!
Tuesday, January 27, 2009
The body is barely cool....
....from the new circle scissor and the poor Coluzzle has been discontinued. Not that I am too awful sad...but there are some things that I have been able to do because I have a Coluzzle that I don't think I could have done with another cutter. Here is the actual statement from the Stampin' Up! demonstrator web site:
DISCONTINUED COLUZZLE CUTTING SYSTEM January 27, 2009Our manufacturer of the Coluzzle has recently discontinued both the Starter Set (item 102264) and the Refill Blades (item 102721). We no longer have any inventory of the Refill Blades, and they are now unavailable for order. We will continue to sell the Coluzzle Starter Set until inventory has been depleted. We apologize for any inconvenience this may cause you.
I urge you to grab one before they are totally gone....the circle scissor is great but it doesn't cut ovals.....yet ;) lol! (before you ask....I have NO inside information about an oval cutter....but it would be awesome if we had an oval cutter that cut in 1/8th inch increments like the new circle scissor.....) Hey! A girl can dream!!!
Wednesday, January 21, 2009
I feel pretty....Oh, so pretty.....
I feel pretty, and witty, and bright..... Are you singing it yet???? LOL!!! I originally heard this on West Side Story....but I do think that Baby's sister sings it in the talent show at the end of Dirty Dancing. You know - when Patrick Swayze (sp???) walks over to the table and looks her dad in the eye and says.."nobody puts Baby in a corner...." Oh my.....what a romantic!!!! lol!! Anyway....back to why I am here. hehe!!!
 I can't get the color to look right in these pictures.... The base is pink pirouette. The flower stack is from the pretties kit, hence the "I fell pretty" bit..... I colored the larger flower with pink pirouette ink and a sponge dauber, I colored it fully to get solid color. The next flower is colored with close to cocoa and a sponge dauber. The top flower was brushed lightly with the pink pirouette ink dauber to keep some white showing through. I threaded the beaded hat pin, also all from the pretties kit, onto a clear rhinestone brad - from the pretties kit, but can be ordered separately now....whooohoooo!!!! I adhered the three flowers together with that clear rhinestone brad. Both designer series paper layers comes from Bella Rose....I am soooo glad they did not retire that pack!!!! I matted both of those layers with a 1/8th inch mat in whisper white. I then adhered the flower stack down with two pop up glue dots (the thick ones). Here is a bird's eye view of that flower.
Here is a card I made a few minutes ago....in between cutting pieces of curly ribbon off of the spools that my daughter found....she claims she was making a cake with colors! I have huge spool after huge spool of curly ribbon....it makes anything look fun! And she found my stash....hehehe!!
I can't get the color to look right in these pictures.... The base is pink pirouette. The flower stack is from the pretties kit, hence the "I fell pretty" bit..... I colored the larger flower with pink pirouette ink and a sponge dauber, I colored it fully to get solid color. The next flower is colored with close to cocoa and a sponge dauber. The top flower was brushed lightly with the pink pirouette ink dauber to keep some white showing through. I threaded the beaded hat pin, also all from the pretties kit, onto a clear rhinestone brad - from the pretties kit, but can be ordered separately now....whooohoooo!!!! I adhered the three flowers together with that clear rhinestone brad. Both designer series paper layers comes from Bella Rose....I am soooo glad they did not retire that pack!!!! I matted both of those layers with a 1/8th inch mat in whisper white. I then adhered the flower stack down with two pop up glue dots (the thick ones). Here is a bird's eye view of that flower.The sentiment is from A Little Birthday Cheer. It is a one line sentiment, but I wanted it to fit into my curly label punch.....so....I stamped the "happy" and then inked just "birthday" and stamped it aligning it with my stamp a ma jig. Both words were inked with my close to cocoa stampin write marker. I then stamped the vine flower from fresh cuts in pink pirouette, stamping off once. I adhered that down and tied a piece of pretty in pink taffeta ribbon around the edge of the large background panel and the sentiment. Then I had to add three little flat backed pearls, from the pretties kit, with mini glue dots to the bottom corner.
Take a gander...I even decorated the inside of my card a little.....I think I an going to try to do this a little more...it really adds to the card, don't you think???
Tuesday, January 20, 2009
Loving my new goodies!
Hi Everyone! Did you think I fell off the edge of the horizon??? I gave it some thought, but decided to come back to reality! lol!!!
When I found out that Stampin up was retiring ginormous flowers...I was very sad! I have used that set so many times in cards, 3 dimensional stuff, and scrapbooking.....I was devastated!!! And then I got my list of preorder stuff....As a demo, when there is a new catalog or mini catalog, Stampin' Up gives us a small sampling of things we can order ahead of time. When I saw that sampling....I fell in love with Petal Pizazz!!!!! I have had this set for a while now and just today got the chance to ink it up! Sad, huh? I wonder if my hubby would hear to all day day care so I had more time to stamp???? I mean, I would cook and clean on occasion....Nah!! I think I would be the one to protest that...lol!!! I would be spending good stamp money on day care.....we could not have that!!! HEHEHE!!!!!
Anyway...without further adieu....my sweet little card for the day:
The base is regal rose stamped with a flower from Petal Pizazz in bravo burgundy. I then cut two top note dies with my big shot....still lovin' it...and I CAN NOT WAIT TO GET MY PAWS ON SOME OF THE NEW BIG SHOT STUFF!!!!!!!! I layered the white on bravo burgundy....just pointing out the obvious....lol!
I stamped a few leaves in kiwi kiss on the white top note and some on scrap paper to cut out. The Thanks sentiment is from Thank You Kindly, it is stamped in regal rose. I used the horizontal slot punch to create a hole for the 5/8 inch bravo burgundy grosgrain ribbon. I wrapped that around the card and tied a simple knot. The final touches were stamping the larger flower from petal pizazz in bravo burgundy onto whisper white and the next biggest flower in regal rose. I cut them out and layered each of them with stampin dimensionals. The two leaves that I cut out, I adhered them down on the flower end with SNAIL and then rolled them and adhered the other end down with a stampin' dimensional.....here is a closer look at that:
What do you think?? This was fun! Now to check on that daycare.......
Wednesday, January 14, 2009
Not just your average Valentine's Day set!
I just love the birds that are in the Love You Much bundle stamp set. I love the birds that are in A Little Birdie Told Me.....so it was no surprise to me that I would love these birds just as much!

See that scallop square? It measures over 2 inches, so it is definitely not the square scallop punch! lol!!! I made that baby with my scallop edge punch....oh what fun!!! I accented it with my white gel pen. Here is a closer gander.....
recipe:
stamps: love you much, hugs and wishes
card stock: baja breeze, real red, whisper white, brushed silver, holiday treasures ds
ink: black staz on, versamark, real red
accessories: aquapainter, silver embossing powder, heart to heart punch, red gingham ribbon, scallop edge punch, stampin dimensionals
Tuesday, January 13, 2009
Out with the OLD....In with the NEW!!!!!
Oh, I can't tell you how excited I am for this new catalog!!! It will knock your socks off!!!

For today's card, I combined the soon to be retired with something that isn't even available to purchase yet. Fun, huh? I am giving a gift if thank you cards to my Grandmother in a few weeks, here is one of my designs. I made ten of these babies. I had so much fun with them. They are an extremely simple design...I wanted the designer series paper to really stand out. I also wanted them to be simple with not alot of dimension that she would have to worry about postage. :)
The card base is very vanilla. I cut a 4x4 piece of the damask pattern from Parisian Summer designer series paper....I think this pack is so beautiful...and it is retiring this Monday - bummer! I matted that with a piece of close to cocoa with the edges scalloped with the scallop edge punch. I then tied a piece of 1/4 inch chocolate chip grosgrain ribbon around it and tied a simple knot. I then took a BRAND NEW stamp, Elegant Thank You, and stamped it with close to cocoa ink and punched it with the wide oval punch. It fits perfectly in the square scallop punch turned on it's side like a diamond.
Oh Yeah....did I mention that it is a single stamp.....STAMPIN' UP IS NOW CARRYING A HANDFUL OF SINGLE STAMPS!!!!!!! How awesome is that...and they are very affordable!!! I think it is wonderful, especially for the card elements kits and as an add on to the sentiment sets you already own! It is mounted up on stampin' diemnsionals....I almost forgot that....hehehehe!!!
Friday, January 9, 2009
Blogger's Challenge - week 81
HI Stampers!
 Here is a closer look at some of the details:

This week we were to use designer series paper. I knew right away that I wanted to use the items in my Love You Much bundle - I love the Candy Lane designer series paper...it is so yummy!!!!! I wanted to use an assortment of the paper and really wanted to do another quilt card like I made HERE and HERE but I thought that maybe you were tired of that type of card....I love it though!! So anyway, lots of ideas ran through my head and I decided on a technique that my upline, Pam, shared with me. Thanks Pam!!! I am very pleased with the results!
Here is a closer look at some of the details:The buttons are retiring....so sad....I just ordered a ton of them....lol!!!! Better stock up!!
I can't get into too lengthy of a post today...my little one has walking pneumonia and her steroids have kicked in big time...if you know what I mean! ;) Now I have an understanding when they say athletes are on "the juice." LOL!!!! I am not sure I can keep up with her today...but I am giving it my all! My hubby better watch out when he gets home...I am likely to punch out for the day...that will be our little secret! ;)
I would love to hear what you think of this card.....
Tuesday, January 6, 2009
I am ready to throw a HOLY fit.....
....if Season of Friendship doesn't make it into the new catalog!!! Please...please...please let it be in the new cattie!!!!!! {fingers crossed, staying away from black cats, turning my head when I see a ladder, throwing salt over my shoulder any chance I get......}
 The main image is the tree from Season of Friendship - I'm telling you.....it will get ugly if this tree does not make it into the new catalog!!! lol!!! I stamped it in chocolate chip ink. The little hearts are from the new punch, heart to heart, that is available in the new bundle - don't miss out on getting it for a discount!!! I adhered them down with my 2 way glue pen and then accented them with dazzling diamonds - love the bling!!! I stamped the little bird from Season of Friendship in baja breeze and mounted him up on a stampin' dimensional. The real red designer series paper is from the patterns pack in the level one hostess pack. I scalloped the bottom with my scallop edge punch. That entire panel was matted with chocolate chip and then in baja breeze. The 5/8th inch real red grosgrain ribbon was tied around all three panels. My sentiment is from Short and Sweet. I punched it with the word window punch and then tied it around the ribbon with linen thread. I liked the "dangly" look but wanted it more controlled. I adhered it to the ribbon with a mini glue dot up by the linen thread hole. The entire panel is mounted up on stampin' dimensionals.
 I am not sure if you can see the bling in these pictures or not...but they are so sparkly in real life! Here is a closer look at that :)
This card is for last week's Blogger's Challenge - 80 - to use baja breeze - LOVE IT!, use chocolate chip - LOVE IT!, and to use any red - LOVE IT!!!! I did not have a second to create last week to have this done on time, but the second I had a free minute last night...I pumped this card out! I absolutely love it, and I hope you do too!!!
 The main image is the tree from Season of Friendship - I'm telling you.....it will get ugly if this tree does not make it into the new catalog!!! lol!!! I stamped it in chocolate chip ink. The little hearts are from the new punch, heart to heart, that is available in the new bundle - don't miss out on getting it for a discount!!! I adhered them down with my 2 way glue pen and then accented them with dazzling diamonds - love the bling!!! I stamped the little bird from Season of Friendship in baja breeze and mounted him up on a stampin' dimensional. The real red designer series paper is from the patterns pack in the level one hostess pack. I scalloped the bottom with my scallop edge punch. That entire panel was matted with chocolate chip and then in baja breeze. The 5/8th inch real red grosgrain ribbon was tied around all three panels. My sentiment is from Short and Sweet. I punched it with the word window punch and then tied it around the ribbon with linen thread. I liked the "dangly" look but wanted it more controlled. I adhered it to the ribbon with a mini glue dot up by the linen thread hole. The entire panel is mounted up on stampin' dimensionals.
 I am not sure if you can see the bling in these pictures or not...but they are so sparkly in real life! Here is a closer look at that :)
Monday, January 5, 2009
The SALES continue!!!!
Holy SALES Dinah! Stampin' Up! is having a first ever inventory blow out sale!!! Some items are retiring items, some are current items, and some are already retired items (think last catalog....) Here is the link for that SALE: CLICK HERE
Now for the list of retiring accessories. These are a WHILE SUPPIES LAST.....limited quantities.
Item #
Product Description
Availability
111377 ACCENTS & ELEMENTS ROOF GARDEN
112012 ACCENTS & ELEMENTS SEASON TO SHARE
112088 ACCENTS & ELEMENTS TRUE ELEGANCE
102782 ALBUM LEATHER BLACK 12X12 SOLD OUT
104188 ALBUM LEATHER BLACK 6X6
105384 ALBUM LINEN POST MELLOW MOSS 6X6*
104516 ALBUM LINEN POST NAVY 6X6
105381 ALBUM LINEN POST REAL RED 6X6* SOLD OUT
103977 BUTTONS BOLD BRIGHTS*
103978 BUTTONS EARTH ELEMENTS
103981 BUTTONS EARTH ELEMENTS & NEUTRALS
105446 BUTTONS RICH REGALS
105445 BUTTONS SOFT SUBTLES
103604 DAYS-TO-REMEMBER CALENDAR 12X12
102174 DAYS-TO-REMEMBER CALENDAR 8 1/2X11
112465 DESIGNER SERIES PAPER BANBURY SOLD OUT
112462 DESIGNER SERIES PAPER GEORGIA PEACH
112463 DESIGNER SERIES PAPER GHOSTLY GREETINGS
112040 DESIGNER SERIES PAPER GREEN TEA
112470 DESIGNER SERIES PAPER HAIKU
112460 DESIGNER SERIES PAPER HAWAII PAPAYA
112469 DESIGNER SERIES PAPER HOLIDAY TREASURES
112458 DESIGNER SERIES PAPER JUNIOR VARSITY
112459 DESIGNER SERIES PAPER MAINE BLUEBERRY
112466 DESIGNER SERIES PAPER MUIRFIELD
112149 DESIGNER SERIES PAPER PARISIAN SUMMER
112467 DESIGNER SERIES PAPER PRESTWICK SOLD OUT
111355 DESIGNER SERIES PAPER SUMMER PICNIC
112039 DESIGNER SERIES PAPER WINDSOR KNOT
112963 ELEMENTOS PARA TARJETAS DIAS FESTIVOS HECHOS A MANO SIMPLY SENT
106523 ENVELOPE TEMPLATE FIVE-IN-ONE CARD COVER
104104 ENVELOPE TEMPLATE MINI SOLD OUT
107298 ENVELOPES CONFETTI WHITE MEDIUM
110695 ENVELOPES OPEN END KRAFT SMALL
109115 ENVELOPES OPEN END VERY VANILLA SMALL
103372 METAL EDGE TAGS ALUMINUM WHITE SQUARE
107925 ON BOARD BITTY BOOK*
109190 ON BOARD CLIPBOARD 9X9*
109180 ON BOARD SIMON UPPER
112086 ON BOARD SOMETHING SEASONAL
107923 PAGE PROTECTORS RING 3.25 X 3.25 SOLD OUT
104942 PUNCH 1/4 INCH CIRCLE SOLD OUT
104943 PUNCH 1/4 INCH SQUARE
107273 PUNCH 3/4 INCH SQUARE
104389 PUNCH DOUBLE CIRCLE*
100391 PUNCH HANDHELD 1/8 INCH CIRCLE SOLD OUT
104830 RIBBON GINGHAM CARAMEL
104829 RIBBON GINGHAM LIGHT BLUE
104828 RIBBON GINGHAM LIGHT PINK
104831 RIBBON GINGHAM MOSS
109037RIBBON GROSGRAIN MORE MUSTARD 1/4 INCH
110282 RUB ON ANCHORED
111806 RUB ON CHILLS & THRILLS
111805 RUB ON SCHOOL DAYS
111417 RUB ON WORD FLURRIES
110283 RUB ONS TAKE NOTE
112193 SIMPLY SCRAPPIN I WISH
112186 SIMPLY SCRAPPIN PINA COLADA
112068 SIMPLY SCRAPPIN SUMMER HOME SOLD OUT
112043 SIMPLY SCRAPPIN U R SWEET
112061 SIMPLY SCRAPPIN WINTER RETREAT SOLD OUT
112016 SIMPLY SENT CARD ELEMENTS HANDMADE HOLIDAY
109868 SIMPLY SENT CARD KIT LIFELONG NOTES
103647 STAMPIN STORE MINI
105813 WRITE ME A MEMORY FONT CD VOL II
WHEELS:
107212 MATEYS MAP
106749 BRIGHT BULBS
109672 BRONCO SOLD OUT
104100 MAKING TRACKS
108978 SANDY SHELLS
110332 SNOW
101233 SNOWFLAKE
109694 SWEET STARS
111249 TAKE A NUMBER
*This item is discounted and included on the Inventory Blowout.
Oh how I long to stamp......
Hi everyone! I wanted to drop in and let you know I haven't forgotten about you! I have been so busy enjoying the Holidays and playing with my little one that I have neglected my creative desires.....
I will get back to normal soon, I promise!
I also wanted you to know that the Accessory Retirement list gets released this afternoon. I will be sure to post a link to it here. If you are new to the Retirement Lists.....here is how it works: The stamp sets hardly ever sell out but the accessory list is another thing. Things usually become sold out starting the day the list is released so if there is something you want, don't delay in placing an order. You can call or email me directly, I will be compile every one's orders and get them for you or you can click on "My Stampin Up Web Site" in the upper left hand corner and then click on the "SHOP NOW" button on the upper right hand corner.
I will be back later today with the list for you.
Monday, December 22, 2008
Ok...Time to let the cat out of the Bag!!!!
LOL!! If you didn't see earlier today...this is my second post for the day....be sure to scroll down for some Christmas goodies!
 Even though Christmas is in three days....it is NOT too early to think about Valentine's Day.....

You have the opportunity to purchase a brand new-never released before bundle at a 20% discount!! I know...I had to pinch myself too!! lol! I have been having so much fun with this bundle in secret in my studio...now I can shout about it! hint: Remember those adorable little hearts on the chest of my gingerbread men???? Oh yeah....they came from a brand new punch in this bundle!!!! Can you believe it????? Here are the details:
 Oh my......isn't is sweet????? I stamp set, coordinating punch, and coordinating designer series paper???? Oh my!!! This bundle price is only available until January 31st. Click HERE to download the flyer.
 Card base is close to cocoa. I stamped the birds from Love You Much in chocolate chip. The designer series paper is from Candy Lane Designer Series paper - isn't it divine???? The sentiment is from All Holidays, stamped in riding hood red on very vanilla. I punched it with the 1 inch circle punch before putting it behind a piece of styled silver hodgepodge hardware. And that row of hearts.....You guessed it! I stamped the trio heart stamp and punched it out with the new heart to heart punch and adhered them down randomly and with stampin' dimensionals. I'll give you a "bird's eye" view....lol!
Even though Christmas is in three days....it is NOT too early to think about Valentine's Day.....You have the opportunity to purchase a brand new-never released before bundle at a 20% discount!! I know...I had to pinch myself too!! lol! I have been having so much fun with this bundle in secret in my studio...now I can shout about it! hint: Remember those adorable little hearts on the chest of my gingerbread men???? Oh yeah....they came from a brand new punch in this bundle!!!! Can you believe it????? Here are the details:
Oh my......isn't is sweet????? I stamp set, coordinating punch, and coordinating designer series paper???? Oh my!!! This bundle price is only available until January 31st. Click HERE to download the flyer.Here is a card I whipped up in no time...thanks to the entire kit! One of the stamps lines up perfectly with the new Heart to Heart punch! I {luv} that!
Card base is close to cocoa. I stamped the birds from Love You Much in chocolate chip. The designer series paper is from Candy Lane Designer Series paper - isn't it divine???? The sentiment is from All Holidays, stamped in riding hood red on very vanilla. I punched it with the 1 inch circle punch before putting it behind a piece of styled silver hodgepodge hardware. And that row of hearts.....You guessed it! I stamped the trio heart stamp and punched it out with the new heart to heart punch and adhered them down randomly and with stampin' dimensionals. I'll give you a "bird's eye" view....lol!Just a reminder - tomorrow is the last day to save 10% off retiring stamp sets and get the free shipping on orders of $70 or more as well as the first day you can order this wonderful bundle!!!
I have had so much to share.....
but where have I been??? I just realized that I haven't posted anything since Wednesday!??!?!? What is up with that??? I have had things that I wanted to share and I guess I haven't had the time to even post it! Sorry :(


I will show you two things today and one is a tutorial!!! Will you forgive me now???? Pretty please.......
First, remember last week when I showed you the gingerbread man tags that I gave to a friend? Well, I also went to dinner that night with my cousin and friend. It was the three of us...we had such a good time! These are the gift tags I took her along with a big ol' cocoa cone to enjoy in the f.r.e.e.z.i.n.g. COLD weather we are having right now!!! So, Fawn.....if you are reading this...make some cocoa and curl up!!!
 Aren't they adorable? Santa was made entirely out of punches except for his hat brim...I just cut that from a skinny piece of whisper white card stock. Here is a closer look at him:
Aren't they adorable? Santa was made entirely out of punches except for his hat brim...I just cut that from a skinny piece of whisper white card stock. Here is a closer look at him:Next.....for the tutorial. These are perfect if you need a super quick treat to give or you could even use these as gift tags on presents! My little one had her session one pee wee bowling banquet last Wednesday and we always try to take a little something for her team on Holidays. This is what we gave them this year for Christmas.
Aren't they sweet?
Ok...for the tutorial....
Take a piece of card stock. I think mine was 1x3. Use the slit punch on both ends and slip it through the candy cane like this:
Take your favorite stampeed image that can easily be punched out and adhere to the card stock after it is on the candy cane. I did use sticky strip to adhere the scallop circle to the glorious green card stock. The santa image is from the level 2 hostess set, Deer Friends. He was inked up with stampin' write markers onto whisper white card stock and punched out with the 1 1/4 circle punch. The glorious green layer is punched with the 1 3/8 th circle punch. The real red was punched with the scallop circle punch.
Easy peasy, right????
MAKE SURE TO CHECK BACK LATER THIS AFTERNOON.....I WILL POST THE SALE OF A BUNDLE THAT IS AVAILABLE STARTING TOMORROW FROM THE NEW CATALOG!!!! YOU ARE GOING TO LOVE IT!!!!!!
Wednesday, December 17, 2008
Celebrate with cupcakes
HI All!


I just altered a plain kraft gift bag from the store. How easy is this!??!?!?!

I wanted to make a gift bag for my Dad's Birthday gift, so I thought that I would use Kristina's color challenge as a starting point. I knew in my head that I wanted to use Simple Birthday Thanks to make a cupcake on the bag. That was the primary reason I bought that stamp. I did preform a major stamp surgery on it....I will try to get that up for you tomorrow.... :) For now...the bag.
Here are the colors for the challenge:

chocolate chip, close to cocoa, baja blue, so saffron, very vanilla - I will have to make another creation out of these colors....I love them together!!!
I just altered a plain kraft gift bag from the store. How easy is this!??!?!?!

See the cupcake up close? I paper pieced the entire thing with the papers from ski slope out of the Holiday Mini - I can't believe how diverse this paper pack is....it definitely isn't just a holiday pack!!! I ran the cup cake liner through my paper crimper. I didn't stamp the cherry, I just drew a black line on the paper where it was. I used soft subtles brads for sprinkles. The icing is mounted up on stampin' dimensionals. The sentiment is from celebrate everything.
This was fun! Now I need to make a cupcake in feminine colors so I can bling up that cherry with glitter!!!
Tags galore!
HI stampers!
 Don't they look so sweet??

Last night I went to dinner with two good friends. I took each one of them a small gift. I gave both of them a bag of gift tags with another gift. Heidi loves to read so I put a book marker for her in the gift bag I showed you yesterday with the gingerbread man on it. A couple of weeks ago, my friend Heidi, invited us over to make Christmas cookies with her, her daughter, and fawn and her daughter. We had such a good time! The three little girls had a blast....they made sprinkles with cookies, if you know what I mean.... lol!!! Anyway....Heidi had her house decked out for the Holidays and her kitchen was full of her gingerbread man collectibles. It looked so nice...she had mentioned that she collected gingerbread men....so I had to make her a gift bag with one on it as well as a bunch of these tags.....
Don't they look so sweet??Still noticing the little heart on his chest??? Well...you will have to wait to learn more about that! {grin} You will be in the know next Tuesday, the 23rd. :)
Here is a closer look at this sweet little guy...wouldn't you just love to bite his arm off??? LOL!!!Tuesday, December 16, 2008
Another Gift Bag with the Big Shot
HI Stampers!!
 Isn't it sweet??? It is made with the exclusive Top Note die. I cut two of those and cut the bottom off to make it flat. The snowflakes are from snow swirled.....I absolutely love those snowflakes...I have used them a million times already! I accented them with white dots from my white gel pen. I made a banner type sentiment for the front by stamping the holiday wishes stamp from the Holiday Collection stamp set out of the Country Living kit. I then cut a V in one end and wrinkled the whole thing up. When I unwrinkled it, I sponged the wrinkles with creamy caramel ink and a stampin' sponge. I made the girls at the wrap it up stamp camp wrinkle up flowers to give them more dimension...and they all freaked out. LOL!!!!! And then I put a little gingerbread man on the front with stampin' dimesnionals...but he is for another day...hehehehe!!!
I have been on a punch/die cut run lately....I hope you don't mind! I made a little gift bag last night for a small gift I am giving. Wanna see???
Isn't it sweet??? It is made with the exclusive Top Note die. I cut two of those and cut the bottom off to make it flat. The snowflakes are from snow swirled.....I absolutely love those snowflakes...I have used them a million times already! I accented them with white dots from my white gel pen. I made a banner type sentiment for the front by stamping the holiday wishes stamp from the Holiday Collection stamp set out of the Country Living kit. I then cut a V in one end and wrinkled the whole thing up. When I unwrinkled it, I sponged the wrinkles with creamy caramel ink and a stampin' sponge. I made the girls at the wrap it up stamp camp wrinkle up flowers to give them more dimension...and they all freaked out. LOL!!!!! And then I put a little gingerbread man on the front with stampin' dimesnionals...but he is for another day...hehehehe!!! See all of that dimension?? To make the top note dies into a gift bag, I adhered them to the front and back of a small lunch sack type of bag that had been cut down to fit inside of the die. I meant to take a picture of the small lunch bags so you would know what I used, but I forgot. When I have more time, I will post a picture of those. I bought the package of bags at Target.
See that little heart on his chest......you just wait!...hehehehe!!!! (can you say new stuff coming our way????)
Monday, December 15, 2008
Isn't he cute???

This wasn't my original idea, that is for sure! Stampin' Up! demonstrated these Santas at Convention this past year. I wasn't fortunate enough to go, but I saw lots of pictures of them. They were mostly ornaments or several were put together to form a banner. I have been wanting to do one to decorate a gift bag for some time now.
 You will need to use your big shot cut a small pennant from the pennant die. His face is the scallop die. I used the scallops #2 die for the beard and his hat. His eyes and nose were circle punches.
Well...I am sorry this is very short today...I have a mountain of laundry to conquer. If I get a minute to create today...I'll be sure to post it for you :)
Happy Stampin'
Friday, December 12, 2008
Blogger's Challenge - week 77
Hi Stampers! This week's Blogger's Challenge was do make an ornament or home decor item. I have to admit, I have had NO time this week to create something that wasn't used for a class, club or camp so I am cheating a little. Don't get me wrong...I am not complaining, I just stretched myself a bit this week ;) I love doing this, so it makes it all worth it! :)
 The card base is baha breeze. We stamped it with the snowflakes from snow swirled. The white dots were added with a white gel pen. The sentiment is also from snow swirled. And there are those sparkly icicles....ooooo...i luv 'em! Oh yeah....the not quite navy piece was punched with the scalloped edge punch....how could I forget that??? The ornament hanger is made from the round tab punch and brushed silver card stock. We hung it with the silver elastic cord in the holiday mini catalog. Make sure to stock up on that good stuff before the end of the mini catalog.
Anyway, I am going to show you one of the things we made at our clubs this week. It is a card and an ornament all in one! Everyone loved the icicles across the top of the sentiment...it really does add to the card :)
 The card base is baha breeze. We stamped it with the snowflakes from snow swirled. The white dots were added with a white gel pen. The sentiment is also from snow swirled. And there are those sparkly icicles....ooooo...i luv 'em! Oh yeah....the not quite navy piece was punched with the scalloped edge punch....how could I forget that??? The ornament hanger is made from the round tab punch and brushed silver card stock. We hung it with the silver elastic cord in the holiday mini catalog. Make sure to stock up on that good stuff before the end of the mini catalog.
That is all I have for today....we have our Wrap it Up Stamp Camp tonight so I gotta finish getting ready for that.
If you attended all of the stamp camps this year you will be receiving a special gift from me! Wonder what it could be?????? hehehehe!!!!
Thursday, December 11, 2008
Gift Card Inspired
Hi Stampers!


Sorry for the lack of posts lately...I have been prepping for clubs and the gift bag and tag stamp camp tomorrow night all week. I was in my local Giant Eagle and was browsing the gift cards....and one from Bath and Body Works popped out at me! I didn't buy it...it was a $25 card, and I didn't need it...but I put the image in my little image bank in my head...lol! It was a plain white gift card with a grayish colored twig tree with a red bird on the branch. Do you know where I am going with this??? hehehe!!! That was it on the card other than the Bath and Body Works logo in red. So...we have a plain white card...grayish colored tree, red bird and red writing......soooooo.....

What do you think? This card was so simple, and I like it! I sure hope Season of Friendship makes it into the regular catalog....Stampin' Up! - are you reading this??!??!??!?! I did change up the inspiration though...I made a red card base.
The card base is real red. I stamped the snowflake from season of friendship in whisper white craft ink and heat set it with my heat tool. The main image is whisper white. I stamped the tree in sahara sand and the little bird in real red. I matted that onto sahara sand. I decided to do a "banner" type sentiment instead of stamping it onto the main image. I stamped it and cut a v into the one side. I adhered it to the main image panel with vintage brads on one end. For the wave in the middle, I stacked three stampin dimensionals on top of each other and then adhered the other end with a small piece of sticky strip. I mounted the entire main panel on stampin' dimensionals. Here is a better angle of the banner and the inside of the card.

What do you think? Sweet and simple, huh?
Well...back to work....I need to get a few things done today before taking the little one to lunch at Burger King to play in the play land with two of her cousins.
Tuesday, December 9, 2008
Holy Retirement Sale Dinah!!!!!
This will remain at the top of this blog....scroll down for newer posts!
Oh My!!! Stampin' Up! is remarkable!!! I had to pinch myself at the sale Stampin' Up! has put out with the retirement list!!!! Here is the run down:
1. From December 9-23 - RETIRED STAMPS ARE 10% OFF!!!!!
2. ALSO FROM DECEMBER 9-23 - SPEND $70 OR MORE- GET FREE SHIPPING!!!!!!
I had NO idea Stampin' Up was going to put such a sale in motion!!! This is unbelievable!!!! WOWZERS!!!!!
As if this sale isn't great enough.....I was already planning a ONE DAY SALE - Order three retiring sets - get the 4th one 50% off!!! (half off the lowest price set, not good on previously ordered sets.)
So if you combine all three ways to save today - you are in for a real bargain!
click HERE for the retirement list by page number
click HERE for the retirement list alphabetically
click HERE for the 10% off pricing sheet
Monday, December 8, 2008
Scrappin' Saturday 9 (on monday....)
Hi all!

The retirement list comes out tomorrow....and I am going to offer a ONE DAY SALE!!!! It will be tomorrow only so be sure to check back here to see the list and what the sale is!!!!
First off...let me say I had this Scrappin' Saturday done to the point it is now early last week....but I need to pull out my cd's to get the date for these pictures and haven't had the time to do that. I remember exactly that we took these pictures before church one day...she was in such a good mood...but I don't recall the exact date. So I will post this and do the journaling later. I have millions of things to do today so I will give brief details. sorry :(
The base is very vanilla. The solid paper is pink pirouette. The designer series papers are parisian summer. (so elegant) I cut the four large scallops on the left had side with the colluzzle ( a little measuring, a little pencil marking...and voila! scallops!). The flowers are cut with the flower layers die and the big shot. Their centers are buttons from the designer series buttons pack. I tied a piece of linen thread through the centers of the buttons and actually through the entire flower before adhering them to the page with pop up glue dots. The scallop circles around the pictures were made with the 3/16th inch corner rounder with the guard taken off after a circle is cut from the colluzzle. I also used my scalloped edge punch for the straight scalloped edges. My title was cut with my VERY neglected cricut machine. I have had mine for over 2 years and used it a handful of times...what a waste of money! I just don't get it out. oh well...here are the shots of these pages:


Friday, December 5, 2008
Blogger's Challenge - week 76
Hi All!
 The first thing we made at my last giftable stamp camp. It is a box made sort of like a pizza box with the top note die used for the lid and base! These were so fun to make! The sentiment stamp is from the country living set, only available until December 31st....you won't want to miss out on this one!
 My next thing in these colors is a home made bow. I have been working on holiday packaging and I whipped this up last night. It is from the frosty days designer series papers.
I have a really quick post this morning.
This week we were to do a color challenge. The colors were tangerine tango, bashful blue, kiwi kiss, close to cocoa and whisper white. Perfect colors for frosty day designer series papers!!!
 The first thing we made at my last giftable stamp camp. It is a box made sort of like a pizza box with the top note die used for the lid and base! These were so fun to make! The sentiment stamp is from the country living set, only available until December 31st....you won't want to miss out on this one!
 My next thing in these colors is a home made bow. I have been working on holiday packaging and I whipped this up last night. It is from the frosty days designer series papers.
**Retirement list is coming Tuesday! Be sure to check back here for the details! :)
Wednesday, December 3, 2008
A Sketchy Thank You
LOL!!! I have been up since 4:00 am....so bear with me. lol! I participated in today's online sketch challenge. I made a thank you card....hence, "a sketchy thank you"....oh my. Let's just get to it!
 I was working on a project with Parisian Summer designer series papers....such an elegant pack of paper. I had some scraps laying there and thought I will use one of the larger pieces for my card today. The card base is very vanilla. You can only see 1/8th of an inch on the front though. The designer series panels are a toile print from parisian summer, I told you they were very pretty papers! lol! I layed them with a thin mat of close to cocoa. Those three panels are adhered to pink pirouette. I then took the kraft taffeta ribbon and wrapped it around the layers and tied a bow instead of my usual knot. Then the whole panel was adhered to the card base. My sentiment comes from Say it with Scallops, the Ronald McDonald House Charity set. I really think this set is a must have for simple to put together cards. It was for me anyway. It was stamped with close to cocoa ink on very vanilla. I punched it with my square scallop punch and adhered it to the card with stampin' dimensionals. I bet you thought I wasn't going to use stampin' dimensionals, huh? I probably could not do a project without them.....I don't care for one dimension.....
 I was working on a project with Parisian Summer designer series papers....such an elegant pack of paper. I had some scraps laying there and thought I will use one of the larger pieces for my card today. The card base is very vanilla. You can only see 1/8th of an inch on the front though. The designer series panels are a toile print from parisian summer, I told you they were very pretty papers! lol! I layed them with a thin mat of close to cocoa. Those three panels are adhered to pink pirouette. I then took the kraft taffeta ribbon and wrapped it around the layers and tied a bow instead of my usual knot. Then the whole panel was adhered to the card base. My sentiment comes from Say it with Scallops, the Ronald McDonald House Charity set. I really think this set is a must have for simple to put together cards. It was for me anyway. It was stamped with close to cocoa ink on very vanilla. I punched it with my square scallop punch and adhered it to the card with stampin' dimensionals. I bet you thought I wasn't going to use stampin' dimensionals, huh? I probably could not do a project without them.....I don't care for one dimension.....
Hey! You didn't forget about the retirement list coming did you????? It comes out next Tuesday, the 9th of December! Hard to believe it is retirement time again!
Tuesday, December 2, 2008
Elegant Neutrals
Hi Stampers!
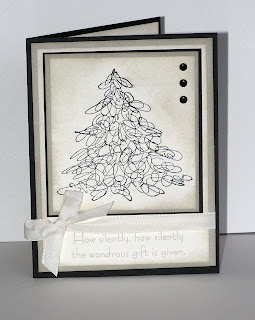 What do you think? Six layers???? Oh My!!
 Here is a closer look at that embossed tree...isn't it sparkly????
Guess what??? I was up still prepping for my big shot clubs Sunday and the kiddo was in my room watching tv and I thought.....maybe I could get a card in today! I cut and cut and cut for the big shot club (that is a hint for you clubbers....lol!) and then thought I need to get inky! So I pulled out some neutrals that were in the color challenge today and thought hummmmm..... what will I do with basic black, sahara sand and very vanilla?!??!?! That's why it is a challenge, huh? So I got to it......here is what I came up with!
 What do you think? Six layers???? Oh My!!
The main image is the beautiful tree from wonderous gift. I stamped it onto very vanilla with black craft ink. I then embossed it with irredescent ice embossing powder and my heat tool. I then sponged all around the tree with sahara sand leaving a halo of very vanilla around the tree. It is matted with sahara sand with sponged edges and then matted onto basic black. Next, I pulled out my matt pack and piercer to get the holes lined up for my black brads from the vintage pack of brads. That whole panel is mounted up on stampin' dimensionals onto the next three layers.
The sentiment, also from wonderous gift, is stamped in sahara sand onto very vanilla. That entire layer is sponged before layering onto sahara sand, which is also sponged. I took very vanilla tafetta ribbon and tied a bow very close to the sentiment, leaving room for the tree panel. I actually tied this box and then adhered the tree panel.
Now with cards that have a dark base...

this one is basic black....can't get any darker than that, huh? I cut a layer for the inside. wanna see that?
 Here is a closer look at that embossed tree...isn't it sparkly????
Don't forget about the retirement list....it comes out in one week!!! OH MY!!!!
Monday, December 1, 2008
Wow...I got to stamp...a little!
First, we have some business matters to tend to today. :)
3. Drum roll........

 The base is baja breeze. I stamped the door front tone on tone. I drew in some snow with my white gel pen and sketched in some of the bow with a real red stampin' write marker. I also colored in some decorations on the pine around the door. The sentiment is stamped with chocolate chip along the bottom. The designer series paper is from Ski Slope. I ran a piece of whisper white card stock that had been punched with the scallop edge punch along the bottom. I tied a piece of chocolate chip 1/4 inch grosgrain ribbon around the panel.
 Here is a closer look at the snow on the tree....I'm not sure if you can see....but i blinged up the snow and the red with dazzling diamonds and a two way glue pen. It really makes the card....bling!!!!
1. The last day for the Holiday Extravaganza is TODAY!!! Wow...what a sale??!?!?!
2. Today starts the sale in the Catalog Sampler. (Buy $20 in merchandise and get 20% off any stamp set in the sampler!!!)
3. Drum roll........

Can you believe it is retirement time already???? Oh My!!!
Well, I was up in my stamp room getting the project together for my Big Shot Clubs on Sunday and decided that I needed to whip out a card real quick! For you Big Shot club members....I sure hope you love what we are going to be doing this month!!! We are only doing one project instead of two....but it is a big one! Intrigued???? You will see on Sunday..... :)
So back to the card I got to whip out. I puled out my Home for Christmas set that has never seem air let alone ink. lol! I really wanted to watercolor it but I had the little one under toe and knew that wasn't going to happen easliy....or sanely, on my end! lol!
 The base is baja breeze. I stamped the door front tone on tone. I drew in some snow with my white gel pen and sketched in some of the bow with a real red stampin' write marker. I also colored in some decorations on the pine around the door. The sentiment is stamped with chocolate chip along the bottom. The designer series paper is from Ski Slope. I ran a piece of whisper white card stock that had been punched with the scallop edge punch along the bottom. I tied a piece of chocolate chip 1/4 inch grosgrain ribbon around the panel.
 Here is a closer look at the snow on the tree....I'm not sure if you can see....but i blinged up the snow and the red with dazzling diamonds and a two way glue pen. It really makes the card....bling!!!!
Subscribe to:
Posts (Atom)


