Hello All!!
I have a card to show you today! I fell IN LOVE with the dressed up line in the Spring Mini - I mean IN LOVE........and sadly to say this is the first thing I have cranked out with it
Wanna see?
A few things to note quickly - the skirt was made with the new 1 14/ inch two-tone ribbon in Pink Pirouette/Rose Red and the waist band is pink pirouette satin ribbon accented with a flower from the new 5/8" flower trim. LOVE THESE!!!!!
Here is a closer look at the dress-a-roo........
I would love to know what you think of this little gem!
Showing posts with label birthday. Show all posts
Monday, February 18, 2013
Tuesday, February 21, 2012
Back in the saddle again!!
Well - HELLO!!!
I have been so desperately wanting to get back at it, regularly. Life just seems to take over - with a vengence - lol! So, I decided to pull out the stops and go with the Create with Connie and Mary Challenge - what a great starting place! This week was a color challenge - check it out:
Wowzers - good fun, that combo, huh?!!???
My birthday card supply is getting depleated......so I wanted to do that theme. ;) Want to see what I did with it?
No? Ok - well......I guess we will chat later.
BAWAHAHHAAAAAA!!!!!!!
Just kidding! Here is what I did:
I did all of the coloring with stampin write markers. see?
I also had to "do up" the inside - lol!!!
Sorry to not put too much detail in this post - but I am in a New York rush.....living in Pennsylvania! HAHA!!!
Thanks for stopping by my little piece of blog-land!
I have been so desperately wanting to get back at it, regularly. Life just seems to take over - with a vengence - lol! So, I decided to pull out the stops and go with the Create with Connie and Mary Challenge - what a great starting place! This week was a color challenge - check it out:
Wowzers - good fun, that combo, huh?!!???
My birthday card supply is getting depleated......so I wanted to do that theme. ;) Want to see what I did with it?
No? Ok - well......I guess we will chat later.
BAWAHAHHAAAAAA!!!!!!!
Just kidding! Here is what I did:
I did all of the coloring with stampin write markers. see?
I also had to "do up" the inside - lol!!!
Sorry to not put too much detail in this post - but I am in a New York rush.....living in Pennsylvania! HAHA!!!
Thanks for stopping by my little piece of blog-land!
Labels:
birthday,
cards,
ccmc,
challenges
Tuesday, August 16, 2011
WOW! It has been a while........
I can't believe how long it has been since I was able to stamp something that I can share - and boy have I missed it!!! If you know me personally - you know that we hosted a baseball player for the summer from Colorado so we have been engulfed in his games -it has been a really fun summer - busy, but fun!! Well, he turns 21 on Sunday so I needed to whip him out a card to mail with his birthday gift. I have some serious stamper's block going on - awful! I have been stamping all summer, I made him a scrapbook of his season/summer here but not much cards unless it was for a class or club. So - you know I had to turn to a challenge........What better challenge that the Create with Connie and Mary challenge - this week was a sketch challenge. Wanna see????
Kind of feminine, I think....but I think I manned it up - wanna see what I did?
I know - I took some creative liberties here. I flipped the sketch.......took the three elements that would be at the top of the flipped sketch and put it at the bottom - one element instead of three.......please don't beat me.....pretty please.......
I am on a time crunch here- but I will tell you I am LOVIN' the new designer series paper, Well Worn. And the sentiment came from the hostess set, many birthday wishes. I adhered it to the new denim ribbon with a safety pin from trinkets. Oh Yeah - the denim ribbon.......I bet you are all thinking that it will be stiff....like blue jeans - it isn't.......so pliable. I am really liking it too. shocker, uh? LOL
Here is a closer look at the main image - the scallop circle is cut from the new pennant die.....a MUST have! I also inked the chipboard numbers with the not quite navy craft ink spot.
Everything on the card was roughed up and dirtied up - what do you think? Make sure to keep checking back - I am going to share his entire scrapbook with all of you. minus the sappy journaling at the end - LOL
Kind of feminine, I think....but I think I manned it up - wanna see what I did?
I know - I took some creative liberties here. I flipped the sketch.......took the three elements that would be at the top of the flipped sketch and put it at the bottom - one element instead of three.......please don't beat me.....pretty please.......
I am on a time crunch here- but I will tell you I am LOVIN' the new designer series paper, Well Worn. And the sentiment came from the hostess set, many birthday wishes. I adhered it to the new denim ribbon with a safety pin from trinkets. Oh Yeah - the denim ribbon.......I bet you are all thinking that it will be stiff....like blue jeans - it isn't.......so pliable. I am really liking it too. shocker, uh? LOL
Here is a closer look at the main image - the scallop circle is cut from the new pennant die.....a MUST have! I also inked the chipboard numbers with the not quite navy craft ink spot.
Everything on the card was roughed up and dirtied up - what do you think? Make sure to keep checking back - I am going to share his entire scrapbook with all of you. minus the sappy journaling at the end - LOL
Tuesday, June 28, 2011
I will "Awash" your Birthday with Flowers :)
Howdy All!!
I can't believe I finally got some time to stamp this week! I gotta tell you - I am going to start scheduling it in my calendar! Anyway - You know how it is - The Create with Connie and Mary Challenge rolls around every week.......and I love to participate in their challenges ;) So - of course when I get the chance to stamp and I haven't doen their challenge yet I must start there, right? hehehe...... This week was no exception. They are hosting a color challenge ove rthere this week - check it out:
Wow - that looks like summer, right? Summery flowers........bright summery flowers......I bet you know where I am headed here. ;) Wanna see?
Well? How did I do with that one? I had to add the accent of black - it just seemed to fit and it is a neutral, right? lol. Don't you just love that sentiment????? It is from the upcoming hostess set Happiest Brithday Wishes. Just wait until you check out the new hostess program starting with the new catalog - can I say - "Anyone want a BIG SHOT FOR HALF PRICE??????" Really - you just wait ;)
Sorry - off in dream land again......
Back to the task at hand. The flowers from Awash with Flowers were stamped with tangerine tango and tempting turquoise and then I stamped their outlines with black staz on. Hence - the addition of basic black :). The bottom strip of old olive was also stamped with a leaf image from the same set. I felt the bottom was missing a little pizzzazz - so I added three tempting turquois brads from the brights brad pack and lined them up with the mat pack and paper piercer - A STAPLE IN MY STUFF - lol. Wrap basic black satin ribbon around the panel and tie a simple knot and there you go - a birthday card front.
HOLD ON - I still think is is missing a little something........a little more blingage, perhaps???? Ok - take a closer look:
I added smooch ink to the flowers to bring them to sparkly life. you like?
Well - that about sums it up today. I have a full day of this and that to accomplish. lol Now, GO STAMP. ;)
I can't believe I finally got some time to stamp this week! I gotta tell you - I am going to start scheduling it in my calendar! Anyway - You know how it is - The Create with Connie and Mary Challenge rolls around every week.......and I love to participate in their challenges ;) So - of course when I get the chance to stamp and I haven't doen their challenge yet I must start there, right? hehehe...... This week was no exception. They are hosting a color challenge ove rthere this week - check it out:
Wow - that looks like summer, right? Summery flowers........bright summery flowers......I bet you know where I am headed here. ;) Wanna see?
Well? How did I do with that one? I had to add the accent of black - it just seemed to fit and it is a neutral, right? lol. Don't you just love that sentiment????? It is from the upcoming hostess set Happiest Brithday Wishes. Just wait until you check out the new hostess program starting with the new catalog - can I say - "Anyone want a BIG SHOT FOR HALF PRICE??????" Really - you just wait ;)
Sorry - off in dream land again......
Back to the task at hand. The flowers from Awash with Flowers were stamped with tangerine tango and tempting turquoise and then I stamped their outlines with black staz on. Hence - the addition of basic black :). The bottom strip of old olive was also stamped with a leaf image from the same set. I felt the bottom was missing a little pizzzazz - so I added three tempting turquois brads from the brights brad pack and lined them up with the mat pack and paper piercer - A STAPLE IN MY STUFF - lol. Wrap basic black satin ribbon around the panel and tie a simple knot and there you go - a birthday card front.
HOLD ON - I still think is is missing a little something........a little more blingage, perhaps???? Ok - take a closer look:
I added smooch ink to the flowers to bring them to sparkly life. you like?
Well - that about sums it up today. I have a full day of this and that to accomplish. lol Now, GO STAMP. ;)
Labels:
birthday,
cards,
ccmc,
challenges
Tuesday, June 21, 2011
Happiest Wishes!!
Hi All! wow - it has been a while, huh? Sorry about that - I have been busy getting things ready for my retirement party Wednesday and with life in general. I have really been neglecting the challenges over at Create with Connie and Mary - and boy have I missed doing them - so when I had a little time today to create - I headed straight over there. :) And this week, they are hosting a sketch challenge - take a peeky:
And I had to pull out my preorder goodies for the new catalog......I just had to.......hehehe...... Wanna see what I came up with today? Well - If you don't want to see - turn your head ;)
Don't you just {luv}} that new designer series paper???? It is from a new set called "Just Add Cake." There are some awesome patterns in that pack - I can't wait to get the chance to play some more with that. You recognize the cupcake stack on the tag element, right? It is from one of my favorites - Crazy for Cupcakes. The tag itself is from the Two Tags Die - another favorite and must have item in the 'ol collection. (I bet you are seeing a pattern forming here......lol!) And the blingage - yummo on the glimmer brads returning to the New Idea Book and Catalog!!! I added my two little somethings in the upper left hand corner instead of the lower right. like the picture, because I really felt my card needed some balance in that upper corner......let's call that - creative liberty ;) I love the little flowers adorned with a simple brad - cute, huh?
Oh - you are wondering where that stamp for the main sentiment and in the lower portion of the card are from????? Sorry - I was getting to that..... Both of those stamps are from a new upcoming hostess set, Happiest Birthday Wishes. Oh - the NEW hostess program - you are going to love it....that is all I am going to say - check back when the new catalog goes live to check it out....trust me, it is sooooo worth the wait. ;) Anyway, getting back to those stamps....the main one was stamped with poppy parade ink and punched with the 1 3/4 inch circle punch. And the scallop circle mat - that is from the pennant die.....so sad to see this retire - just for that scallop circle alone.......so get it while you can. The bottom of the card looks like it has been wheeled with a wheel, doesn't it??? Well, it hasn't. It is one stamp that I stamped repeatedly across the bottom with wild wasabi classic ink. This is one of the awesome benefits of the clear mount stamps - I was able to stamp that without having to use my stamp a ma jig. Of course, the same effect could be achieved with wood mount stamps and the stamp a ma jig - I just got to skip that step. A simple bow of poppy parade ribbon completes the front of the card.
I also had to pretty up the inside, as well. I had to....... hehehe
I started with a whisper white base and then added some stamps, designer series paper and voila - a cute card center. well, at least I think it is cute - nothing like tooting my own horn, huh? lol!!!
Let me know what you think. I honestly had a hard time not ripping, tearing, sponging, distressing, etc.....but I think I pulled it off.....or maybe not ;)
And I had to pull out my preorder goodies for the new catalog......I just had to.......hehehe...... Wanna see what I came up with today? Well - If you don't want to see - turn your head ;)
Don't you just {luv}} that new designer series paper???? It is from a new set called "Just Add Cake." There are some awesome patterns in that pack - I can't wait to get the chance to play some more with that. You recognize the cupcake stack on the tag element, right? It is from one of my favorites - Crazy for Cupcakes. The tag itself is from the Two Tags Die - another favorite and must have item in the 'ol collection. (I bet you are seeing a pattern forming here......lol!) And the blingage - yummo on the glimmer brads returning to the New Idea Book and Catalog!!! I added my two little somethings in the upper left hand corner instead of the lower right. like the picture, because I really felt my card needed some balance in that upper corner......let's call that - creative liberty ;) I love the little flowers adorned with a simple brad - cute, huh?
Oh - you are wondering where that stamp for the main sentiment and in the lower portion of the card are from????? Sorry - I was getting to that..... Both of those stamps are from a new upcoming hostess set, Happiest Birthday Wishes. Oh - the NEW hostess program - you are going to love it....that is all I am going to say - check back when the new catalog goes live to check it out....trust me, it is sooooo worth the wait. ;) Anyway, getting back to those stamps....the main one was stamped with poppy parade ink and punched with the 1 3/4 inch circle punch. And the scallop circle mat - that is from the pennant die.....so sad to see this retire - just for that scallop circle alone.......so get it while you can. The bottom of the card looks like it has been wheeled with a wheel, doesn't it??? Well, it hasn't. It is one stamp that I stamped repeatedly across the bottom with wild wasabi classic ink. This is one of the awesome benefits of the clear mount stamps - I was able to stamp that without having to use my stamp a ma jig. Of course, the same effect could be achieved with wood mount stamps and the stamp a ma jig - I just got to skip that step. A simple bow of poppy parade ribbon completes the front of the card.
I also had to pretty up the inside, as well. I had to....... hehehe
I started with a whisper white base and then added some stamps, designer series paper and voila - a cute card center. well, at least I think it is cute - nothing like tooting my own horn, huh? lol!!!
Let me know what you think. I honestly had a hard time not ripping, tearing, sponging, distressing, etc.....but I think I pulled it off.....or maybe not ;)
Labels:
big shot,
birthday,
cards,
ccmc,
sneak peeks
Thursday, June 2, 2011
I'm sailing away.......
Set an open course for the Virgin Sea.
'Cause I've got to be free......
Free to face the life that's ahead of me.
That has to be one of my ALL time favorite Styx songs - ever! If you are familiar with it -keep humming away as you read along. :)
I have a little goodnesss to share with you today......and it all began with a sketch. I know - shocked, right? Me starting with a sketch or color challenge.....I can't help myself....that is what inspires me. you should try it out sometime......hehe
Anyway - back to my little creation for the day. The sketch originated with the Create with Connie and Mary Summer Edition. They offer up the best challenges. Head over and check it out. Here is the sketch:
Now I know you are probably wondering what stamp set I used for this little baby.....When I saw the sketch - I IMMEDIATELY thought to use Open Sea......but all of you are probably tired of my obsession with the nautical stuff.....so I sat on the sketch for a few days and couldn't get my mind to bend from my original vision.....so I stopped fighting it and went for it. What do you think?
I adore "dirty" cards. do you? The stamps are all from Open Sea except the sentiment with is from All Holidays, which is on the retirement list.....WHAT??? I love this set - it covers just about All Holidays.....get it? i couldn't help myself...... I just can't believe it is retiring :( The designer series paper is from the mini catalog as well - Nautical Expedition and the baker's twine....oh how I love the baker's twine........ wanna take a closer look at the ship? If you don't, turn your head because I am about to show you:
And I just couldn't resist the inside:
Well- that about sums it up for the day - let me know what you think - i {{luv}} comment love.....lol!!
'Cause I've got to be free......
Free to face the life that's ahead of me.
That has to be one of my ALL time favorite Styx songs - ever! If you are familiar with it -keep humming away as you read along. :)
I have a little goodnesss to share with you today......and it all began with a sketch. I know - shocked, right? Me starting with a sketch or color challenge.....I can't help myself....that is what inspires me. you should try it out sometime......hehe
Anyway - back to my little creation for the day. The sketch originated with the Create with Connie and Mary Summer Edition. They offer up the best challenges. Head over and check it out. Here is the sketch:
Now I know you are probably wondering what stamp set I used for this little baby.....When I saw the sketch - I IMMEDIATELY thought to use Open Sea......but all of you are probably tired of my obsession with the nautical stuff.....so I sat on the sketch for a few days and couldn't get my mind to bend from my original vision.....so I stopped fighting it and went for it. What do you think?
I adore "dirty" cards. do you? The stamps are all from Open Sea except the sentiment with is from All Holidays, which is on the retirement list.....WHAT??? I love this set - it covers just about All Holidays.....get it? i couldn't help myself...... I just can't believe it is retiring :( The designer series paper is from the mini catalog as well - Nautical Expedition and the baker's twine....oh how I love the baker's twine........ wanna take a closer look at the ship? If you don't, turn your head because I am about to show you:
And I just couldn't resist the inside:
Well- that about sums it up for the day - let me know what you think - i {{luv}} comment love.....lol!!
Labels:
birthday,
cards,
ccmc,
challenges,
masculine
Tuesday, March 29, 2011
WELL - I really struggled with this one :)
Hi All!
I have been pondering the sketch challenge presented over at Create with Connie and Mary all week.....I don't usually do that to be honest. It is such a sweet sketch.....and a clean lined sketch....which is where my struggle came in, I guess. lol! wanna see it?
See? I told you it was a sweet, clean lined sketch. I guess I do piles of stuff better than clean....like my housekeeping - just ask my hubby - HAHA!!!!! Well - here is what I came up with
I must confess - this is my second card for this challenge. My original idea of a sympathy sentiment and cut out flowers flanking that with sponging and wrinkly texture in the flowers didn't make the cut. I looked at it and said - boy that is U.G.L.Y. If I ever get the courage - I will share that with you...but don;t hold your breath, if you know what I mean.
I do like how this one turned out. I have a hard time with too much open space....are there any shrinks out there can decifer all of this? lol!!! It is all tying together as I type it out :) hehehehe.......
The designer series paper is from Playdate - love it! The sentiment, from play on words (??), was inked up with stampin write markers and stamped onto shimmer white card stock. I flanked the sentiment with designer label punches - also from playdate. I adorned that with two tempting turquoise buttons from the brights button collection and chocolate chip thread.
WHAT?????
Did I say "chocolate chip thread?" Yep - but I didn't mean it....I was seeing if you were paying attention to me...lol! I took two slivers of chocolate chip card stock and threaded them through the buttons and secured it with mini glue dots. See?
Well....after all of the screaming and stomping on the card that is in the crap pile - I sure could use soem lovin' from all you fellow stampers.....we have all been "there" - right? lol! Maybe it is only me .......
I have been pondering the sketch challenge presented over at Create with Connie and Mary all week.....I don't usually do that to be honest. It is such a sweet sketch.....and a clean lined sketch....which is where my struggle came in, I guess. lol! wanna see it?
See? I told you it was a sweet, clean lined sketch. I guess I do piles of stuff better than clean....like my housekeeping - just ask my hubby - HAHA!!!!! Well - here is what I came up with
I must confess - this is my second card for this challenge. My original idea of a sympathy sentiment and cut out flowers flanking that with sponging and wrinkly texture in the flowers didn't make the cut. I looked at it and said - boy that is U.G.L.Y. If I ever get the courage - I will share that with you...but don;t hold your breath, if you know what I mean.
I do like how this one turned out. I have a hard time with too much open space....are there any shrinks out there can decifer all of this? lol!!! It is all tying together as I type it out :) hehehehe.......
The designer series paper is from Playdate - love it! The sentiment, from play on words (??), was inked up with stampin write markers and stamped onto shimmer white card stock. I flanked the sentiment with designer label punches - also from playdate. I adorned that with two tempting turquoise buttons from the brights button collection and chocolate chip thread.
WHAT?????
Did I say "chocolate chip thread?" Yep - but I didn't mean it....I was seeing if you were paying attention to me...lol! I took two slivers of chocolate chip card stock and threaded them through the buttons and secured it with mini glue dots. See?
Well....after all of the screaming and stomping on the card that is in the crap pile - I sure could use soem lovin' from all you fellow stampers.....we have all been "there" - right? lol! Maybe it is only me .......
Labels:
birthday,
cards,
ccmc,
challenges
Wednesday, February 16, 2011
Sale A Brate! Sale A Brate!
Dance to the music! Sale A Brate! Sale A Brate! Dance to the music!
HI All!!
Guess what???? I had a little stamping time this week. My daughter has a birthday party this weekend - so I decided to stamp up a little goodness for her. I already had in my mind that I wanted to stamp out a sentiment in rainbow fashion, so I pulled out the FREE sale a bration set, So Happy for You. Can you get over the FREE goods that we can select from out of this year's Sale A Bration catalog????? Oh MY!!!!
To get my mojo flowing, I pulled out the mojo monday sketch for the week. Wanna take a look at that?
HI All!!
Guess what???? I had a little stamping time this week. My daughter has a birthday party this weekend - so I decided to stamp up a little goodness for her. I already had in my mind that I wanted to stamp out a sentiment in rainbow fashion, so I pulled out the FREE sale a bration set, So Happy for You. Can you get over the FREE goods that we can select from out of this year's Sale A Bration catalog????? Oh MY!!!!
To get my mojo flowing, I pulled out the mojo monday sketch for the week. Wanna take a look at that?
BUT - my rainbow sentiment wasn't going to fit that sketch......SO - I flipped it. See??
The card base is real red. The sentiment panel was stamped with real red, tangerine tango, daffodil delight, wild wasabi, pacific point and rich razzleberry. I backed that panel with basic black. The whisper white circle was cut with my big shot and the new 3 inch circle die in the Occassions Mini. I used the scallop- circle die and the pacific point designer series paper to back it with. I decided to "pump" up the three brads in the circle with the flower stamp, also from So Happy for You, in tangerine tango. I used black brads for the flower centers. Tie a bow with daffodil delight satin ribbon - adhere the sentiment panel with stampin' dimensionals and Voila! A birthday card.
A have another project to share with you using the Sew Suite collection that I am in love with...be sure to keep checking back within the next couple of days to see it.
Now - Go Stamp! ;)
Labels:
big shot,
birthday,
cards,
challenges,
mojo monday
Monday, January 24, 2011
Another year better......
HI All!!
i was able to whip up a little eye candy for you this morning.....but i have to keep this super quick.
isn't that sweet? i {luv} the newsprint designer series paper......{{luv}}
something to note about that flower:
the first two layers in the front are from the new fun flowers bigz die in the mini and the back layer of petals are punched from the new blossoms petal punch, also from the new mini. I had to wrinkle them up before adhering them together with an antique brad.
i was able to whip up a little eye candy for you this morning.....but i have to keep this super quick.
we will get right to it:
isn't that sweet? i {luv} the newsprint designer series paper......{{luv}}
something to note about that flower:
the first two layers in the front are from the new fun flowers bigz die in the mini and the back layer of petals are punched from the new blossoms petal punch, also from the new mini. I had to wrinkle them up before adhering them together with an antique brad.
cardstock: sahara sand, baja breeze, basic grey, newsprint dsp
ink: basic grey, sahara sand
stamps: growing green, bring on the cake
accessories: antique brads, very vanilla seam binding ribbon, big shot, fun flowers die, blossoms petal punch, framed tupils embossing folder
Thursday, January 13, 2011
oh - sweet cupcake!!
Hi Stampers!!
I busted out a little cutie for you today! I took my inspiration from cupcake wars that I watched the other night. The cupcake was green tea flavor with a fondant cherry blossom on top - looked pretty - don't think the flavor would be that great though. Wanna see?
The card base is soft suede - are you feeling the love I have for soft suede? lol!! I punched three flowers out of soft suede and adhered them down to give a "faux" dry emboss look. Can you see that in the picture?
Wanna closer look at that adorable cupcake that was punched with the build a cup cake punch?? How genius is this combo in a stamp set/punch????
Gotta run.....chat with you later ;)
Wednesday, August 25, 2010
Live, Laugh & Love......
......Love me do! You know I {luv} u!.....I'll always be true......so, pleeeeeeease......Love THIS too!!!
Oh my....with all of the Beetle talk yesterday on a show I was watching about their top 100 songs.....I just could not resist!
****warning!!!! This is a very long post.......
GUESS WHAT?!?!??!
Did you guess yet???
I have a tutorial for you today!!! And a cute card to show you - if I may toot my own horn........lol!
Let's start with the card, shall we?
The starting point for this was a sketch challenge. The area that has my sentiment in it is actually supposed to be a separate panel....but.....I went my own way.....surprised?
I didn't think so! lol!!!
The card base is tempting turquoise. The main panel is whisper white, that I embossed with the square lattice embossing folder....and then there is that area that I didn't emboss.......we'll get to that later in this post :)
The whisper white is matted with old olive. The Island Oasis designer series paper really popped against the whisper white. I layered it with a torn panel of daffodil delight - not afternoon delight.....my head keeps going into song with every paragraph I type.....what in the H$!) is wrong with me????? I have a splitting head ache that I can't take anything for because of another medicine I am on.......maybe the rheumatologist doesn't get it that I need a handful of ibuprofen every now and then!?!?!?!?!???!?!!!!!
Oh - I got off track there a bit, huh? Sorry :)
Here is a closer look at some of the sweet goodness.....
The sentiment is from On Your Birthday. I inked it up with Stampin' Write Markers and used my stamp a ma jig to line it up exactly where I wanted it. I made a "frame" around the sentiment with a rose red stampin' write marker to break up the embossed/not embossed areas. And that cone - Isn't it the sweetest thing you have seen since your morning cereal?? The stamp set Sweet Scoops and the designer series paper, Island Oasis, will be RETIRING at the end of this month......do NOT let these babies slip right past you! The cone was inked up with crumb cake and then I edged it up with soft suede. This is what you get from the second stamping of it without reinking. The ice cream is also the second stamping of peach parfait edged up with tangerine tango. And the dazzling diamonds just adds the right amount of pizzazz to it, don't you think? Boy - I sure am big headed today, uh???? And then an accent of a bright button tied with white crochet thread off sets the cone a bit.
And then there is the inside to deal with......
Simple, but enough to add a cohesive feel to the card.
ALL RIGHT ALREADY!!!! I will get to the tutorial now.......
Here is what you will need to gather up: big shot, embossing folder, one cutting plate, the multipurpose platform, a piece of longboard chipboard, cutting mat, hobby blade, ruler, pen....and of course a piece of card stock.
First, cut a piece of longboard chipboard to 4 1/4 x 5 1/2. (this will create a template that is the same size as a card front, making it easier to line up)
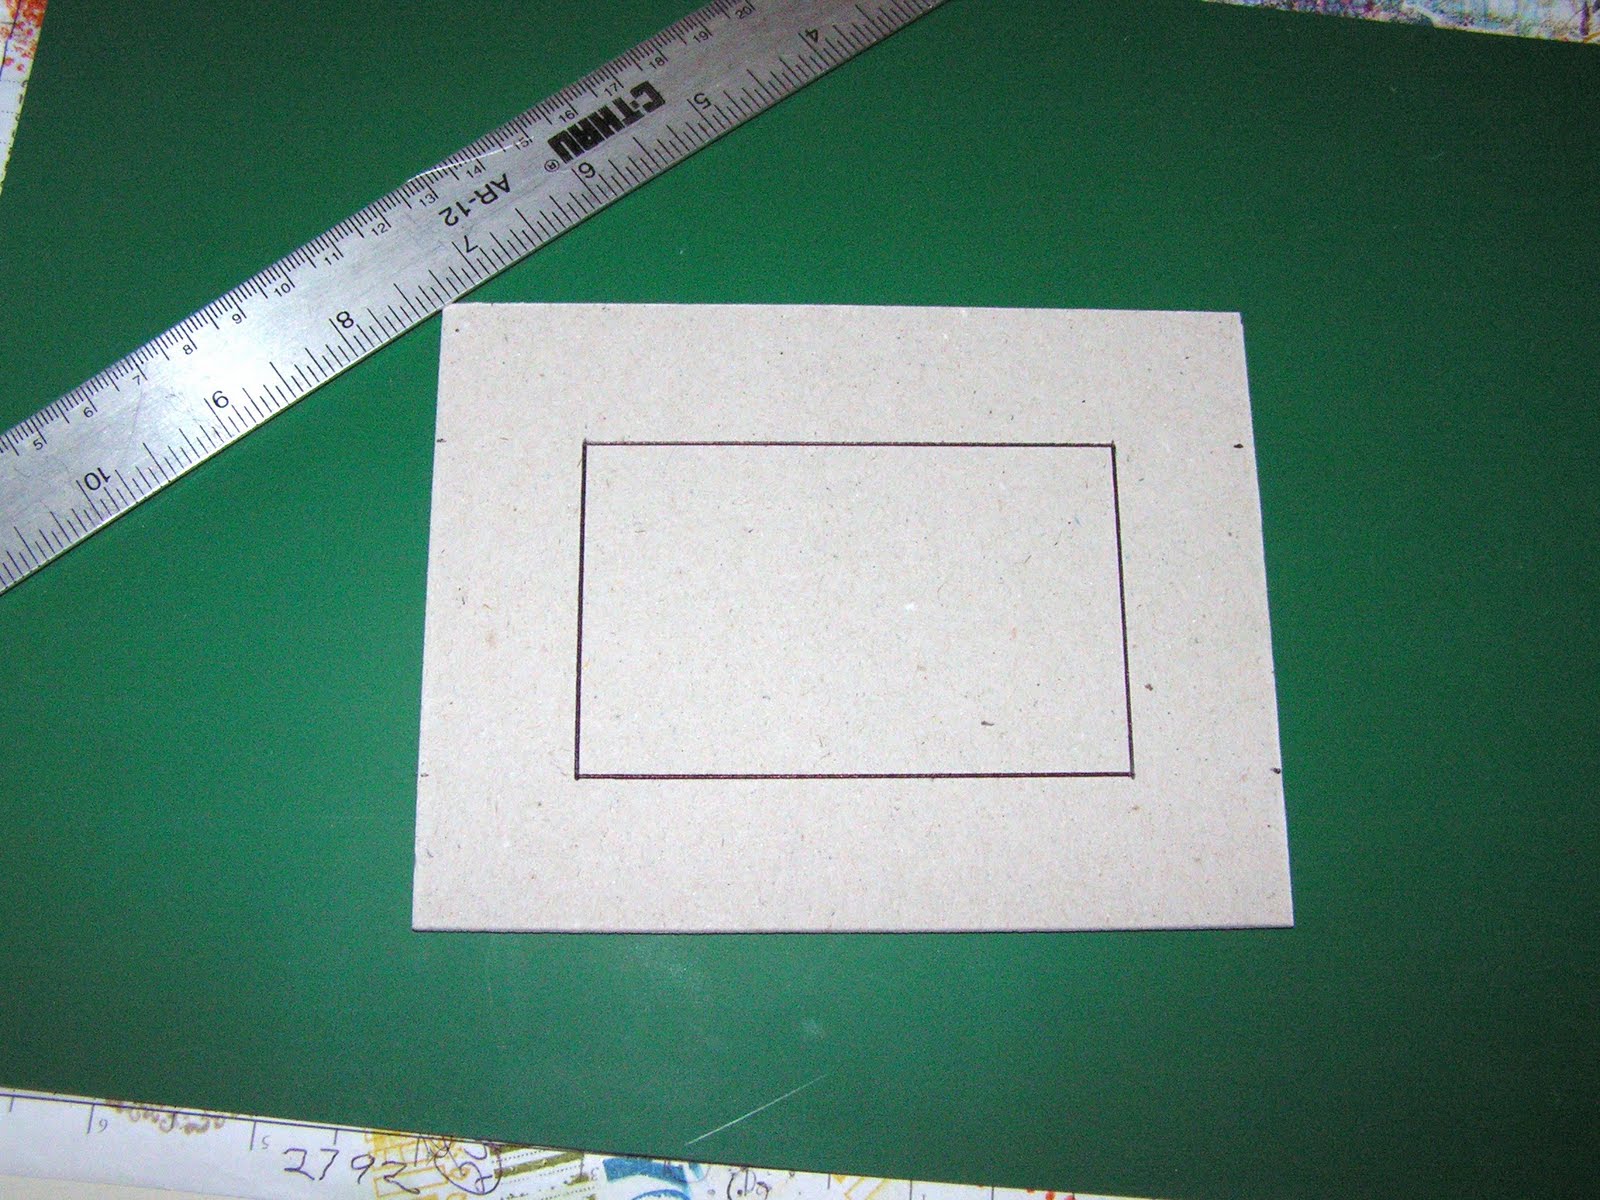
Second, draw out a window in the center of the chipboard piece. (I made a rectangle one inch smaller than the template - being careful to center it)
Third, cut out the window with your hobby blade. And do not throw this piece of chipboard away - you will be able to use it for something else :)
Oh my....with all of the Beetle talk yesterday on a show I was watching about their top 100 songs.....I just could not resist!
****warning!!!! This is a very long post.......
GUESS WHAT?!?!??!
Did you guess yet???
I have a tutorial for you today!!! And a cute card to show you - if I may toot my own horn........lol!
Let's start with the card, shall we?
The starting point for this was a sketch challenge. The area that has my sentiment in it is actually supposed to be a separate panel....but.....I went my own way.....surprised?
I didn't think so! lol!!!
The card base is tempting turquoise. The main panel is whisper white, that I embossed with the square lattice embossing folder....and then there is that area that I didn't emboss.......we'll get to that later in this post :)
The whisper white is matted with old olive. The Island Oasis designer series paper really popped against the whisper white. I layered it with a torn panel of daffodil delight - not afternoon delight.....my head keeps going into song with every paragraph I type.....what in the H$!) is wrong with me????? I have a splitting head ache that I can't take anything for because of another medicine I am on.......maybe the rheumatologist doesn't get it that I need a handful of ibuprofen every now and then!?!?!?!?!???!?!!!!!
Oh - I got off track there a bit, huh? Sorry :)
Here is a closer look at some of the sweet goodness.....
The sentiment is from On Your Birthday. I inked it up with Stampin' Write Markers and used my stamp a ma jig to line it up exactly where I wanted it. I made a "frame" around the sentiment with a rose red stampin' write marker to break up the embossed/not embossed areas. And that cone - Isn't it the sweetest thing you have seen since your morning cereal?? The stamp set Sweet Scoops and the designer series paper, Island Oasis, will be RETIRING at the end of this month......do NOT let these babies slip right past you! The cone was inked up with crumb cake and then I edged it up with soft suede. This is what you get from the second stamping of it without reinking. The ice cream is also the second stamping of peach parfait edged up with tangerine tango. And the dazzling diamonds just adds the right amount of pizzazz to it, don't you think? Boy - I sure am big headed today, uh???? And then an accent of a bright button tied with white crochet thread off sets the cone a bit.
And then there is the inside to deal with......
Simple, but enough to add a cohesive feel to the card.
ALL RIGHT ALREADY!!!! I will get to the tutorial now.......
Here is what you will need to gather up: big shot, embossing folder, one cutting plate, the multipurpose platform, a piece of longboard chipboard, cutting mat, hobby blade, ruler, pen....and of course a piece of card stock.
First, cut a piece of longboard chipboard to 4 1/4 x 5 1/2. (this will create a template that is the same size as a card front, making it easier to line up)
Second, draw out a window in the center of the chipboard piece. (I made a rectangle one inch smaller than the template - being careful to center it)
Third, cut out the window with your hobby blade. And do not throw this piece of chipboard away - you will be able to use it for something else :)
Now what is cool about this embossing template is you can lay your stamps in the window to see how they will fit :)
Now you are ready to be a big shot!!! {hit me with your big shot......come on - hit me with you big shot......} - told you!!
The sandwich layer from bottom to top is:
multipurpose platform on tab 2 (nothing open) - chipboard template - embossing folder with card stock in it, centered onto the chipboard template - cutting plate.
Run that baby through the big shot and you get this!!!!
Well?????? How did I do?
If you liked this tutorial - let me know......leave some love in the comment section.....i won't bite ;)
Thursday, July 8, 2010
When in doubt.....CASE!!
I couldn't get my mind off of the sample on page 115 of the Idea Book and Catalog that used the new set, homegrown. I don't have that set, yet......., but I knew I could CASE (copy and share everything) it using one of my favorite new sets, Friends Never Fade. You know...the best source of inspiration is already in your hands.....or it should be ;)....the Idea Book and Catalog!!! So - I went to work!
How did I do?
The card base is crumb cake (i {luv} that name....). I stamped the flower image from Friends Never Fade in the new crumb cake classic ink and then took that baby to my color catcher and smooched it with my log cabin smooch spritz.
The main image panel started out as confetti white. I first embossed the flower image with clear embossing powder and then stamped the same flower with stamped off early espresso ink around it. Next, I stamped the A to Z background stamp in early espresso. Next - I "funned" the image up by sponging some color on the embossed flower. I couldn't go on with out getting a little dirty....now could I? ;) I sponged crumb cake ink on the edges and lightly in the center. Next, it got matted with chocolate chip and pear pizzazz card stock. How about a closer look??
The horizontal panel is a strip of greenhouse gala designer series paper matted with a strip of baja blue. I attached two white buttons from the Neutrals button collection with linen thread. I wanted to pull some of the orange color up into that panel so I cut a thin strip of tangerine tango and trimmed the edges before adhering to the entire panel. My sentiment is from Perfect Punches. I stamped it twice. The back layer was punched with the wide oval punch and the front layer was punched with the large oval punch.
I would love to know what you think of today's card.....I have a scrapbook layout to share with you tomorrow :)
Click to keep going on the tour :)
How did I do?
The card base is crumb cake (i {luv} that name....). I stamped the flower image from Friends Never Fade in the new crumb cake classic ink and then took that baby to my color catcher and smooched it with my log cabin smooch spritz.
The main image panel started out as confetti white. I first embossed the flower image with clear embossing powder and then stamped the same flower with stamped off early espresso ink around it. Next, I stamped the A to Z background stamp in early espresso. Next - I "funned" the image up by sponging some color on the embossed flower. I couldn't go on with out getting a little dirty....now could I? ;) I sponged crumb cake ink on the edges and lightly in the center. Next, it got matted with chocolate chip and pear pizzazz card stock. How about a closer look??
The horizontal panel is a strip of greenhouse gala designer series paper matted with a strip of baja blue. I attached two white buttons from the Neutrals button collection with linen thread. I wanted to pull some of the orange color up into that panel so I cut a thin strip of tangerine tango and trimmed the edges before adhering to the entire panel. My sentiment is from Perfect Punches. I stamped it twice. The back layer was punched with the wide oval punch and the front layer was punched with the large oval punch.
I would love to know what you think of today's card.....I have a scrapbook layout to share with you tomorrow :)
Click to keep going on the tour :)
Monday, June 7, 2010
My Monday Mojo was inspired by my vacation.....
While I was on a Disney shuttle bus going - who remembers where???? - but what I do remember was a beautiful pinkish/purplish sunset. I wasn't in a position to take any pictures of it....I was in a bus driven by a road racer....lol!! Not to mention the Disney balloon stickers on the outside of the windows :) So needless to say, I have been dying to get this sunset on paper for a few weeks now. So today was the perfect time to "git 'r done!" Oh my....sorry, I don't know where that came from!! LOL!!!!
Here is the Mojo Monday sketch for the week:
Here is what I did with it:
I hope that I am not banned from Mojo Monday sketch challenges since I made my focal image larger than I was supposed to :)
pretty. huh? not to toot my own horn :)
We'll start with the base and work forward, shall we??
The base is rich razzleberry. I stamped the "birthday wishes" sentiment from wow flowers ( retiring June 30th) in basic black. The next panel up is soft suede embossed with the square lattice embossing folder and the big shot. I then lightly sponged all over with basic black. There is a torn layre peeking out from the bottom only. The next set of layer up started with pretty in pink. I stamped rich razzleberry and regal rose flowers all over in a random pattern. I then took the palm branch leaf and stamped all over in pretty in pink. I then sponged all of the edges with soft suede and then basic black. I matted the entire panel with basic black.
Now for the main image panel. I must warn you.....don't even try to case it if you don't want to get inky!! I fingers were a mess - I had to keep wiping them off. lol! It started as a piece of confetti white card stock. I punched a 1 1/4 inch circle out of a piece of scrap paper and applied it to my card stock with dotto adhesive. {luv} that stuff - totally removeable!! I then tore a piece of scrap paper and applied it over the entire sky leaving only the ground exposed. I sponged it with soft suede. I then removed that scrap paper, leaving only my circle on. ok.....ready for this????
sponged along the horizon with pretty in pink....and sponged some more :)
then sponged some regal rose into the pretty in pink to blend the sky
the sponged with perfect plum down into the sunset.
the came the rich razzleberry sponging.....sponge and sponge some more until i was happy with the blending.....
ok....not that I am hapy with that....I took so saffron and sponged into the horizon line. I pulled off the circle and the white was TOO STARK!! So, I sponged lightly with so safforn to tone it down a bit.
I then stamped the palm trees and leave branch in the foreground with basic black. Did you notice the palm trees are bent in two different directions???? NO?? Well....take a look again:
Now do you see it?? Well....with clear mount rubber stamps, you can manipulate htem a bit and change direction of things. Another thing I love about my clear mount stamps - Thanks Stampin' Up!!
To finish that panel off, I sponged around the outside with soft suede and then basic black. Then, it had to be matted with basic black, right?? hehe!! The ribbon treatment is 5/8th inch regal rose grosgrain ribbon with soft suede polka dot (turned over) adhered over it. They are held to my main image panel with balck brads form the vintage collection.
I replaced the circle image in the sketch wth some flowers that I stamped tone on tone and then sponged the edges with basic black. Then I gave them some black brad flower centers before adhereing them down. Did you notice the dimension of the flowers????
Come on poeple!!!! Don't be afraid to bend that card stock!!!! Flowers aren't flat in nature.....right??
Well.....what do youthink?
Labels:
big shot,
birthday,
cards,
challenges,
mojo monday,
tutorials
Subscribe to:
Posts (Atom)