Friday, October 31, 2008

Blogger's Challenge - week 71

Hi Stampers!!

This week's blogger's challenge was Halloween. Fitting, huh??? lol!

As I mentioned before, my daughter is on a pee-wee bowling league. Unlike regular bowling leagues, the kiddos do not rotate lanes or the teams they bowl with. It isn't that competitive, thank goodness! My little one has always bowled on lane 1, which is a good thing....a wall on one side makes half of the distractions. LOL!!! Anyway...wondering where I am going here???? I always try to make some kind of treat for her team on the team on lane 2 for the Holidays.

I found these little cups at wal-mart 5/$1.00....what???..... .20 cents each???? I had to get them! I was pondering many ways to give them a halloween treat...this solved that problem! So I bought these cups and filled them with candies. The one little boy on lane 2 has a little brother that doesn't bowl. I doubt he eats candy yet, my daughter didn't at that age....so I made him a treat cup with animal crackers and stuff like that.

Aren't they cute? I was happy how they turned out. I made a personalized tag for each one.

I started with a layer on whisper white and stamped "to: from:" from the Holiday Collection Artwork stamp set that will be in the Country Living Promotion beginning in November. I stamped it in pumpkin pie. I also stamped Happy Halloween from All Holidays in pumpkin pie. I layered the tag with pumpkin pie as well. I punched the two top corners with the tag corner punch. Did you happen to see the bat on the tag????

I made that out of punches to coordinate with the little bats on the cup. The body is a 1 1/4 circle punch. The ears are one point from the large star punch. I colored the eyes on with a white gel pen. The wings are a large oval punch. I then punched one edge of the oval punch with the 1/2 inch circle punch to create the wings. I adhered it all together with tombo momo multi adhesive and mounted it on stampin' dimensionals to the tag. I punched a hole in the top of the tag with the 1/4 circle punch. The cup is in a cello bag. I wrapped black polka dot ribbon around it and through the hole in the tag to tie a bow. The ribbon isn't stampin' up....I have no idea who is the manufacturer....I had it in my ribbon box, off the spool.

Happy Halloween to each of you!!!!

Wednesday, October 29, 2008

I got to stamp.....Just for fun!!!

Hi Stampers!!!

I got to stamp a little this morning,just for my pleasure. So I pulled out today's online sketch challenge. Doesn't it look fun???? I really liked the three square elements.


Wanna see my take on this layout?


But, before I got to stamp....My daughter saw the snow!!! She said she had to go out and eat some! Gross, huh? oh well..... So we bundled up and went out so she could frolic in it. Yes...at 7:30 in the morning...we are outside tossing snow around!!!! She threw a few snowballs...ate a few snowballs....tried to catch some flakes...and just plain walked around in it! She doesn't even have her winter boots yet...we just put on her mud boots and had at it!


Even though I liked the square elements...I used round!!! LOL!!! My card base is kiwi kiss. The bottom panle is from the Patterns Designer Series Papers in Riding hood Red. I won an assortment of 6x6 designer series papers from my up-up-up-upline, Janet Wakeland, and this is where this paper came from. I recently offered a 6x6 assortment of designer series papers with a purchase at a stamp camp because I loved getting this package myself. It gave me an opportunity to use papers that I don't have...yet! ;) lol!

My sentiment is from Cardinal Christmas and it was stamped with chocolate chip ink. I wrapped riding hood red satin ribbon around the edge of the designer sreies paper and tied it in a simple knot with a snipit of the double sided satin ribbon - kiwi kiss/vanilla. I love the edges on both of these ribbons!!!

My deer friends medallions are four layers thick. Starting in the back: a chocolate chip scallop circle from the scallop circle punch; a kiwi kiss 1 3/8 inch circle punch; deer friends stamp, from dear friends, stamped in riding hood red and punched with the 1 1/4 circle punch; next is the same stamp in chocolate chip punched with the 1 inch circle punch. I mounted up the chocolate chip deer on stampin' dimensionals. To add a little sparkle, I used my tombo mono multi adhesive to adhere some red chunky glitter to the nose. It is more sparkly in real life.


Don't you just love this little stamp??? The deer is soooo cute!! If you would like 2 chances to win this stamp set...register for my giftable stamp camps. I will be giving away one at each camp!!!

Tuesday, October 28, 2008

I'm cleaning out!!!

THIS POST WILL REMAIN AT THE TOP FOR A WHILE....PLEASE SCROLL DOWN FOR NEWER POSTS!!!

Here is a list below of what I have put aside to sell out of my craft space. If you are long distance, I ship flat rate priority only. Depending on your order, I will ship in the smallest size flat rate available to me. If you are local and can pick your order up - great!! No Shipping for you :)

$40 Cuttlebug machine and cutting plates - hardly used
$20 Original Sizzix red die cutting machine, cutting plate used
$15 Sizzix sidekick - red, no cutting plates but can be bought for about $3 at craft stores


Here is a list of Stampin' up goodies:
N/UM- new, unmounted
N - new, mounted
M - mounted
$15 - stamp set from Simply Sent Remembering You - mounted
$15 Stampin' Up! Pure Color pencils - new, not used
$10 Birthday Whimsey N/UM - have 2
$10 So Very, N/UM
$15 Event Full, N/UM
$15 From the Garden, N/UM - have 2
$20 Cause for Celebration N/UM
$10 Lots of Thoughts, N/UM - have 4
$10 Sprintime Stems N/UM
$25 Time Well Spent N/UM
$25 Office Accoutment - minor staining on one wood block
$20 Serene Sunflower - minor rubber staining
$7 Birthday Best - minor rubber staining
$8 Petite Patterns, N/M
$8 Fresh Fillers
$15 Polka Dots and Petals
$13 Circle of Friendship
$10 Fun Filled
$15 Polka Dots and Paisley
$12 Flannel Plaid Background stamp
$10 Soft Swirls Background Stamp - no box
$18 In My Thoughts - 1 wood block stained
$25 Stamp of Authenticity
$25 Year After Year - minor staining on rubber
$7 Uninked spectrum pad - New, unopened

I used to scrap with Creative Memories albums, So I have some of that too: ALL CM SOLD
$12 - 12x12 blank refill pages (15) - have 5
$8 - 8x10 Holiday Pages - have 2
$5 - 12x12 page protectors - have 3
$15 - 12x12 The Wedding Pages and blank wedding pages refills (1 pack of each)
$10 - The Baby Pages - Girl, pink ribbon border
$15 the Baby Pages - Girl, purple ribbon border, and 1 set of blank purple ribbon refills ( 1 pack of each)
$20 12x12 Holiday pages and 2 packs of Holiday Pages border refills
$10 - 2- 12x12 square corner border pages (get 2 packs)
$25 12x12 sapphire premiere albums, 1 unopened, 1 opened but new
$15 8x10 premiere sapphire album
$15 8x10 premiere sapphire album embossed with 10th anniversary logo in silver

If you are interested in any of these products, contact me (regcorn@zoominternet.net) right away. I will try to update when items are sold.

Where is she????

Wondering where I am???


I am busy prepping the samples for the annual Giftable Stamp Camps!


The registration deadline is this Saturday...don't miss out on getting your spot reserved....I am only taking 15 registrants for each one. We will be doing different gifts at each camp, so you won't want to miss either one of them!


You will receive a free gift for attending both camps...an did I mention doorprize???? I don't think I did....BUT....you will have the chance to win a heavily sought after Level 2 set - Deer Friends!!!


Email me right away to reserve your spot!

Saturday, October 25, 2008

Scrappin' Saturday 5

Hey Stampers!!
I have been cranking out scrapbook pages this week amidst all my other prepping for last night's stamp camp. Well....2 2-page spreads actually...but that is "cranking out" to me. I am a slow scrapper. I do too much fussing I guess, but it probably doesn't show that I work hours on a spread to the common person. I will show you both 2 page spreads this week....and if I have to skip a week...consider yourself paid in advance! LOL!!!!!

Here is the first spread that I completed this week....I am really happy with it!!! Most of you are full into football season, cheer leading, soccer....we are in full swing with my daughter's bowling league. This layout uses pictures from January ( it was her banquet for the first season - Oct-Dec 2007). We put her into bowling for several reasons....but my main reasons, personally, was I wanted her to have something that made her learn to take turns with their kids, and to have more interaction with kids. The first season was pretty painful for me...I must admit. She really didn't get it - how to roll the ball down the lane. Almost every ball had to be pushed down for her...she really was all over the place with her thoughts, it was hard to keep her focused on the bowling lanes. But she is in her third session (2nd year) this year and so far, it has been so much better. She was only two her first two sessions....so I shouldn't have expected too much. Let me tell you..this year is so much better, we don't even have to walk up to the alley with her...she takes her ball and walks up there and gives it a heave. Now, it isn't the fastest ball that rolls down the alley, but it gets there on its own, mostly. Well, I am getting really off track here....I wanted to keep this post short because there are so many pictures to share.


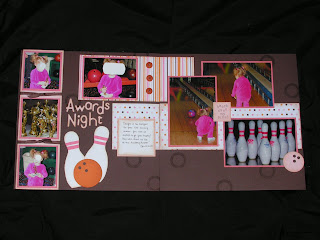
It is hard to see in these pictures...the base is textured chocolate chip. I guess I shouldn't have taken it on a black background. Also hard to see in the pictures are what I stamped on the background. I wanted a round element...you know to "roll" with the bowling ball thing. I don't have any circle stamps...I have lots of flowers....but I didn't really want a flower. And then, like it was meant to be, my eyes went down to my big deal alphabet and the "O" stamp was the first thing I saw. PERFECT!!! The O in that alphabet is a perfect circle!!! I stamped it a few times randomly on the bases with chocolate chip ink. The patterned paper is from the designer series pack, Sweet Always. What is not to like about pink, brown and orange????

Here is a closer look at the left hand side:
I made the bowling pins and bowling balls myself. I was going to buy some "J-Boutique 3 Dimensional" bowling pins a few weeks ago at Mike's...but then thought for $4 I can make my own...they will match my project and I can make them any size I want to...and for pennies!!!


How did I do? I hand drew one bowling pin and cut it out and used it as a stencil to cut these out. The bowling ball was cut with the colluzzle and I punched three holes in it with my 1/4 inch circle punch and backed it with chocolate chip card stock to fill the finger holes. The title was cut with my big shot and the go-go boots alphabet. I accented the left panel with two knots of chocolate chip ribbon. The pumpkin pie buttons are "threaded" with slivers of chocolate chip card stock. Everything on both pages is sponged with creamy carmel ink.

Here is the right hand page:

One thing she and I have always said towards the ball while bowling is "knock down my pins!!!" So I stamped that out with a retired mini alphabet set, rough edges alphabet, and put it in the center of her bowling.

Ok....Now onto the next layout....my "paying you in advance" layout! LOL!!!

The whole family, practically, camped where my Grandma and Aunt camp during the summer one weekend. It was a real nice family get together weekend. . It happened to be the weekend that the campground was celebrating Halloween. So all of the kids dressed up and went trick or treating around the camp sites. My daughter loved it!! We were the last ones back to the camp site...she didn't want to quit!

The bases are tangerine twist textured card stock. The upper panels of designer series paper is from ghostly greetings. Kiwi kiss and tangerine twist couldn't have been a better match for my daughter's clown suit! I stamped along the bottom with the trio of stars from just jawing. Let's get right to it...
Here is the left hand page:

The date is adhered to a key tag punch of confetti cream. The date is cut from go-go boots alphabet die set and the big shot. I punched holes in it to thread my 1/4 inch basic black grosgrain ribbon through it. The candies, from tasty sweet, are stamped with lavender lace, tangerine twist and kiwi kiss. I embossed the candy centers with iridescent ice embossing powder...it gives them just a hint or sparkle.
the right hand page:
I used the same candy as I did on the other side. I adhered a piece of tangerine twist striped grosgrain ribbon to the picture with a black brad from the vintage brad set. See that adorable skull and cross bones??? I don't know what it is about the set just jawing....but I love it!! I stamped it with basic black onto whisper white and cut it out. I then took tombo mono multi adhesive and filled in the eyes and one tooth and then poured on the clear chunky glitter. A skeleton must have a blinged sweet tooth on Halloween, I think. To "girl" it up a little....I stamped the bow, also from just jawing, with tangerine twist. I cut it out and adhered it with stampin dimensionals.
Well, tell me...have I out done myself this week? lol!


Friday, October 24, 2008

Stamp Camp Preview

Be Sure to scroll down to see this week's Blogger's Challenge.

Hi Stampers!


I don't usually post the stamp camp projects before the camp...but I am feeling frisky today! If you are registered for tonight's camp.....these are the cards we will be making! You will leave the camp with three of each of these cuties as well as Mr Twigster!!!


Blogger's Challenge - week 70

Hi Stampers!

This week's Blogger's Challenge was to create something that you would give as a gift. I saw this candle the other day while picking up picture that I was getting developed and I knew what I wanted to do with it. I know I just said last week that I wasn't going to get any more pictures developed until I had the ones scrapped that were already developed....but I couldn't help myself! I really wanted to use my brand new just jawing stamp set and do a Halloween layout....I am so weak!! But that isn't why were are here today.... Let's deal with the task at hand.


The candle smells so good....my craft space smells so good just having the wrapper in the garbage!
My Join in the Cheer decorative strip die has been sadly neglected. I have a bunch of ideas, I just don't seem to get them executed. This die is a perfect border for scrapbook pages, it will make a really nice framed accent for the holidays - I will try to make that next. You can cut the words apart to use on your cards, scrapbooks or tags.
Anyway, I cut a strip of very vanilla, I backed that with a piece of baja breeze that had been scalloped on one side with my scallop edge punch. I wrapped those pieces around the candle and adhered them to each other. hint: adhesive does not stick well to candle wax...lol! I ran the join in the cheer die through my big shot cutting a perfect sentiment out of kiwi kiss. I did have to cut the word "cheer" off of the back though, it was too long for this candle. I adhered that to the vanilla panel with tombo mono multi adhesive. What did I do before this stuff???? I wanted to scatter some felt flurries around the panel so I pierced a hole through the layers into the candle with my piercing tool. I placed gold brads through the felt flurries and just pierced the brad into the candle. So easy to remove and reuse! I really love these felt flurries!!!

Thursday, October 23, 2008

I can't believe the stamp camp is tomorrow....

I have another sneak peek for you.....
What could this be???? Do I happen to see a card made with something that may have been cut by the Big Shot??? hmmmmmm.......


I didn't get anything new stamped for you today....I'm sorry :( But I do want to remind you of the Birthday Celebration going - 20% off select birthday sets!!!! Click on the icon on the left hand side of my blog to view the flyer. In honor of the sale, though, I do have a picture from the Stampin' up! web site. Isn't it awesome that a small jar of candy can be transformed into a wonder ful gift with some handmade accents like a tag????

This candy jar uses crazy for cupcakes. I just love this!!! It sure does help that it is a jar of jelly belly jelly beans.....there is no jelly bean like a jelly belly....yummmmm...........

Wednesday, October 22, 2008

It has been so cold......

It has felt like the snow has swirled.....lol!!


I was really drawn to this stamp set, Snow Swirled, as soon as I saw it in the catalog...and then it went on sale....it was destiny!! I was really initially drawn to the swirliness - I know...that is not a really word - lol! The snowflakes are gorgeous! The sentiments are beautiful!


The card base is old olive. I stamped the largest snowflake in old olive ink in a random fashion.

The background panel of designer series paper is from Ski Slope, it is in the mini catalog. There are so many beautiful papers in this pack of paper!


Now skipping to the main panel....I stamped the tree from snow swirled with old olive ink. I used the smallest snowflake from the same set to create a tree topper with real red. I matted that panel with chocolate chip.

The sentiment is from cute and curvy,
the stamp set that is art of the curvy label punch bundle. I stamped it with real red ink and punched it with the curvy label punch. But before adhering the sentiment down, I wrapped a piece of felt ribbon, from alpine originals, around the designer series paper that extends just under the tree panel. I adhered the tree panel down with stampin dimensionals and then the sentiment over that with stampin dimensionals. What do you think of the felt ribbon up close....it really is nice ribbon!!!


Now for your sneak peek for Friday's camp......


Do you like the sneak peeks?? A big tease, huh???? I can't help myself...lol!!!

Tuesday, October 21, 2008

A bag of candy and a sneaky peeky.....

Hi Stampers!

I have another sneak peek for you for this Friday's Stamp Camp....


What stamp set do you think this could be????


Is that more bligy - blingy????

What ever could this be???

lol!!!


But what I really have to show you is a bag of candy. Did you notice in the Holiday Mini Catalog that we have rope twine??? If you didn't...get your copy back out and study!!! now!!! hehehe!!! Anyway....When I ordered it, I'll be honest, I thought it would be stiff...but it is not, at all. I had a gift bag in my head when I took my first look at it. You know the kind of bag...with rope like handles.


Wanna see it yet?

Let's get the boring ho-hums out of the way first thing....

The card base is tangerine tango. The background panel is kiwi kiss. The bag was made out of kraft card stock. See the little points on the top??? I did that by just punching one point of the small star punch along the top. I stamped the large circle stamp from tasty sweet in kiwi kiss and the small swirl with tangerine tango on the bag front. I stamped the sentiment in basic black. I then inked my candy stamp with tangerine tango and lovely lilac. Seperately, of course. lol! But before I stamped each of those onto whisper white, I stamped off. I stamped the candy centers with the same colors, not stamping off. The candy corn stamp was inked up with old olive, pumpkin pie and summer sun stampin' write markers.


Before cutting the candies out, I inked them once more with my versamarker and embossed them with irredescent ice embossing powder. I cut each of them out and adhered them in the bag with both snail and some on stampin' dimensionals. But wait...I didn't tell you how I adhered the bag, huh???


I used sticky strip for this one.... I placed sticky strip along all three sides and used a pice of left over stamp rubber for a dimensional in the middle of the bag...I wanted it fuller than regular dimensionals.


You gotta see the dimension here....


I had lots of fun putting this together. I wonder what else could come out of my shopping bag?? We'll have to see what I can come up with. In the mean time...if you make a bag and fill it with soemthing..post a link here, I would love to see it!

Monday, October 20, 2008

I have more halloween fun to show you!

HI, again, Stampers!!!!

First off, if you are reading this and this is the first time you have stopped by today...be sure to scroll down...this is my second post today! Can you believe it????

Well, I started this card the other night. It is a totally simple card...let me tell you....it is simple!!!! But...I did use Tombo mono multi adhesive and chunky glitter, so I wanted it to sit overnight...my overnight turned into a few days. lol!!!! I made this with my niece in mind...she has an older brother so she loves anything creepy crawly. I did her creepy crawly...but "girled" it up a little. What do you think???


I drew the spiderweb free hand with a pencil onto lovely lilac card stock. I, then, traced it with the small tip of my tombo mono multi adhesive and then poured on the black chunky glitter. I didn't dump it...I left it sit there over night. You don't want to dump the mono multi with glitter unless it is dry. So set it out of your way and let it dry.

Then this morning...I thought I need to get that card done before glitter goes everywhere....and I mean everywhere!!! lol! So......I pulled out some punches....i {luv} my punches! {blush}

I punched four photo corners out of basic black and lavender lace. I only used the four large lavender lace corners and the four small black corners. The punch a basic black scallop circle. I adhered it all together....and viola....spider body! I punched two 1/4 inch circles with whisper white and drew in the black pupils and then accented that with my white gel pen. I hand drew on the little mouth. I wanted to "girl" it up a bit more....so I pulled out a scrap of wide organdy ribbon that came around a pair of pajamas. I'm telling you....throw nothing away!!! There are ribbons on more things than you think...lol!!! I put it in between a little purple flower brad that I had in my stash and adhered it to the spider head. so girly....don't you think???

My sentiment in from All Holidays, I stamped it in basic black. The card base is pumpkin pie.

Now, before I leave you today....I want to give you a little reminder of sorts.....

The scallop circle punch fits perfectly onto a small peppermint patty....so You could do this little spider thingy onto Halloween candy!!!!! Don't you love it?????

Paris.....you were looking for a backup plan for your brownies.....would this fit the bill???

Rolling out the red carpet for you......

HI stampers!

Are you registered for my Christmas Card Stamp Camp this coming Friday???? If you are....I will be giving you sneak peeks all week! If you didn't sign up....you can enjoy the fun of it and try to guess what we have here!

I really hope I get a chance to stamp something tangent this week that I can show you. I am busy cranking out other samples that can't be shared just yet....let's just say I have been having fun fun fun in between cutting, counting, measuring, sorting and packaging up your packets for the card camp.

Anyway.....you will receive Mr. Twigster this Friday at the Camp.....so I wonder which stamp set I used here?????


ooo....do I see a little bling baby????

Sorry the picture is dark....my lighting wasn't the best when I took these pictures.

Saturday, October 18, 2008

Scrappin' Saturday 4

Wow....I am four 2 page layouts further in my daughter's scrapbook than I would have been if I weren't doing this challenge to myself!!! I couldn't get a good 2 page spread picture, so I will have to show it to you in left and right pages.

You know.....I am all over the place with my scrap booking lately. I used to scrap chronologically...ONLY....but lately...I scrap what ever I feel like. lol!! A lot of times when I transfer my memory cards to my computer, I usually get around 100 pictures printed out from various events. So needless to say...I have dates all over the place to scrap. I have resolved to myself not to get any more printed until I get the ones scrapped that I have printed out already.

How do you scrap?

You know...."they" say that if you are really behind, you should scrap current and then go back to the past as you have time. I should take that approach...but then that would go against my resolve....lol!!!

Anyway...with that off my chest...I come to you with Easter pages! Easter Egg hunt pages, actually....not even real Easter day pages!

Here is the left hand side:

The base is so saffron. The designer series paper is the same retired package I used on week 1, flowers for you. These papers are so girly that I have to use them for her scrapbook...that is why I bought them actually. Remember....I did say that I might use retired goodies here...but you can definitely substitute current papers for your layouts. This is the problem with not scrapping current....in the next catalog there will be heaps of springy things, I'm sure....that is why we have two catalogs per year....but I am a free spirit of sorts, so I make do! lol!!!


I matted all of the pictures with whisper white. The main picture on this side of the page also is matted with pixie pink. The designer series paper strips on both sides along the top is adorned with whisper white punched with the scallop edge punch. Along the bottom, between the two rows, I spaced out holes with my mat pack and piercer and adhered pixie pink flowers punched with the three for you punch with "altered brads." Remember when I told you how to make white brads...since Stampin' Up! doesn't sell them.....wonder why not???? Anyway....click here to learn how to make your own white brads.

See that adorable flower accent with the chick???
I pulled out the largest flower from the pretties kit and dyed it to match my project with lavender lace ink and a sponge dauber. I just pulled the dauber from the center outward. I wanted a flower that still had some white in it...not completely one color. I love this about the pretties kit flowers...we can totally customize them to our project. I adhered it to the page with a brad. The little chick is from A Good Egg. I jumped on this set right away because it is definitely a good one for card making and scrap booking.....cute!


I stamped the chick onto whisper white with jet black staz on. I colored in the egg shell with my pretty in pink stampin' write marker. The chick was colored with barely banana and his little beak was colored with apricot appeal. I cut him out with my hobby blade and cutting mat. Now the fun part....blinging him up!!! I used my 2 way glue pen and dazzling diamonds to spruce him up! He was adhered to the center of the flower with a pop up glue dot ( one of the thick gooey ones....) You like?

Now the title.
I was going to use my new sizzix dies but then decided to do something a little different. I pulled out more paper from that same pack and stamped the word "hunt" with versamark ink and embossed it with clear embossing powder and the heat tool. I then cut the letters out. It is hard to see in this picture, but it is a cool look in real life. I accented it with a little flower like the ones along the bottom of the pages.


I can see myself doing this type of stamping lots more in the future. It really adds visual interest to the usual solid color titles, don't you think?

Now onto the right hand side of the 2 page spread.

It is pretty much all the same as the other side color wise except one main photo is matted in pixie pink and one is matted with lavender lace.

This color scheme went so well with my daughter's dress even though there wasn't a bit of yellow in it.

See the egg accents? Those were so fun to create!!!


The stamp set has a large open image egg with lots of different stamps to adorn it with.


I stamped two eggs onto whisper white with jet
black staz on.


For the one, I stamped the zig zag band in the middle. For the other, I stamped the flower/open circle stamp multiple times. I colored them in with stampin' write markers - barely banana, pretty in pink and lavender lace. They had to be blinged up too! I used my 2 way glue pen on the lavender lace part of the right egg and covered it with dazzling diamonds. The left egg, I just put dazzling diamonds on the pink flowers. The lavender lace egg is mounted on stampin' dimensionals.
Boy....I type alot, huh??? I hope you are enjoying Scrappin' Saturdays. I sure am enjoying doing them. If you are behind in your scrap booking, I urge you to try to tackle it just like I am. One week at a time....one layout at a time. It is very liberating to be getting some pages done.
Now, Go Scrap!

Friday, October 17, 2008

Blogger's Challenge - week 69

HI Stampers!
Sorry I am so late posting today....I am in very slow motion...... I stayed up until after 2:00am last night getting things ready for next Friday's Christmas Card Camp And the little one got up this morning at 6:30 and don't forget that the hubby got up at 3:30 to go to work....so if you do the math...I had 4 1/2 hours of broken up sleep!

And if you know me personally...you know I am not a night person! According to my hubby, I am not a morning person or a day person either!!! lol!!! I was in my room, everyone was asleep, and it felt so good to stamp, cut, count, bag, scrap all alone...with NO interruptions!!! I just couldn't stop myself. I kept telling myself that I would regret my stamping spree in the morning, but I couldn't help it! I looked down at my watch and it said 2:00 and I was running on pure adrenaline and had a thought to just stay up until my hubby went to work....but I though that I had better not.

Oh well....I was able to squeak out the Blogger's Challenge card this afternoon while my daughter wiped what ever she could with a baby wipe telling me that she is a "good wiper" - meaning a "good cleaner." She started picking up glass jars full of embellishments and I thought that maybe it was time to get out of there.

Today's challenge was a color challenge - riding hood red, really rust, old olive and white/vanilla. WHAT?!?!??!?!?!? RIDING HOOD RED & REALLY RUST????? How was I going to pull that off????? So I started by laying swatches out on my desk...I always do this with color challenges....And I thought, well...this won't be too bad if I use only a small dose of riding hood red or really rust. Olive? You can't go wrong there....right? lol!

Well....I did bend the rules a tad......I used chocolate chip craft ink for my sentiment and embossed that in clear embossing powder.

Here it is:

The base is riding hood red. I stamped a single leaf in the bottom right corner with riding hood red ink. The sentiment from holidays and wishes is chocolate chip craft embossed with clear embossing powder.

My main panel is very vanilla....it was allowed...lol! I inked the leaves from with gratitude with old olive and "rock and rolled" them in riding hood red...wait...there is more....it is very subtle, but I "thumped" the leaves with a really rust marker before stamping. My clubs learned "thumping" this month and several of you asked what other sets you could do it with....this is definitely one of them. With these colors, that technique is very subtle, but you can tell in real life. See the speckles??? That is the tiny cluster of dots stamp from itty bitty backgrounds inked in really rust and stamped off twice before stamping around the leaves. I matted that panel with old olive.


And here is where the small dose of really rust card stock comes in......

I took a 1 3/8 inch circle punch of really rust and folded it in half around the side of the main panel. I adhered it with snail adhesive...but it looks like it has been sewn on with an old olive button and riding hood red thread!!! you have got to get a better look at that.....

I guess it is still hard to see here...but I took a tiny sliver of riding hood card stock and threaded it through the button holes and adhered the ends with a mini glue dot. I then adhered the "threaded button" onto the semicircle with mini glue dots.
At least this close up gives you a better look at the leaves.....
I am having the darndest time getting a decent picture lately....argh!!!!!!
What do you think? I am pleased with the super simple layout...and I think the leaves really pop off this card. It won't be long and there will not be any more fall leaves here in western PA to look at..... :(

Thursday, October 16, 2008

Ever wonder what I do when.......

.....my tools collide?

Well.....It happened so innocently.....a crank of the big shot......a squeeze of a few punches.....a tiny inking of a background stamp....a few swipes of a stamping sponge......

Are you wondering where I am going here??? lol!!!

Well....remember Frankie???? He has a new friend!!!

I vant to suck your bloooood.........


what do you think????


I ran going gray and a small piece of basic black through the big shot using the top note die...both colors at the same time. I took my 1 3/4 inch circle punch and punched out his hairline. His eyes are 1 inch circles punched in whisper white. I stamped these with my sanded background with real red ink. The pupils are 1 /2 inch circles punched with basic black. I added highlights with my white gel pen. His nose is the small oval punch. I sponged the edges of his head and nose with basic gray. Did you see his fangs??? That is two points of the small star punch snipped off. I hand drew his mouth on with my basic black stampin' write journaler. The card base is elegant eggplant. I stamped the Happy Halloween sentiment from All Holidays in basic black. The vampire is mounted up on Stampin Dimensionals.


I wonder who else will join my top note family??? Hmmmm.....I wonder?????


Tuesday, October 14, 2008

Decor Elements are in the house........

I have to admit, I did wait until the phase 2 of Decor Elements to come out to make my first purchase. I liked some things in phase 1 really well....but I knew there would be something that I would have to have....I just knew it! Stampin' up! has that effect on me...lol!!!


I made this last week and was able to take it to my Thursday night club for the girls to see....I think they were really impressed with it. And let me tell you...the hardest part about putting it together was deciding which designer series paper I was going to use for the background!!!


I bought the frame (which is a shadowbox frame) for 40% off.....who could beat that!??!!?? The leaves were garland that I cut apart.....it was 50% off ( 2.50!!!)...and I only used half of it!

My designer series paper that I finally decided on was from Juntos. It is in the Spanish Supplement Catalog. It is really a beautiful package of papers. It does have some spanish wording on it.....but it is very tiny. Then I applied me Decor Element to the front of the frame...and Voila....a seasonal frame that I can change with the seasons. I think the sentiment will go year round with different elements inside. "Season of Thanks.....Season of Blessings....Season of Love~" I can totally see this with pine garland, springy leaves, some summer flower tops, roses for valentines day....do you see where I am going with this??? lol!!


I am telling you this project was easy peasy....If you are a local customer and would like to put one together for yourself I would be more than happy to help you....all you need to do is ask. Well....I am dying of thirst so I better run......lol!

Saturday, October 11, 2008

Scrappin' Saturday 3

....was almost Scrappin' Sunday! lol!! I am sorry about the late post tonight, but time just gets away from me. Is it the same for all of you? I used a demonstrator online sketch challenge for my basic layout.
These pictures were from a day at Kennywood Park 2 years ago.....I am soooooo behind!!! You guys keep after me to keep Scrappin' Saturday going so I can at least keep my daughter's scrapbook caught up! As you can see, I need a kick in the "tukus!"
Here is the 2 page spread.


Sorry about the poor photo....the picture was taken at 8:30 at night....not good light! lol!!


Here is a close up of the left hand page:

The bases are pumpkin pie. The horizontal panels are regal rose. The printed paper is from Sweet Always Designer Series Paper - it is a beautiful pack of paper. All of the photos are matted with chocolate chip. The title is stamped with chocolate chip craft ink. The stamp set is contempo alphabet. I did emboss it with clear embossing powder. My journaling block is pink pirouette. the ribbon adorning the lower picture is striped ribbon in pink pirouette adhered with a brad from the vintage brads. See that flower in the bottom left hand corner. It was made with the 5 petal flower punch. Wanna see it up close???


I can tell you this is not the last time you will see this flower coming from me.....I love them!!! I was inspired by rebel inker. The flower is pink pirouette. The center of the top flower is sponged with apricot appeal. The next layer is sponged with pretty in pink. the rest of the layers are sponged with regal rose. The flower center is a build a brad that has a stamped image from Always in close to cocoa. The leaves are kiwi kiss punches with the wide oval punch. I folded them in half and put vein lines in them with my stylus and then trimmed then to a point.


Here is the right hand page:
The tab on the vertical picture in the round tab punch in pink pirouette. I accented it with a pumpkin pie felt fusion flower and a brad. Both pages are accented with build a brads. And last, but certainly not least, my date was cut with my big shot and the go go boots alphabet! I can't get enough of these alphabets!!!! I sure hope we get a few more in the next catalog!!!
So, tell me.....What are you thinking of my Scrappin' Saturday? Leave me a comment below and share your {luv}. lol!

Blogger's Challenge - week 68

Hi Stampers!!! I was supposed to post this Friday...but time just gets away from me!

This week's Blogger's Challenge was an inspiration challenge. We were to create a project out using this picture as our inspiration.
I really do love the color combination black, white and red...
I was going to take this challenge literally with the geometry, but decided to go with the color scheme.

Don't you hate it when you get a stamp set in your head...and no matter how hard you try to think of different set you would like to use for a challenge....you can't change your mind! I have an ignorant amount of sets that have never had the feeling of ink on their rubber....just sitting stacked in my studio....waiting......

And I HAD to use Baroque Motifs. I love Baroque Motifs, anyone who has been stamping with me since it's release knows I {luv} it!!! It has been inked plenty...believe me....but I had it in my mind for this.....so I finally gave in and used it to create this:
The card base is basic black. I stamped the flourish from baroque motifs with whisper white craft ink and embossed it with white embossing powder. I tied a knot around the top edge with 5/8 inch real red grosgrain ribbon. The sentiment is from On Your Birthday. I stamped it with basic black onto whisper white and punched it with a 1" circle punch. I punched a 1/8 th inch hole with my handheld punch and tied it to the ribbon with crochet thread. I did adhere the tag to the card with a stampin' dimensional.
Now, I don't know if you can tell by the picture, but the red bird is sparkly..... I stamped the bird from Always with versamark ink onto whisper white and then used heat and stick powder to create an adhesive and then adhered red glitter to the bird. Don't hate me....I had this glitter in my stash - It isn't Stampin' Up!, but couldn't resist using it here. I cut out the bird with my hobby blade and then adhered it with stampin' dimensionals.
So, What do you think? In real life, it is extremely sparkly...and I love it!

Thursday, October 9, 2008

Meet Mr. Twigster!

If you signed up to come to my Christmas Card Stamp Camp....you will receive this adorable snowman stamp set, Mr. Twigster, as part of your registration!!!!! He is the cutest 2 legged snowman I have ever seen......

I whipped up this card yesterday.


The base is real red. The bottom bashful blue panel is from Summer Picnic Designer Series Paper....this has been my "go-to" paper lately, even though the projects have nothing to do with summer. That is what I love about Stampin' Up!'s designer paper packs - they totally get it that we don't want an entire package of summer print paper....we want to have prints that can be used year round - kuddos to you Stampin' up!

I accented that panel with a piece of whisper white scalloped with my scallop edge punch. The sentiment is from Many Merry Messages. I then used my mat pack and piercer to align the holes for my red brads matted with white brad washers. Remember those??? {luv it!} Next I tied a simple knot with red striped grosgrain ribbon. The main image panel is kraft card stock. I stamped the snowman in black staz on. I colored him in with white craft ink refill and a blender pen....cool, huh? The rest of the coloring was done with stampin write markers. I matted that onto whisper white and then made a mat of old olive and tilted it for visual interest. That entire main image panel was mounted up on stampin dimensionals....but you knew that already, huh? lol!!!


Now....go stamp!

Wednesday, October 8, 2008

Want something tasty???

HI Stampers!

Sorry for the lack of posting.....I just can't seem to get into "my time." Now I did get to get a card, or two, stamped today. I pulled the inspiration from a layout challenge for today. I really wanted to ink up my new set, Tasty Sweet. It is categorized as Halloween, but I have some visions of candy for any reason with this stamp set.....now to get them out of my little head! lol!!
My card base is pumpkin pie. The background panel is designer series paper, Ghostly Greetings...it is really a nice paper pack! I broke down and finally ordered, well earned for free, Just Jawing. I can't wait for it to get here to pair up with some more of this paper! Did you read I "earned it free?" That's right....if you host a show/workshop/club/order that totals $350 or more, you can select a stamp set out of the catalog sampler, FREE!!!!! I have been eyeing up Just Jawing since the new cattie came out.....I think it will make sweet embellishments for scrap booking, great Halloween gift bags, gift tags for teens, great card fronts, the list can go on and on...skulls are very hot right now.....not just for Halloween!!!!

Oh, back to the card....lol!!!

That background panel was accented by layering two photo corners from the photo corner punch in basic black and kiwi kiss. i {luv} kiwi kiss ;) The sentiment, from tasty sweet, was inked with kiwi kiss and then inked with stampin' write markers in basic black and pumpkin pie. I stamped that onto whisper white. It was matted onto kiwi kiss stamped with a circle stamp from tasty sweet in kiwi kiss. I matted that entire panel onto basic black and tied a simple knot with black gingham ribbon.

Did you see my candies????


The candy corn was inked up with kiwi kiss, pumpkin pie, and apricot appeal. The two wrapped candies are inked up with pumpkin pie and kiwi kiss. the edges are sponged with tangerine tango and old olive, respectively before stamping. The center swirl was stamped with tangerine tango and old olive. I wanted them to shine......so........I took out my versamark pen and colored in the image and embossed them with clear embossing powder! cute, huh? I adhered them with stampin' dimensionals....and that about sums it up!

Thanks for stopping by today, I appreciate it more than you know.

Monday, October 6, 2008

Promotions for October!!!!

THIS POST WILL REMAIN AT THE TOP FOR A WHILE - SCROLL DOWN FOR NEW POSTS, PLEASE!!

HI Stampers!

As you know, Stampin' Up! is celebrating their 20th Birthday this year...and the promotions are flowing!!!! I wanted to give you a run down:

1. While Supplies Last: Buy a large tip aquapainter for 7.95.
All of my club girls know how much I love my aquapainters - now is the chance to get one to try out!

2. In honor of World Card Making Day: 20% off all Simply Sent Card Kits and Simply Sent Card Elements Kits!!! Click HERE for the flyer. THIS SALE IS ONLY OCTOBER 4-11th!!!

3. Happy 20th Birthday Stampin' Up! - Spend $20 in regular catalog merchandise - get 20% off select stamp sets!!! Click HERE for flyer. note: there is no limit to how many birthday sets you buy after the $20 has been reached!!!

4. Last, but certainly not least, host a $350 show in the month of October - You get to pick a free stamp set out of the Catalog Sampler. Click HERE to see the Catalog Sampler!!

5. The Holiday Mini Catalog starts today!!!!

OH MY!!!! What a Promotion, huh??? Make sure to contact me if you have any questions.

Saturday, October 4, 2008

Scrappin' Saturday 2

Well....I fulfilled my second week of Scrappin' Saturday! WhoooHoooo!!!! I also completed the second side to last week's Scrappin' Saturday post.

Before I go into this week's pages....I have a question for all of you. Do you scrap in a 2 page spread layout or 1 page??? I start out thinking...I am only doing a 1 page layout with these pictures and then I can't seem to commit to a single page. This will sound silly but.....I hate the thoughts of my two facing pages not coordinating in my scrapbooks! What is the matter with me?????? Leave me a comment below letting me know how you do it.....please. Help me over this...or make me feel better that I am not the only one! lol!!!

Anyway.....here are my pages for today:

The bases are textured card stock in pink pirouette.....our textured card stock is so yummy!!!!! The designer series paper is from the Holiday Mini - Ski Slope. I love this paper pack!!! It has so many papers in it that could be used other than holidays.....did I mention it has chocolate chip printed papers in it???? You gotta get some!!! Yummmmmm.......

Oh...my color scheme...that's right! I accented it with baja breeze, regal rose and whisper white.

Here is a close up of the left hand page:

Do you see those snowflakes??? They are from the felt flurries sets. both in the holiday mini!! I love them!! They are a must have for scrap booking and card making alike! I adhered them together as well as the page with pink rhinestone brads from the fire rhinestone brads. Gotta have bling!!!

Did you notice the stitching down the regal rose panel??? I did not pull out the old sewing machine....I pierced it with my mat pack and piercer and then drew in stitches with the white gel pen...love it!

Oh yeah...did you notice the title???? That is cut with my big shot!!!!! First, I stamped whisper white card stock with the snowflake from Season of Friendship and the adhered it to chipboard with my anywhere glue stick. I ran it through my big shot with the Serif Essentials Alphabet die set.....I am in love.......Stampin' Up!....If you are reading this....give us more fonts!!!!! I love being able to customize my own chipboard!!!!!! I'll give you a closer lookie:

Not much left to talk about for the right hand side.....lol!!! But here it is:
I was really happy with how these pages turned out. We really had fun that day in the snow. This is just a fraction of the pictures I took...gotta love digital!!! I take hundreds of pictures of things....then pick my favorites....love it!!!!!

Friday, October 3, 2008

Two Challenges, One card......

Hi Stampers!!!

I made this card to fulfill two challenges. This is for Blogger's Challenge - week 67 and Kristina's color challenge. The Blogger's Challenge was "Falling for you" or Love/Anniversary." And check out the color challenge over at Kristina's:
Chocolate chip, pumpkin pie, kiwi kiss and very vanilla.....Oh My!!! I am in {luv}.

I have bought so many new sets and accessories that have not been used yet....and today's card uses a set I was dying to ink up since I saw it in the holiday mini preview for demos. Season of Friendship. I have sooooo many ideas in my head for this set!!!!! I hope I have the chance to get them all out! lol!!


recipe:
stamps: season of friendship (holiday mini)
card stock: pumpkin pie, very vanilla, chocolate chip, kiwi kiss, bella blossom ds
ink: chocolate chip, kiwi kiss, pumpkin pie, old olive stampin write marker
accessories: tag corner punch, linen thread, earth elements buttons, stampin' dimensionals
**Dont' forget about al of the current promotions and you can now order out of the Holiday Mini!!!! WhoooHooooo!!!!!!