
Today is Blogger's Challenge Day! We were to do a sketch challenge this week. Our Challenge "mom, " Lisa, provided us with a great sketch that I will use again and again, I'm sure!
 I'm not sure why it is so small.....I uploaded it on large setting.....argh!!!!
Here is my take on it:
 I'm in a hurry today...can't get into too much detail - I have a Stamp Camp tonight and I still need to make some goodies :)
The designer series paper is from Christmas Cocoa Specialty paper in the mini catalog. This paper has a metallic sheen to it.....wait until you get your hands on some - it is divine!! The stamp set is my beloved cold and cuddly. I absolutely adore that set!!! Polly, the polar bear, is stamped with whisper white craft ink onto kraft card stock, as is the hat and cup of cocoa. Now that could be any hot drink you desire....but I am a hot chocolate girl, through and through! I blinged up her hat, steam and iceberg with dazzling diamonds and a two way glue pen. The ribbon is soft suede polka dot grosgrain ribbon.
 See Polly?
For the brad placement, I used three white grommets and I placed large red rhinestone brads from fire round rhinestone brads in the center - more bling!!!!
Leave me some love, I would love to know what you think of Polly.
Make sure you check back - my next stamp camp is awesome - if I can toot my own horn ;)
 Isn't she sweet? I will start at the card base though. It is pale plum that I embossed with my big shot using the stampin' up exclusive texturz plates. I love the subtle amount of texture that the plates offer. The designer series paper here is from cottage wall. Remember the ribbon from yesterday?? You know, the white ribbon with the red stitching along the edges????? Well...remember when I said it was from a 2 spool collection???? That gorgeous old olive taffeta ribbon with the white edges is from the other spool! That is right - both of those are from mistletoe ribbon collection! I have a feeling I will be going through a LOT of that ribbon!

 Isn't he darling!??!?! The card base is real red. I stamped the snowflake image from delightful decorations (also in the mini) in whisper white craft ink and embossed it with white embossing powder. I also stamped the north pole sign at the bottom just for fun :) All of the edges are sponged with whisper white craft ink with a sponge dauber. Moving up to the penguin tag....It is kraft card sotck that I stamped the iceburg in whisper white craft ink and embossed it with white embossing powder. I accented the sides of the iceburg with a two way glue pen and dazzling diamonds. Now that is what I call "chilly goodness!" I rounded both of the right corners with a corner rounder and matted it with chocolate chip. I inked up the penguin with stampin write markers and cut him out. He needed the red top hat, don't you think?? It has a band of dazzling diamonds around t as well :) The ribbon is also from the holiday mini - it is from the mistletoe collection of ribbon. It contains two full spools of ribbon - and this is one of them - {luv} it! I accented it with a kraft corduroy button and some crochet thread.


 The card base is soft suede.....a beautiful brown. seems a little strange using brown for a Christmas card base, huh? It just felt right.

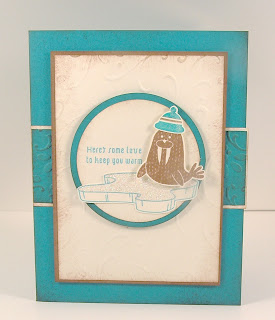 Well?!?!?!? Isn't he the cutest thing ever??? Wait until you see his play mates! I used only the three colors that were listed. The taken with teal horizontal panel across the card front is embossed with the finial press embossing folder and the big shot. The very vanilla panel on the front is embossed with the new stampin' up perfect details texturz plate. This is sold by itself in the catalog for only $3.95!!!!! Everything is sponged with close to cocoa ink and a stampin' sponge. The main image panel (circle) was cut with the circle scissor plus.
 It is hard to see in these pictures, but I blinged up his ice with a two way glue pen and dazzling diamonds!
 The page base is regal rose. The designer series paper is from tall tales. The photos are matted with rose red. I used my big shot and billboard alphabet die for the title. Did you notice the pictures are numbered? I don't usually do this type of journaling, but since build a bear is a sequence of events I figured I would label them in such a manner. I cut out flowers from the designer series paper and layered then with a 1" circle punch in old olive, using a stampin' dimensional. The numbers were stamped in brilliant blue and the calendar alphabet and number stamp set onto very vanilla. I punched them out with the 1/2 inch circle punch and then adhered them down as flower centers with stampin' dimensionals.
 I sponged around the edges of both bears with chocolate chip classic ink and a sponge dauber to bring them to life :) They are both adhered to the pages with stampin' dimensionals.
 I started with the mojo monday sketch this week. To me, it screams out to use different designer series papers. That is what is so awesome about Stampin' Up!'s designer series paper collections....the guess work is done for you. If it is in the same pack - it coordinates! Like here, I used 4 different patterns. That is pretty bold for a 4 1/4 x 5 1/2 inch canvas. hehehe!!
 I also wanted to incorporate today's challenge to ruffle something. I decided to ruffle my ribbon where there was a bow in the sketch.
 I drew out a pattern on scrap card stock and traced it on a standard real red card base. I cut it out and then made the white guitar face out of shimmery white card stock. I know absolutely nothing about guitars - but they usually do have little knobby things on the front. I made my little knobby things from punching basic black circles with a 1/2" circle punch. I don't even know how many strings are on his guitar....I dated a bass guitar player in high school and i know it had four strings....but a regular guitar has how many??? So I just went with how many fit on the neck of the guitar, spaced out how I wanted them. That is called "Creative Liberty, " right??? lol! The neck is whisper white matted with creamy caramel. I rounded the one corner with the 3/16" corner rounder. I used my matt pack and paper piercer to place the holes for the strings. I used silver cord for the strings - which is coming out again in the Holiday Mini - whoohoooo!! I anchored the strings on the back with adhesive, but I put silver brads at the bottom of the strings - you know, to look like string holders - hahahaha!!!


