Friday, February 29, 2008

Blogger's Challenge - week 36

The blogger's Challenge group is to make a card, meeting specifications, and post it to their blog on Friday. Well...technically it is Friday, but it is being posted later than I had intended. We were to case the card on page 44 of the Spring/Summer Collection - "With Heartfelt Sympathy" I really liked this layout so to case it was no problem. The problem came in deciding which stamp set to use. I finally decided on my Winds of Grace set. I have never even been on a sailboat, but I really like this set. I have been on a pontoon boat numerous times...does that count? hehehehe!


I have soooo many sets that have never even been mounted, let alone been graced with ink and I seem to keep going to the same sets. I wanted to do something that was masculine so I grabbed my Winds of Grace and went at it!


Here it is:
(Sorry the picture is so yellow. When I used the flash tonight...it just washed it out too much!)

I started with a card base of bordering blue. I stamped it with my sanded background in white craft ink and then sponged the edges with the same. I sponged all of the edges with whisper white craft ink, except the white mats. My Happy Birthday sentiment comes from It's your Birthday. I use this sentiment set almost every time I do a birthday card...it seems to cover all of the bases, so to speak. It was stamped with not quite navy and aligned with my stamp a majig.

The horizontal panel was stamped and sponged the same way as the card base. It is sage shadow. I then took my mat pack and piercer and marked where I wanted my brads. Then...out comes the big dog - my crop-o-dile! I punched the holes and set the eyelets, bordering blue eyelets mind you, from the rich regal eyelet pack. I love having matching eyelets to my card stock....using the standard gold or silver all of the time sure gets old!

My main image was the sailboat from Winds of Grace. I stamped it in not quite navy onto bordering blue card stock. Yeah...that's right...my main image isn't stamped on whisper white. Try it yourself...it is very liberating to stamp on a color! lol! I then took my white gel pen and drew in the highlighted areas that I wanted to accentuate. Sponge the edges with whisper white and mat that onto whisper white and mat that onto not quite navy that has been stamped with sanded background and sponged with whisper white. This main panel was adhered with stampin' dimensionals...hard to believe, huh? me mounting with stampin' dimensionals...I know, I know~ I can't leave those things alone!

My hardware in the corner comes from the pewter hodgepodge hardware set. I decided on the long oval clip to mimic the longness of the sailboat. I tied a simple knot with 1/4 inch grosgrain ribbon in white...hope that doesn't make it too feminine! I didn't think it really "girl-i-fied" it too much...do you?


well..until later, my stampers, happy stampin'!!

Thursday, February 28, 2008

A punch riddle for you!

As I sit at my desk....I begin to ponder....

I know what you are thinking...."oh my, what now?!?!?!"

anyway....Here is my riddle for you. Well, probably not considered to be a "real"riddle....but oh well!

What do a scallop circle punch, 1 3/8 circle punch, tag punch, word window punch, 1/4 inch square punch, and 1/2 inch circle punch have in common? Oh yeah...Don't forget to throw in Polka Dots and Paisley stamp set and a little black gingham ribbon.

I know what you are probably thinking.....

"Why does she have to play such games with us?"


"Can't she just post a card with no nonsense?"


W
E
L
L
.
.
.
.
.
.
.
Here it is....your answer:


Here is a close up of my little guy:

I used a pencil eraser to "stamp" his cheeks in blush blossom.

come on...tell me...what do you think? Leave a comment below, I have big shoulders! (and big hips...but that is another story!!!!) LOL!

Wednesday, February 27, 2008

Simply Said....A Clover????

Well....I have had this card pondering in my little head for a few days. I wanted to make a St. Patrick's Day card using a stamp set intended for other purposes. What better color to use for St Patty's day???? Wild Wasabi, of course!


Well...after the obvious greens in the Bold Bright family...but you know me....I needed accessories-ribbon and glitter-that would match perfectly. I'm a little OCD like that. That is what drew me to Stampin' Up!'s product line in the very beginning....the fact that everything matches perfectly....without mistake. You know what I mean. You buy a red sweater...just try to match that red exactly somewhere else with an accessory. Virtually impossible! Even a color as simple as black....buy a black shirt, black pants, black socks and black accessories in different places....I would almost guarantee you the blacks would not match perfectly. Maybe to some....that's not a big deal...but to me...when it is something I am making or designing....it has to match perfectly! I really digressed today, huh? Well...enough of my rambling!


Here is my card today:

Got you wondering where my stamps come from yet?

Well.....here is another picture......


The shamrock was created using the heart stamp from Simply Said and the stem is from Heartfelt Thanks. Did you guess it right? My sentiment is from the Three for You Punch Box. I don't have a dedicated Happy St. Patrick's Day stamp so I thought this one was perfect.

Notice the bling factor of this baby?????? I used my 2 way gel pen to outline the clover leaves and stem and sprinkled with my beloved cosmo glitter in celery. I gotta tell you....I LOVE THIS GLITTER!!!!!!!! It is as smooth as Dazzling Diamonds but colored! Does it get any better than that???? I don't think so! :)

Did I hear someone ask if my card opened like a typical card?

Maybe a side fold?

Maybe a top fold, if I am feeling frisky?

Well check this out!

I know....it isn't like I invented electricity....but The card itself is flat, un-openable. (is that a word???) The main image panel is actually the card! I thought it was kind of cute! Gives the recipient something to think about, right?

Tuesday, February 26, 2008

Basic Rocks!
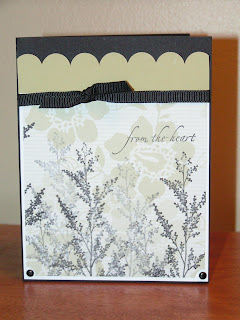
Hi all! Here is my card for today's color challenge: to use river rock, basic black and whisper white. I did pull out a retired stamp set, Garden Silhouettes. But there is plenty new also! :)


I have to keep this very short today....I have a half a hundred things to do today!


The entire panel is mounted up on Stampin' Dimensionals.

recipe:
stamps: holidays and wishes, garden silhouettes (retired)
card stock: basic black, whisper white, river rock, ginger blossom dsp
ink: basic black
accessories: slit punch, tag corner punch, 1/4 inch black grosgrain ribbon, mat pack and piercer, black brads, stampin dimensionals.

Friday, February 22, 2008

Blogger's Challenge - week 35

Well....today's blogger's challenge was a color combination. We were to use Brilliant Blue (what????), Purely Pomegranate, and Old Olive. We could add white or vanilla if we wanted to.


I wanted to make a birthday card for my cousin, so I thought that I would fulfill two things today. And My challenge to myself was to get some of my Sale A Bration stamps inked up! I have all of them and have only used one of the sets....what in the world is the matter with me??? My stamps cry out to me when I enter my room....they plead for my attention and today I would give in to their pleas! Don't get me wrong...I really like all of the Sale a Bration sets as well as the rub ons....I just don't have enough time to ink everything at once. My little one only naps so long, you know?


I also didn't feel the colors needed too much stamping...they are very bold together and I didn't think they could be softened all together to my liking. You know what??? I really didn't know what I would think of this when I was working on it and it turns out that I do like it. It isn't really my typical style of stamping, but like I said before...that is why we do challenges, right?

I would love to see what you can do with this color combination. (Fran - we talked last night about you inking up your peony set for homework, but consider this 2 assignments."wink")


Well, with that said...here it is:


recipe:

stamps: forever friends, mft sentiment

card stock: brilliant blue, old olive, purely pomegranate, confetti white

ink: white craft, basic black

accessories: heat tool, white detail emboss powder, stampin dimensionals, horizontal slot punch, 5/8 inch olive grosgrain ribbon, stampin' dimensionals

Thursday, February 21, 2008

Well...I got one done!

This card came about by using the online sketch challenge presented yesterday. I have been wanting to ink up Embrace Life again....I really love this stamp set! You are probably getting tired of seeing it though...I'm sorry! Sometimes when I sit down to stamp something I can't get a certain "something" out of my idea bank in my little head and lately it has been this stamp set. It has kinda been my "go to" stamp set, I guess. :)

Here is my little creation for you today:


The base is ruby red stamped with the large flower from Embrace Life in ruby red ink. Love a tone on tone look! The next background panel starts with a piece of Ginger Blossom Designer Series Print Paper...another favorite! I know...I know....it's all my favorite, right? I punched that with the ticket corner punch. The next layer of groovy guava was pierced with my mat pack and piercer to create the holes for the brads from my Antique Copper Hodgepodge Hardware. That layer was mounted up on stampin' dimensionals onto a piece of very vanilla. I took some hoarded, I mean very hoarded ribbon from Beachfront set of ribbon, and adhered it around that panel with sticky strip. I bought it when the last catalog was released and couldn't bring myself to cut into it. What is my problem????? It is only ribbon.....this is why my stampin' space is bulging! What can a girl do? I am trying to rehabilitate myself.....use the good stuff!...what good does it do me stacked up on a shelf of stashed in a drawer? I digress, sorry. I just need to get it out. LOL!


My main image panel was created by stamping the single stem flower from Embrace Life with black staz-on ink onto watercolor paper. I watercolored it with ink refills and my beloved aquapainter. For the flower, I used blush blossom, groovy guava and ruby red. For the highlight, I used river rock with a touch of always artichoke directly under the flower. The stem was lined with always artichoke. Here that is close up:


I matted that onto groovy guava. I stamped my sentiment, happy birthday, from amazing to zany in groovy guava onto very vanilla. I punhed it out with my small oval punch and then matted it with groovy guava punched with my large oval punch. Gotta love layering punches...easy peasy! I punched a hole in that with my 1/16th inch handheal punch and threaded linen thread through that and tied to create a loop. That was threaded onto a piece of vanilla taffeta ribbon that was wrapped around my flower panel and tied into a knot. I did adhere the sentiment to the main panel with a stampin' dimensional.


Speaking of stampin' dimensionals......I used a ton of them on this card! Check out the dimension here:


Wondering where I have been????

Well......I haven't got to do much stamping this week! Insert very sad face!!!! :C


That isn't totally true, I must admit. I have been stamping, just nothing I can share, yet. I have been feverishly working on designing the cards for my upcoming birthday card stamp camp on March 9th. It sounds like it is quite a ways away but it really isn't! I try to be prepared for my camps well in advance so I can better estimate what I need to order, supply wise. Nothing gets me down more than designing a card that I love, I mean love, come to fidn out that I don't have enough ribbon for an entire camp to duplicate it. That is the pits! So that is why I am trying to get my ducks in a row early.


The camp is Sunday March 9th at 2:00. It will be at my ususal spot - the Big Mac Borad Room at McDonalds. We will be making 15 birthday cards.....for everyone on your list! We will be focussing on Stampin Up!'s Long Notes as well as a couple of regular sized cards. You will be using some new, not available yet, styled silver ribbon slides as well as new glitters, designer series paper and the new Tombo Mono adhesive. You won't want to miss this camp....get your Birthday Card Supply stocked up! The cost for this camp is only $22. Email me to register today, there are just a few spots left...don't miss out!


The next time you need a birthday card...I don't want you to be stuck here:

Monday, February 18, 2008

We have a winner...Kathy!

I will probably not have the chance to stamp anything new today...insert very sad face now....so I want to show you what the door prize was for my cook book stamp camp a couple of weeks ago. The lucky winnner, in my humble opinion, was Kathy F. I hope she enjoys the set...again I hated to part with it, they ar eall my little stampin' children. LOL! No seriously, I know it went to a good home and will love it just like I do. Oh my, Regina...get over it! I thought the set together was sooo cute and not to mention I used some new Cosmo Glitter. LOVE IT! The Cosmo Glitter is so fine and sparkly....it is like layering glittery satin on your projects. ummm....

Any way here it is:


Here are some closeups: Sorry this one is sideways...couldn't get it off or turned around for some reason....argh!!!


recipe:
stamps: fun and fast notes
ink: black staz on, various for watercoloring
card stock: river rock, wild wasabi, blue bayou, whisper white, porcelin prints
accessories: aquapainter, colluzzle, round tab punch, scallop circle punch, 1 3/8 circle punch, 5 petal punch, boho blossom punch, three for you punch, gold brad, river rock double stitched ribbon, 2 way glue pen, cosmo glitter. white gel pen


my...how I used the punches on this set! I really do love having a wealth of punches...it makes layering a breeze! I couldn't imagine not having them!

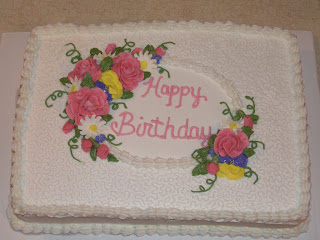
Are you still wondering which came first - the cake or the card? Well...I guess I will let the cat out of the bag. it was the.................................CAKE! When I finished decorating the cake...I was like...this would make a nice card. My wheels started to spin....smoke started pouring out of my ears....What did I have that I could use to duplicate that cake?????? I originally thought Roses in Winter, another retired set. I made my card front and thoguth ...that will not work. Rpses in Winter roses are too big for this card...with all of the masking I had in mind. Picture this...me starring at my stamp shelf with a very heavy heart...I had an idea and no way to execute it! And then, like a spotlight on an object in a dark room....my retired Level 3 Hostess set - Flowers for a Friend. Imagine the "ba-bing" being played with an organ inthe background. It was perfect, the roses were the right proportion for what I had in mind.

Well...I sure have a lot to say considering I didn't even get to stamp today....remember to insert very sad face....

Happy stampin' to all of you!

Sunday, February 17, 2008

Like it?

Do you like my new banner? I made it using my newest favorite card. Still wondering what came first...the card or the cake?

Saturday, February 16, 2008

Which came first......

The cake or the card???? You tell me.

Ok...now brace yourself ladies....what I am about to show you may shock you.....only once that I can think of I have posted any pictures here that weren't Stampin' Up! related, but I am going to let another cat out of the bag.

Here it goes....this is your warning!

If the sight of sweet suger mixed to a buttercream consistancy that you can smell from the next room offends you...you might not want to read this post. If the use of a few retired Stampin' Up! stamps offends you, you might not want to read this post. (Here is where I might get you.....) If the tiny use of product that is not Stampin' Up! offends you, you might not want to read this post.

Now, mind you, this line of redneck-imitating jokes are just coming off the tips of my fingers as I type...I didn't rehearse this ahead of time. Maybe I can get a stand up job on a channel that is a cross between HGTV, Food Network and Comedy Central, huh? Or maybe I can stick to my daytime job of being a domestic engineer at my abode. (sounds impressive for a stay at home mom....makes me feel good!)

Are you saying to yourself....get on with it already!!!! Show me the pictures and explain what in the "H-E-double hockey sticks" you are talking about! ok....ok....give me a little time, bear with me...it is 5:30 in the morning! (***note to self...learn to stay in bed no matter what time you wake and your legs start to jump around....)

ok with all that being said....here is the run down.

Today is my Grandma's birthday get together. ( I hate to say party.....we really all get together and eat...eat...eat...and then when the table is cleared off we eat some more. So it is more of an eating fest in honor of her birthday rather than a party so to say.) So, anywhooo.....I was to make the cake. more background info here: I took a few classes (three courses, actually) last fall on cake decorating desperately trying to fill the creative void that quitting my hairdressing job of 12 years left...like I don't have enough other "irons in the fire...." right? ( I did tell you that I was an "engineer" didn't I?) But I really liked learning something new.


And being a papercrafter....I am going to make her card, right? So I'll show you the pictures and you can deside...which came first, the card or the cake? (please feel free to leave a comment below and let me know what you think.....)

The pictures are in no particular order....


Some close ups:


recipe: for the card...not the cake! lol!
stamps: flowers for a friend (retired), springtime stems (retired), sincere salutations
ink: regal rose, pretty in pink, perfect plum, mellow moss, white craft, barely banana marker, summer sun marker
card stock : regal rose, whisper white
accessories: colluzzle ctiing system, SU hobby and craft knife, cutting mat, stampin' dimensionals, white detail embossing powder, heat tool
Note: I just wanted to add....I cut my flower bouqets out with my new Stampin Up hobby and craft knife on the cutting mat....let me tell you - it was a lot easier to get around those little flowers and leaves with this cutting blade than with scissors! It took me a few minutes to get the hang of how much pressure to use when cutting..but when I did...look out! What a breeze!

Thursday, February 14, 2008

voila....a valentine!

Hi all! Can you believe this is the third time I have posted today?????
I made this card for my grandma. (embarrasingly, this is the only valentine card I made this year......) Ever since we used this stamp set, Voila, in my last stamp camp I wanted to pile up something else on his chef platter....I pulled out my Loads of Love set and accessory set...the hearts, perfect!

My grandma was a cook for years before retiring...so I thought I would give it to her.

What do you think?


(notice the tray sticking out from the main image panel...)

Here is a close up of the watercoloring...done with reinkers and my aquapainter, of course. lol! It really does look better, in real life...I could not get the lighting to agree with me and the flash made it look too washed out.....sorry


recipe:
stamps: voila, loads of love, circle of friendship, dotted background
cardstock: purely pomegranate, pretty in pink, basic grey, water color paper
ink: purely pomegranate, pretty in pink, regal rose, basic grey, black staz on
accessories: 1", 1 1/4", 1 3/8" circle punches, scallop circle punch, aquapainters, stampin' sponges

What kind of chocolate are you?

This is what it came up with for me when I answered the questions....what kind are you? This is fitting for me...I even prefer milk chocolate chips over the usual semi sweet! too funny!

You are Milk Chocolate

A total dreamer, you spend most of your time with your head in the clouds.
You often think of the future, and you are always working toward your ideal life.
Also nostalgic, you rarely forget a meaningful moment... even those from long ago.

Did you figure it out????

Did you figure out what is in the box from my earlier post?


A sweet new box of goodies from Stampin' Up!


There is a new collection of Hodgepodge Hardware coming in our Occasions Mini Catalog (starts in March 1) Can you believe it? I love the Hodgepodge Hardware sets and now we get a new one!!!!!! This one is called Styled Silver. It has the most beautiful silver finish! And the best part is there are new sizes of brads with embossed images on them, new flower shaped ribbon slides, book plates that coordinate with more punches! These coordinate with our oval punch, square punch, a circle punch and the designer series lable punch! that is great! I love to incorporate using punches in my projects and now we can incorporate punches and hodgepodge hardware together!!!!


It is so exciting!


You wanna see the picture of the insides?


Or do you want to just talk about the weather....politics.....the use of steriods in baseball......the upcoming nascar season....


okay...okay.....I'll just show it to you!


Tuesday, February 12, 2008

Tempt me galore!

I made this card today sparked by an online color challenge to use green galore, tempting turquoise and kraft. I must say...I would have never put all of this together! I do like the colors together though.
This is why I try to keep up with challenges...to do just that...to challenge myself. I also decided that today I would "try out" a new style for me...very simple, no sponging and use plain old straight ink techniques...no watercoloring. This was a stretch for me!


Well...here it is:

(be easy on me......please...)


The base is kraft. I love kraft...why don't I use it more???? I took my 3/16th inch corner rounder and rounded the corners of my card base. sshhhh.....don't anybody tell Stampin' Up! They recommend that we do not punch any more than one layer of card stock at a time. That is very reasonable...Stampin' Up! card stock is pretty heavy. Now, I'm not telling you to run out and push the limits of your punches, by any means, but I did it today and at least this time it worked in my favor. :) I created the scallop border with my slit punch on green galore. I then took my 1/8 inch handheld punch and punched a row of circles. (I know they aren't perfect...I just eyeballed it.... :) ) The bottom panel is from Bali Breezes designer series paper. Don't you just love the free spirit of those swirls? I then tied a simple knot around the "seam" with 1/4 inch white grosgrain ribbon.

For my main image, I used my Sale a Bration set - So Many Scallops. You can never have too many Birthday cards on hand, right???? (not in my opinion....) I used stampin' write markers in green galore, tempting turquoise and summer sun to ink up my stamp. I then punched it with the 1 1/4 circle punch. I matted that onto a circle punched with 1 3/8 inch circle punch and then finally a scallop circle. I punched green galore with my scallop circle punch and then did the same treatment to the scallops that I did on the row of scallops. Now for the fun! I took my 2 way glue pen and lined up the candles and sprinkled them with my cosmo fine glitter. Oh how i luv that glitter! Anyway, that was mounted on stampin' dimensionals.


It is a very simple looking card but I need to tell you it was a little while for me to complete...this is not my usual "style." I challenge you to make a card that is not your "norm." Come on...you can do it!


oh yeah...I almost forgot! Can you guess what is in this box? This box right here....This one....come on....have a guess?

Monday, February 11, 2008

I feel pretty......

Oh so pretty! I feel pretty and witty and bright! Anyone recognize the tune? From the musical West Side Story, I believe. Or for all you Dirty Dancing fans....Baby's sister (what was her name????) sang that in the talent show. Ok...enough rambling!


Here is todays card...I made it a while ago. It was to showcase how easy it is to create a card with the Pretties Kit. I demonstrated some easy uses for the Pretties Kit at my last retirement party. It is great to have a job that has retirement every six months ;)


My favorite "girly" combo is regal rose/certainly cleery/whisper white. That is what we have on this card. Regal rose card base, a mat of whisper white punched with the ticket corner punch, adn the main front panel: the top is from certainly celery designer series papers and the bottom is pretty in pink. I stamped the sentiment "from the heart" in regal rose, it is from Holidays and Wishes. Next, I tied a simple knot around those panels with pink taffeta ribbon....so silky! On to the good stuff!!!


Here is a close up of those pretties:


The flowers in this kit come white....a blank canvas! I colored these flowers with my stampin write markers. The larger one in regal rose and the smaller one with pretty in pink. Next came out the stick pin!!!! (i luv these!) I threaded a few beads from my pretties kit and then took a tiny drop of crystal effects to hold it in place (so the beads wouldn't slip behind my flower). And then, threaded two more beads on the bottom of the stick pin, secured it with the pin closure. See that rhinestone brad???? That is the thing that holds this entire flower together! I took my rhinestone brad and threaded it through the smaller flower and then took my stick pin and put it between the brad prongs and then pushed the prongs through the hole in the larger flower. Spread those prongs and you have it....a beautiful flower with beads and pearls coming out of it with just a hint of sparkle for the center! Very dramatic for only using one little stamp, huh?


What do you think? Let me know...I won't be hurt ;)

Sunday, February 10, 2008

UPDATE!!!!

I wanted to drop in and let you know that One of a Kind stamp set is now available!

And also....if you have more than 5 stamp sets on your wish list....or if you ever wanted to be a head of your own business......or just interested in buying your supplies at my discount......
STAMPIN' UP! IS OFFERING 20% OFF NEW DEMO KIT!!!!!! You will also get to choose a free stamp set (not included in the regular business kit) valued upto $47.95. This is available during Sale a Bration only! Contact me if this intrigues you!

Friday, February 8, 2008

Do you dare to be fabulous????

Here is my card for my online blogger's challenge group. (week 33) We were to use the color shceme: pumpkin pie, taken with teal, rose red and old olive. We could use white or vanilla. (Have you noticed the amount of pumpkin pie in our cattie??? It is gaining popularity iwth paper crafters every where!) When I first took this challenge...I really thought...that is a lot of color to use on one card. I layed out the colors on my desk and it hit me....Fabulous Flowers woudl be the stamp set and I would use bling! Now to execute that....


Here it is....what do you think?


Wanna challange? I would love to see something you make with these colors. Post me a link here or email me your picture, I love hearing from all of you!

recipe:

cardstock - old olive, rose red, taken with teal, pumpkin pie and whisper white

ink - versamark and all stampin write markers - old olive, basicblack, so saffron, regal rose rose red

accessories - mat pack and piercer, heat and stick powder, dazzling diamonds, 5/8 inch old olive grosgrain ribbon, stampin dimensionals

Serene birdie

Hi all!


I made this card last week for Beate's weekend sketch challenge (last weekend....). Sorry it took me so long to show it to you. :(


The card base (this is where I started this challenge) is chocolate chip (measures 4x8 1/2 - unusual size for me). If you read my earlier posts about where I start my creations...today was the base, mainly size. Cards of various sizes are becoming increasingly popular so I took on this challenge with open arms! And besides - I have dying to ink up my new level 2 hostess bundle Spring Solitude. Thats' right...a bundle! That means you get a stamp set as well as a coordinating wheel...love it!!!!


My left vertical panel is brocade blue stamped with the three flower image from Spring Solitude in brocade blue. I then took my matt pack and a pencil to mark three evenly spaced marks to punch holes for my jumbo eyelets. I grabbed my crop o dile and punched the three holes with the larger hole punch. Next I took my three antique brass jumbo eyelets and pushed them throught the holes. They are a snug fit, but not too tight by any means. With my crop o dile setter set on the setting c-3, I set the eyelets. (rule of thumb - setting A-1 for reguler sized eyelets, setting C-3 for jumbo eyelets.) And then the bling....I took three of the largest light green rhinestone brads from my set of ice round rhinestone brads and put through those eyelets. I have to tell you ....I LOVE THAT LOOK!


My main image panel starts with three squares of confetti cream. I inked the branch with my stampin write markers. I used chocolate chip for the branch and mellow moss with the edges outlined in always artichoke for the leaves. It is very hard to tell in the picture but the shading of the leaves looks real nice in real life. How did I do that? Well....I first colored in the entire leaf with my mellow moss marker and took the always artichoke marker and went around the edges of the leaves softly before stamping.

I inked my bird up with brocade blue and stamped off before aligning it with my stamp a ma jig on the branch.

Those main blocks are matted onto brocade blue and then placed on a thin mat of very vanilla to tie them all together. That was then matted onto mellow moss with just the bottom edge wheeled in the coordinating wheel that comes in the spring solitude bundle with brocade blue ink.

My hanging tag was made by stamping "happy birthday" from Amazing to Zany onto confetti cream and punching it with my 3/4 inch circle punch. I matted that onto a chocolate chip circle punched from my 1 inch circle punch. I then took my 1/16 handheld punch and punched a hole in the top and threaded linen thread through the hole. I tied a simple knot around my mellow moss panel with vanilla taffeta ribbon with the linen thread loop through the knot. That entire panel was mounted to my card with stampin' dimensionals.


Now to get to this weekend's challenge and my blogger's challenge that is supposed to be posted for today....oh my!


wow....that was long winded, huh?

I hope you like it....I really did. I am trying to break away from my standard way of stamping...stepping out of my usual comfort zone, so to speak. And you know what? I am liking the diverse projects that I am able to come up with....are you?

Wednesday, February 6, 2008

Embrace Birthday Wishes

Wow...two posts for you in one day???? Some people would speculate that my daughter sleeps too long....some people, not me. lol! I call myself a nap time stamper. I joke that her nap time is my lunch break...so I stamp most days on my lunch break. I really feel that I personally need that "creative outlet." I was a hairdresser for 12 years before I quit my job when my little one was born so I guess my job was my creative outlet then.....now I stamp and create. Oh well...enough about my lunch break, huh? On to the card!

I made this for today's online sketch challenge. I decided that I was hungry for my Embrace Life stamp set, it has been a few weeks since our last encounter. Today would remedy that, I decided. I reached for my packet of Ginger Blossom Designer Series Paper...you all know how I love that paper pack....and I told my self..."NO!....create with that set with colors that you usually don't use or that you don't usually use together." I like elegant eggplant but don't find myself using it very often, so today I pulled it out and it woudl be my card base. Ok, three decisions made...layout, stamps and card base color. So I went to work!


What do you think?


I will start with my main image panel. I took a piece of very vanilla and stamped the leaf branch in old olive and then took my aquapainter and "smeared" the ink a little to make it bleed to soften the starkness of the vanilla and old olive contrast. Can you see it in this picture?


I then pulled out old faithful Sincere Salutations. Would this be a get well card? a thinking of you? nah....I think I will do a Birthday Card. (these are the thoughts that swin around in my little head when I make a card or anything in papercrafting.) So I inked up my sentiment in elegant eggplant. I matted that onto pretty in pink.


Next for the blossom.....

I stamped it onto watercolor paper with black staz-on ink. I then watercolored it with my aquapainter and reinkers. If you aren't comfortable watercoloring or haven't done it....go and order yourself some stampin' up! watercolor paper and practice. It is only paper and ink after all...if you screw itup...try again. Don't even tell anybody....no one has to know.....it can be a secret. You know the old saying "what happens in Vegas stays in Vegas?" Well..."what happens at your stamping space stays at your stamping space!" Gee....I am really deviating from the task at hand, huh? Bear with me....I will get back on track. lol!

Any way, I watercolored this flower with the reinkers. The colors I used were: elegant eggplant, lavendar lace, pretty in pink and regal rose. I cut it out and mounted it on stampin dimensionals.


My side panel is old olive stamped with the leaf branch and "smeared" in the same manner as my main image. That was matted with very vanilla. I punched my photo corner punch twice with pretty in pink card stock and used the two smaller corners. I put the other two in my "extra punched shapes" jar on my shelf. I took the two smaller corners and sponged then with elegant eggplant before adhering them on my side panel.


The horizontal panel is lavendar lace sponged with elegant eggplant as well. I used my mat pack and piercer to line up my three pretty in pink brads from the soft subtle brad pack.


The card base was stamped with sanded background stamp and sponged on the edges with elegant eggplant.


I have to say that while I was working on this card...I was thinking to myself..."I don't know about this....these colors aren't really my comfort zone...." That's what creating is all about, right? expressing.....pushing.....exploring.....experimenting..... But I have to say that now it is done and I can sit back and look at it....it really isn't that bad. What do you think? Let me know below, leave your comment. I can take it ;)

A Little Birdie Told Me.....

It's time to celebrate! or is it (sale-a-brate???)

I actually made this card yesterday for an online color challenge of real red, ballet blue and apricot appeal. Apricot appeal????? How could I incorporate those colors on one card? The real red and ballet blue were great but apricot? I sat and thought and thought.....what stamp set could I use with those colors? It hit me.....use A Little Birdie Told Me...I can make those cute birdies any color I would like to. And besides, I haven't even mounted it yet...it was screaming to me to be inked up! I grabbed my craft and rubber scissors and went at it.

I decided the first step would be to make my main image and work backwards. Sometimes I work from base up, sometimes from a side panel and then up or back....I don't have a real rhyme or reason to how I create....I just start. But this card would start at the main image.


I stamped the small birdie on watercolor paper with black staz-on ink and then made a "mask" for it on a sticky note. I laid the mask over the birdie and used my stamp a ma jig to line up the larger birdie where I wanted it. I wanted it to look like the small bird was whispering in the ear of the larger bird. Does it?

I used my stampin' write markers, ink refills and my beloved aquapainter to color in the image. In my opinion, colored images look one dimensional and "flat" if there isn't some sort of shadow around the image. For this card, I highlighted around the birdies with sahara sand and made shadows under the birdies with basic grey using an aquapainter. Here is a close up of the main image panel:


Notice the party hat on the ballet blue panel and on the sentiment? It is from the same set! How cute!
The rest is probalbly self explanitory....if not...fell free to contact me, I'd love to hear from you!

recipe:
stamp set: a little birdie told me
card stock: ballet blue, real red, apricot appeal, whisper white, watercolor paper, basic black
ink: black staz-on, ballet blue, night of navy, apricot appeal, more mustard, sahara sand, basic grey
accessories: mat pack and piercer, red gingham ribbon, scallop circle punch, 1 1/4 circle punch, 1 3/8 circle punch, stampin' dimensionals

edited to add: i realize now that i forgot to color in their little beaks....they are colored in with only orange....sorry ;)

Tuesday, February 5, 2008

sorry!

sorry the next post is all over the place....I am having a bit of trouble with blogger. The spell check hasn't worked for days and now I can't get my post to rearrange. It looks good in my preview and then I post it and things get crossed. You get the picture anyway, right?

Sample from stamp camp on Friday

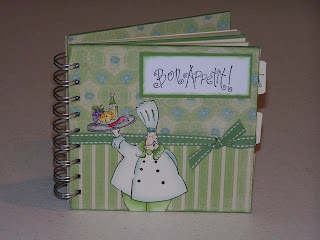
This is the cook book we made on Friday at Stamp Camp. Everyone got to pick the paper and ribbon for their cover so they all turned out a little different. They chose from Porceline Prints Designer Series Paper and Blue Bayou, Wild Wasabi or River Rock Double Stitched Ribbon. It was nice to be able to offer choices but still stay in the same color family. That is what the Designer Series Papers do for you. They all coordinated wonderfully!

Here is a close up of the chef:


Here are the tabs and page separators:


I have to tell you....I had a great time putting this cook book together and I hope the girls that were at the camp did also.


If you are interested in a kit for this project, it is $20 plus shipping. Everything will come stamped (not watercolored unless it is requested), punched and ready to assemble with your adhesives along with a tutorial on how to use the spiral punch. Just email me if interested.


recipe:
stamps - voila, from the kitchen of
ink - black staz-on, misc used for watercoloring
card stock - porceline prints, blue bayou, wild wasabi, river rock, very vanilla, watercolor paper
accessories - round tab punch, double stitched ribbon, spiral punch, stampin' up glue stick, sticky tape

Monday, February 4, 2008

A possible invite.....

At my cook book stamp camp last Friday some of the girls and I got to talking about wedding shower invitations. I suggested maybe a pocket card...well....my wheels started to spin and while watching the Super Bowl last night this came to me! (Go Giants!!! Don't get me wrong...we are true Steeler fans around here but I wanted to see New York win last night!) I got up at five this morning to get it out of my head. Sometimes when I get an idea floating around in there it just wants out! This was the case with this card. Maybe to all of you it isn't really what you would have in mind but I wanted to see it executed on paper, so to speak. I asked what the wedding colors were and a swatch of fabric was presented....Groovy Guava to a T! I don't think there would have been a better match. I asked about accent colors....chocolate chip! Girls....could this be any more "up my alley?" I love chocolate chip! It goes with everything! (in my opinion....hehehe!)

So here is what I "banged" out this morning for all of you:


For mass producing, 5/8 inch chocolate chip grosgraine ribbon would be perfect but low and behold....I went to my ribbon stash and to my disappointment....I didn't have enough of that to even do this card. I told you before I luv the chip....I will have to order some on my next order, if that is all I order. (yeah, right!) lol!


I don't know if you can really get a feel for the glitter on this card but in real life it sparkles with just enough bling to satisfy a girl's need for dazzling diamonds!


Here is the insert pulled out. I stamped off the groovy guava swirl on the bottom to lighten it a tad. You could do any number of things with this insert. You could hand write the information on the insert or computer generate it with the Write Me a Memory Journaling Font CD, Vol.2. Anyone of you that have been to any of my "invite" parties knows how I hate to hand write all that information...so for me, hands down, it would be the Journaling CD.


Leave me a comment below to let me know what you think of this pocket creation. Will another came to me today???? If it does...You'll be the first to know!
recipe:
stamps: Baroque Motifs, Big Bold Birthday (small heart), Sincere Salutations
ink: groovy guava, blush blosson, chocolate chip, versamark
card stock: groovy guava, blush blossom, very vanilla, chocolate chip
accessories: theater originals ribbon, heat and stick powder, dazzling diamonds, heat tool, stamp a ma jig

Friday, February 1, 2008

It's here!


Blogger's Challenge - week 32

Here is my submission for blogger's challenge - week 32. We were to CASE the birthday layout on the cover of the Sale A Bration cover. Did someone mention Sale A Bration????? I sure did! It starts today!

My card starts with a base of close to cocoa. I distressed the edges by taking the ink pad and rubbing it on the edges....no sponge or dauber, just the entire ink pad. My middle panel is sage shadow. Didn't I tell you the other day I was going to use that color more? So I decided to follow through on that and use it today. I took the swirl from Bronc Buster and stamped it in the corner in close to cocoa ink and distressed this layer in the same manner. My main image panel is that handsome cowboy stamped three times in close to cocoa and then distressed. I tore a piece of chocolate chip to use in place of the zig zag edge of the card I was caseing. I decided to use twill tape instead of a ribbon to mahe my knot around the top of my sage shadow panel.


I had fun creating the medallion on this card. I first stamped two stars from Wanted in close to cocoa onto very vanilla. I punched them with my star punch. Next I took out my brand new large star punch and punched out a chocolate chip star. I layed those stars together and just felt they were missing something.....a circle....no....I stared at my wall of punches in wonder what I could use. Then it hit me....my snow blossom punch! I punched it with sage shadow and layed it out....that was what it needed! I distressed all of those punched out pieces and mounted them onto my card with stampin' dimensionals.


It's great that punches make a card come together sooooo quickly with ease!