Tuesday, March 30, 2010

A Happy Moment

HI Stampers!!

Sale a Bration is over tomorrow......booohoooo!!!!!!  I wanted to share with you a card I made to submit to the DIVA display group, my product to use was the Sweat Pea Felt Flowers.  You know how I love those flowers :)


The card base is very vanilla.  The designer series paper is from Sending Love Specialty Paper in the Occasions Mini.  I love the sparkle of that paper!!!!  My tag was cut from the matchbox die and the big shot.  I stamped the tag using the Matchbox Messages.  The sweet pea flower is actually adhered on backwards so the entire flower was pink.  I accented it with a 5/16th inch brad.  The cake is from Happy Moments, a FREE set from Sale a Bration!!!!  I colored it in with my stampin write markers and accented the flowers with a two way glue pen and dazzling diamonds.  It is hard to see that in the picture...but trust me, it is there ;)

Have a wonderful day!!

Thursday, March 25, 2010

Season of Sweet Pea

Hi Stampers!!

I can't believe that Sale a Bration is over in less than a week :(  One set that I think may have been over looked a bit in the Sale a Bration catalog is Good Neighbors.  And it was FREE!!!  It is really a cute little set - not little in number os stamps in the set - 10! - but small in size.  I think the little houses are begging to become this:

A little (not so little to the tree or bird :) ) abode for the bird in the tree from  Season Of Friendship!!!
The house roof and bird are adhered with stampin dimensionals.  The spring blooms in the tree are from the sweet pea felt flower assortment.....love them :)  The designer series paper was also FREE from Sale a Bration, Welcome Neighbor.   

Email, or call, me right away to get these and more FREE before Sale a Bration is gone.

Tuesday, March 23, 2010

Around the note book

HI stampers!!

How are you all doing today?  I'm doing pretty good, thanks for asking ;)  LOL!!!  I didn't get much sleep last night, for some reason so here I am...early....and somewhat goofier than I normally am.  oh my!

I pulled out a project from my archives -- archives......now doesn't that make me sound important???  archives.  Told ya, the sarcasm just rolls off of my finger tips.  I tried to stop it at my knuckles but, you know how that goes......

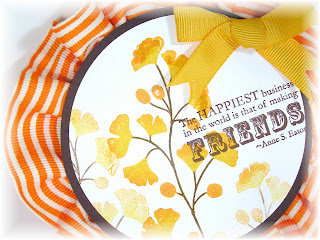
I buy things....a lot of "things".....I can't seem to help myself....if I think I can cover it or change it or alter it or hide it.....lol!  No, seriously, I do buy a lot of note books and things to alter....if I alter them, well....that is another story.  I bought a few round note pads knowing exactly what I wanted to do with them - and then put them in my cupboard of unaltered, needy, ugly crap.  I think this note pad had an ugly flower on it or maybe an "m" - I don't remember.  But, anyway....wanna see?

I stamped it with the level three hostess set, Kind and Caring Thoughts.  I inked up the flower in stampin write markers and then generation stamped them on a circle I had cut with my circle scissor plus

I matted that with a circle of chocolate chip.  Before I adhered that to the cover of the note pad, I ran a piece of sticky strip around the edge of the circle and gathered up pumpkin pie striped wide grosgrain ribbon around it.  This ribbon is so soft - it really does deceive you, you would think that ribbon this wide would be stiff, but it isn't really.

I then tied a bow with 5/8th inch grosgrain ribbon and adhered it to the front with a pop up glue dot.

Monday, March 22, 2010

This was a neccessity!

HI stampers!!

I was commissioned to make some paper flowers for neccessity baskets for a wedding.  The mother of the birde picked them up last Thursday, hopefully they were pleased!!!  I really have been plugging along here behind the scenes, I just haven't been able to share it, yet.  I am in a super big hurry this morning, so I can't get into deep details about these baskets, but I will later....I promise!!!

I would love to know what your first impressions are about these :)
 

Friday, March 12, 2010

Border and Corner punches

HI All!

Sorry I have been so quiet on here this week....it hasn't been quiet in real life :)

I wanted to share a video made by Stampin' Up! showing how to use the new corner and border punches:


Find more videos like this on Stampin' Up!

Sunday, March 7, 2010

A tutorial, as promised :)

HI stampers!!

Did you enjoy the Going Green Blog tour over the weekend?  I sure did - and I also gained many more green ideas for paper crafting!!  Can I get a "whoo whoo!!!"?  lol!

Anyway, I promised to post a tutorial for the flower I used on the project I made on Friday.  I ahd made the same flower (stamped differently though) for a card I made a few weeks ago.  Between the two postings, I received a lot of comments and emails for a tutorial....so here it goes!

Now, I will warn you....I am pretty thorough with pictures.....so long picture post today :)

First, you need to punch five scallop circles.  You can stamp them first or after you punch....what ever suits your fancy ;)

Take 4 of the scallop circles and stack then on each other - no need to line up here....we aren't looking for perfection - lol!!  Punch them with the 1/16th inch hole punch.

Now this is where I might lose some of you.....this is difficult for some people, lol!  Wrinkle up all five circles in as tight of a ball as you can make.  Just do it!  It is card stock - it can't wrinkle you back!

Unwrinkle, but don't smooth out.  Is this making you feel any better???  lol!  Sponge the edges.

Take the four that have been punched with a hole punch and adhere then together with a brad.  Any 'ol brad will do, you will never see this brad again.  Pick an ugly one :)

Pull up the scallops toward the center, smooshing and mooshing, all except the bottom scallop circle.

Push them away from the brad a little.

Put a pop up glue dot in the center, over that ugly brad.

Fold up the remaining scallop circle into fourths and snip the bottom point off.

Smoosh ( technical term, I know) the last scallop circle into the pop up glue dot and fluff out your petals.

Now, isn't that purty????
Adhere it to your project and hand deliver ;)

If you found this tutorial useful, I would love for you to leave me a comment below.  :)  If you make this flower, I would love for you to link back here so I can take a peek.  I am fishing for some love here, huh?  yeah, shamelessly!  lol!!!!

Friday, March 5, 2010

RemARKable Going Green Blog Tour - Day 3

You're my going green girl.....and she used to sing sha la la la la la la la la la la ti da....la ti da!!

oh yes....that is right!!  I have a "green" girl stopping in for a visit today, the last day of our going green tour.  Have you been enjoying your green ideas?  I sure have, there are tons of great green ideas on this tour!!!

My green girl wanted me to use up scraps today and only use minimal new pieces of card stock.  So with thatin mind, I only cut a new card base and trimmed down already cutpieces for the main image panel and mat.  The ribbon was tied right off of the roll, so there was minimal waste there.  Wondering what my "scrappy" green girl look like???

I thought so....here she is:

Oh Stamping Tessa, you look so fresh and green :)  You have just came from the farmers market with your fresh flowers and your recycleable shopping bag.  Your clothes were even paper pieced with scraps my green Tessa! 

Oh Tessa.......is that a recycling logo made out of the small arrow form the going my way punch???
Why, yes that is.  You should look closer at it......

recipe:
stamps: totally tessa, tiny tags
ink: basic black, close to cocoa, chocolate chip, blush blossom, pretty in pink, garden green, cameo coral and ruby red
card stock: old olive, certainly celery, confetti cream, sweet pea ds, rich razzleberry ds
accessories: two way glue pen, aquapainter, going my way punch, modern lable punch, three for you punch, antique brads, so saffron ribbon, stampin dimensionals


Thursday, March 4, 2010

RemARKable Going Green Blog Tour - Day 2

Oh wow!!!  Are you getting some great "green" ideas, or what!?!??!!?  I am so priviledged to be a part of such a great team!!

Today, I am going to show you a hostess gift for all of you demos out there....but if you aren't a demo, you can duplicate this idea for a stampin' friend that you would like to give a small supply gift to or you can use this idea for any small gift packaging - like money :)

You love Stampin' Up!'s build a brads, right?????  What is not to love about those babies!?!?!?!?  Well - I couldn't bring myself to ever throw out the container they come in - what an awesome tin with a window lid!  Wanna see what I did with it?


Isn't that darling???  I wrapped the bottom with Noveau Chic designer series paper and then made a belly band to hold it closed.  It wasn't necessary to have soemthing hold it closed, but it looked cute :)
I filled it with some stamping accessories as a door prize.  Let's look closer at that flower, shall we??

I think we shall.....

I absolutely LOVE the floral fusion sizzlet!  I cut the flowers out in velum card stock and sponged then with sage shadow and then used the spritzer tool to add some basic grey color splashes.  And the half pearl from the pretties kit is the perfect center to this beauty.

Before you leave me, spread a little green love and let me know what you think and then click on the icon below to continue on your tour!


Wednesday, March 3, 2010

RemARKable Going Green Blog Tour - Day 1

HI Stampers!!

Are you ready for a green tour????  If you are coming here directly, just click the Going Green logo at the bottom of the post and you will go through all of the stops and when you arrive back here, you have completed all of the tour. 

What does "Going Green"  mean to me in paper crafting??  Well, one thing it means is the obvious....all green.  It also makes me think of nature, the beauty of the out doors.  It also means repurposing.  By that, I sometimes take things that are packaging for other things - meant to be garbage - and use them for other purposes.  Like today's project, for example.  It started out as a bracelet package from a chain costume jewelry store that my little one bought.  It was full of pretty colored beaded bracelets - just what every four year old would be drawn to.  :)  We took the bracelets out and I grabbed up that packaging right away!!!

I wanted my flower to be the real focal point of the container, so I kept everything else very simple and plain. I made a flower like this before HERE and have had several requests for a tutorial so make sure you come back Monday for that tutorial.

Here is a side shot:


There are alot of people out there in the paper crafting world that are punching their vintage books and novels - I recreated this look by stamping A to Z from the Ocassions Mini onto very vanilla card stock.  this way, I can get a vintage written look without having to worry about what exactly I written on the pages.  I sure wouldn't want to give my Gandma a flower that had soemthign inappropriate written on it without realizing....so with this stamp, I am safe.  :)

The leaves are from the Sweet Pea Felt Flowers and the designer series paper is from Sending Love Specialty.  {luv} these!!

I realize you probably wouldn't ever be able to recreate container this exactly, unless your four year old buys the same set of bracelets....lol! ...but there are lots of pieces of packaging that this could apply to.  So on your way to the trash next time...ask yourself, could I repurpose this into something pretty???

I would love to know what you think.  I will fill this with small somethings - probably candy - and give it as a gift.


Is this cute, or what?

lol!!

Hi stampers!

Sorry it has been so long.  I have been feverishly working on things...I just can't show them here yet.  I do have a scrapbook layout to share though.  I made this a while ago and sent it into Jan Wakeland to use for the diva display - my theme was ruffles and lace with card stock, ribbon, etc.  I was asked to make the display, so I really felt honored.....and guess what????  I am making display items again this month....this is so fun!!  This month's focus for me is Sweet Pea Stitched Felt.....oooohhhhhh......aaahhhhhh....  wait until you see that stuff :)

Getting back on track today.....here is a layout using the Sweet Pea designer series paper.

I absolutely love this pack of paper!!!!  It has such a broad variety of papers in it.  It includes everythign from small prints like tiny polka dots to stripes to hounds tooth to very large graphics on pages as seen in this layout.  My background layer included three flowers and the bird, already printed on it.  How easy is that for a layout????  All I did to that part of the page was cut out the bird and two smaller flowers out from another page and adhere them onto the page with stampin dimensionals.  For the larger taken with teal flower, I punched the edge with the eyelet border punch of a thin strip.  I then ran it through the paper crimper.  I put sticky strip onto the back of the punched out flower center and began adhereing the strip around then edges, pleating it as I wnet to create a flower.  After that was complete, I adhered it to the page with pop up glue dots.

The white space is meant for two photos matted together.
The title "cute" was cut with my big shot and the Stampin' Up! Alphabet Simple Letters dies.

This page was super easy to put together, I let the premade background determine the layout and theme.

Make sure you come back tomorrow.....the RemARKable Stampers are coming back with another blog tour - Going Green!!!!