Oh my....with all of the Beetle talk yesterday on a show I was watching about their top 100 songs.....I just could not resist!
****warning!!!! This is a very long post.......
GUESS WHAT?!?!??!
Did you guess yet???
I have a tutorial for you today!!! And a cute card to show you - if I may toot my own horn........lol!
Let's start with the card, shall we?
The starting point for this was a sketch challenge. The area that has my sentiment in it is actually supposed to be a separate panel....but.....I went my own way.....surprised?
I didn't think so! lol!!!
The card base is tempting turquoise. The main panel is whisper white, that I embossed with the square lattice embossing folder....and then there is that area that I didn't emboss.......we'll get to that later in this post :)
The whisper white is matted with old olive. The Island Oasis designer series paper really popped against the whisper white. I layered it with a torn panel of daffodil delight - not afternoon delight.....my head keeps going into song with every paragraph I type.....what in the H$!) is wrong with me????? I have a splitting head ache that I can't take anything for because of another medicine I am on.......maybe the rheumatologist doesn't get it that I need a handful of ibuprofen every now and then!?!?!?!?!???!?!!!!!
Oh - I got off track there a bit, huh? Sorry :)
Here is a closer look at some of the sweet goodness.....
The sentiment is from On Your Birthday. I inked it up with Stampin' Write Markers and used my stamp a ma jig to line it up exactly where I wanted it. I made a "frame" around the sentiment with a rose red stampin' write marker to break up the embossed/not embossed areas. And that cone - Isn't it the sweetest thing you have seen since your morning cereal?? The stamp set Sweet Scoops and the designer series paper, Island Oasis, will be RETIRING at the end of this month......do NOT let these babies slip right past you! The cone was inked up with crumb cake and then I edged it up with soft suede. This is what you get from the second stamping of it without reinking. The ice cream is also the second stamping of peach parfait edged up with tangerine tango. And the dazzling diamonds just adds the right amount of pizzazz to it, don't you think? Boy - I sure am big headed today, uh???? And then an accent of a bright button tied with white crochet thread off sets the cone a bit.
And then there is the inside to deal with......
Simple, but enough to add a cohesive feel to the card.
ALL RIGHT ALREADY!!!! I will get to the tutorial now.......
Here is what you will need to gather up: big shot, embossing folder, one cutting plate, the multipurpose platform, a piece of longboard chipboard, cutting mat, hobby blade, ruler, pen....and of course a piece of card stock.
First, cut a piece of longboard chipboard to 4 1/4 x 5 1/2. (this will create a template that is the same size as a card front, making it easier to line up)
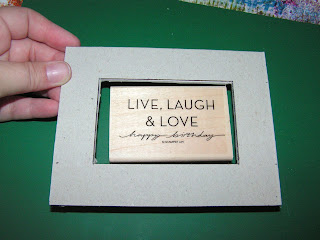
Second, draw out a window in the center of the chipboard piece. (I made a rectangle one inch smaller than the template - being careful to center it)
Third, cut out the window with your hobby blade. And do not throw this piece of chipboard away - you will be able to use it for something else :)
Now what is cool about this embossing template is you can lay your stamps in the window to see how they will fit :)
Now you are ready to be a big shot!!! {hit me with your big shot......come on - hit me with you big shot......} - told you!!
The sandwich layer from bottom to top is:
multipurpose platform on tab 2 (nothing open) - chipboard template - embossing folder with card stock in it, centered onto the chipboard template - cutting plate.
Run that baby through the big shot and you get this!!!!
Well?????? How did I do?
If you liked this tutorial - let me know......leave some love in the comment section.....i won't bite ;)


2 comments:
Thanks for the quick response to my question. I don't have the chip board but I was able to follow your tutorial easily. Very nice job on today's card! MAT
Great card and tutorial. Thanks for sharing.
Post a Comment