Monday, December 22, 2008

Ok...Time to let the cat out of the Bag!!!!

LOL!! If you didn't see earlier today...this is my second post for the day....be sure to scroll down for some Christmas goodies!

Even though Christmas is in three days....it is NOT too early to think about Valentine's Day.....


You have the opportunity to purchase a brand new-never released before bundle at a 20% discount!! I know...I had to pinch myself too!! lol! I have been having so much fun with this bundle in secret in my studio...now I can shout about it! hint: Remember those adorable little hearts on the chest of my gingerbread men???? Oh yeah....they came from a brand new punch in this bundle!!!! Can you believe it????? Here are the details:
Oh my......isn't is sweet????? I stamp set, coordinating punch, and coordinating designer series paper???? Oh my!!! This bundle price is only available until January 31st. Click HERE to download the flyer.

Here is a card I whipped up in no time...thanks to the entire kit! One of the stamps lines up perfectly with the new Heart to Heart punch! I {luv} that!

Card base is close to cocoa. I stamped the birds from Love You Much in chocolate chip. The designer series paper is from Candy Lane Designer Series paper - isn't it divine???? The sentiment is from All Holidays, stamped in riding hood red on very vanilla. I punched it with the 1 inch circle punch before putting it behind a piece of styled silver hodgepodge hardware. And that row of hearts.....You guessed it! I stamped the trio heart stamp and punched it out with the new heart to heart punch and adhered them down randomly and with stampin' dimensionals. I'll give you a "bird's eye" view....lol!

Just a reminder - tomorrow is the last day to save 10% off retiring stamp sets and get the free shipping on orders of $70 or more as well as the first day you can order this wonderful bundle!!!

I have had so much to share.....

but where have I been??? I just realized that I haven't posted anything since Wednesday!??!?!? What is up with that??? I have had things that I wanted to share and I guess I haven't had the time to even post it! Sorry :(
I will show you two things today and one is a tutorial!!! Will you forgive me now???? Pretty please.......

First, remember last week when I showed you the gingerbread man tags that I gave to a friend? Well, I also went to dinner that night with my cousin and friend. It was the three of us...we had such a good time! These are the gift tags I took her along with a big ol' cocoa cone to enjoy in the f.r.e.e.z.i.n.g. COLD weather we are having right now!!! So, Fawn.....if you are reading this...make some cocoa and curl up!!!

Aren't they adorable? Santa was made entirely out of punches except for his hat brim...I just cut that from a skinny piece of whisper white card stock. Here is a closer look at him:


Next.....for the tutorial. These are perfect if you need a super quick treat to give or you could even use these as gift tags on presents! My little one had her session one pee wee bowling banquet last Wednesday and we always try to take a little something for her team on Holidays. This is what we gave them this year for Christmas.


Aren't they sweet?

Ok...for the tutorial....

Take a piece of card stock. I think mine was 1x3. Use the slit punch on both ends and slip it through the candy cane like this:


Take your favorite stampeed image that can easily be punched out and adhere to the card stock after it is on the candy cane. I did use sticky strip to adhere the scallop circle to the glorious green card stock. The santa image is from the level 2 hostess set, Deer Friends. He was inked up with stampin' write markers onto whisper white card stock and punched out with the 1 1/4 circle punch. The glorious green layer is punched with the 1 3/8 th circle punch. The real red was punched with the scallop circle punch.

Easy peasy, right????

MAKE SURE TO CHECK BACK LATER THIS AFTERNOON.....I WILL POST THE SALE OF A BUNDLE THAT IS AVAILABLE STARTING TOMORROW FROM THE NEW CATALOG!!!! YOU ARE GOING TO LOVE IT!!!!!!

Wednesday, December 17, 2008

Celebrate with cupcakes

HI All!

I wanted to make a gift bag for my Dad's Birthday gift, so I thought that I would use Kristina's color challenge as a starting point. I knew in my head that I wanted to use Simple Birthday Thanks to make a cupcake on the bag. That was the primary reason I bought that stamp. I did preform a major stamp surgery on it....I will try to get that up for you tomorrow.... :) For now...the bag.

Here are the colors for the challenge:


chocolate chip, close to cocoa, baja blue, so saffron, very vanilla - I will have to make another creation out of these colors....I love them together!!!

I just altered a plain kraft gift bag from the store. How easy is this!??!?!?!


See the cupcake up close? I paper pieced the entire thing with the papers from ski slope out of the Holiday Mini - I can't believe how diverse this paper pack is....it definitely isn't just a holiday pack!!! I ran the cup cake liner through my paper crimper. I didn't stamp the cherry, I just drew a black line on the paper where it was. I used soft subtles brads for sprinkles. The icing is mounted up on stampin' dimensionals. The sentiment is from celebrate everything.


This was fun! Now I need to make a cupcake in feminine colors so I can bling up that cherry with glitter!!!

Tags galore!

HI stampers!

Last night I went to dinner with two good friends. I took each one of them a small gift. I gave both of them a bag of gift tags with another gift. Heidi loves to read so I put a book marker for her in the gift bag I showed you yesterday with the gingerbread man on it. A couple of weeks ago, my friend Heidi, invited us over to make Christmas cookies with her, her daughter, and fawn and her daughter. We had such a good time! The three little girls had a blast....they made sprinkles with cookies, if you know what I mean.... lol!!! Anyway....Heidi had her house decked out for the Holidays and her kitchen was full of her gingerbread man collectibles. It looked so nice...she had mentioned that she collected gingerbread men....so I had to make her a gift bag with one on it as well as a bunch of these tags.....


Don't they look so sweet??

Still noticing the little heart on his chest??? Well...you will have to wait to learn more about that! {grin} You will be in the know next Tuesday, the 23rd. :)
Here is a closer look at this sweet little guy...wouldn't you just love to bite his arm off??? LOL!!!


Tuesday, December 16, 2008

Another Gift Bag with the Big Shot

HI Stampers!!

I have been on a punch/die cut run lately....I hope you don't mind! I made a little gift bag last night for a small gift I am giving. Wanna see???
Isn't it sweet??? It is made with the exclusive Top Note die. I cut two of those and cut the bottom off to make it flat. The snowflakes are from snow swirled.....I absolutely love those snowflakes...I have used them a million times already! I accented them with white dots from my white gel pen. I made a banner type sentiment for the front by stamping the holiday wishes stamp from the Holiday Collection stamp set out of the Country Living kit. I then cut a V in one end and wrinkled the whole thing up. When I unwrinkled it, I sponged the wrinkles with creamy caramel ink and a stampin' sponge. I made the girls at the wrap it up stamp camp wrinkle up flowers to give them more dimension...and they all freaked out. LOL!!!!! And then I put a little gingerbread man on the front with stampin' dimesnionals...but he is for another day...hehehehe!!!

See all of that dimension?? To make the top note dies into a gift bag, I adhered them to the front and back of a small lunch sack type of bag that had been cut down to fit inside of the die. I meant to take a picture of the small lunch bags so you would know what I used, but I forgot. When I have more time, I will post a picture of those. I bought the package of bags at Target.

See that little heart on his chest......you just wait!...hehehehe!!!! (can you say new stuff coming our way????)


Monday, December 15, 2008

Isn't he cute???


This wasn't my original idea, that is for sure! Stampin' Up! demonstrated these Santas at Convention this past year. I wasn't fortunate enough to go, but I saw lots of pictures of them. They were mostly ornaments or several were put together to form a banner. I have been wanting to do one to decorate a gift bag for some time now.


You will need to use your big shot cut a small pennant from the pennant die. His face is the scallop die. I used the scallops #2 die for the beard and his hat. His eyes and nose were circle punches.


Well...I am sorry this is very short today...I have a mountain of laundry to conquer. If I get a minute to create today...I'll be sure to post it for you :)


Happy Stampin'


Friday, December 12, 2008

Blogger's Challenge - week 77

Hi Stampers! This week's Blogger's Challenge was do make an ornament or home decor item. I have to admit, I have had NO time this week to create something that wasn't used for a class, club or camp so I am cheating a little. Don't get me wrong...I am not complaining, I just stretched myself a bit this week ;) I love doing this, so it makes it all worth it! :)

Anyway, I am going to show you one of the things we made at our clubs this week. It is a card and an ornament all in one! Everyone loved the icicles across the top of the sentiment...it really does add to the card :)


The card base is baha breeze. We stamped it with the snowflakes from snow swirled. The white dots were added with a white gel pen. The sentiment is also from snow swirled. And there are those sparkly icicles....ooooo...i luv 'em! Oh yeah....the not quite navy piece was punched with the scalloped edge punch....how could I forget that??? The ornament hanger is made from the round tab punch and brushed silver card stock. We hung it with the silver elastic cord in the holiday mini catalog. Make sure to stock up on that good stuff before the end of the mini catalog.


That is all I have for today....we have our Wrap it Up Stamp Camp tonight so I gotta finish getting ready for that.
If you attended all of the stamp camps this year you will be receiving a special gift from me! Wonder what it could be?????? hehehehe!!!!

Thursday, December 11, 2008

Gift Card Inspired

Hi Stampers!

Sorry for the lack of posts lately...I have been prepping for clubs and the gift bag and tag stamp camp tomorrow night all week. I was in my local Giant Eagle and was browsing the gift cards....and one from Bath and Body Works popped out at me! I didn't buy it...it was a $25 card, and I didn't need it...but I put the image in my little image bank in my head...lol! It was a plain white gift card with a grayish colored twig tree with a red bird on the branch. Do you know where I am going with this??? hehehe!!! That was it on the card other than the Bath and Body Works logo in red. So...we have a plain white card...grayish colored tree, red bird and red writing......soooooo.....


What do you think? This card was so simple, and I like it! I sure hope Season of Friendship makes it into the regular catalog....Stampin' Up! - are you reading this??!??!??!?! I did change up the inspiration though...I made a red card base.

The card base is real red. I stamped the snowflake from season of friendship in whisper white craft ink and heat set it with my heat tool. The main image is whisper white. I stamped the tree in sahara sand and the little bird in real red. I matted that onto sahara sand. I decided to do a "banner" type sentiment instead of stamping it onto the main image. I stamped it and cut a v into the one side. I adhered it to the main image panel with vintage brads on one end. For the wave in the middle, I stacked three stampin dimensionals on top of each other and then adhered the other end with a small piece of sticky strip. I mounted the entire main panel on stampin' dimensionals. Here is a better angle of the banner and the inside of the card.


What do you think? Sweet and simple, huh?


Well...back to work....I need to get a few things done today before taking the little one to lunch at Burger King to play in the play land with two of her cousins.

Tuesday, December 9, 2008

Holy Retirement Sale Dinah!!!!!

This will remain at the top of this blog....scroll down for newer posts!

Oh My!!! Stampin' Up! is remarkable!!! I had to pinch myself at the sale Stampin' Up! has put out with the retirement list!!!! Here is the run down:

1. From December 9-23 - RETIRED STAMPS ARE 10% OFF!!!!!

2. ALSO FROM DECEMBER 9-23 - SPEND $70 OR MORE- GET FREE SHIPPING!!!!!!

I had NO idea Stampin' Up was going to put such a sale in motion!!! This is unbelievable!!!! WOWZERS!!!!!

As if this sale isn't great enough.....I was already planning a ONE DAY SALE - Order three retiring sets - get the 4th one 50% off!!! (half off the lowest price set, not good on previously ordered sets.)

So if you combine all three ways to save today - you are in for a real bargain!

click HERE for the retirement list by page number

click HERE for the retirement list alphabetically

click HERE for the 10% off pricing sheet

Monday, December 8, 2008

Scrappin' Saturday 9 (on monday....)

Hi all!


The retirement list comes out tomorrow....and I am going to offer a ONE DAY SALE!!!! It will be tomorrow only so be sure to check back here to see the list and what the sale is!!!!


First off...let me say I had this Scrappin' Saturday done to the point it is now early last week....but I need to pull out my cd's to get the date for these pictures and haven't had the time to do that. I remember exactly that we took these pictures before church one day...she was in such a good mood...but I don't recall the exact date. So I will post this and do the journaling later. I have millions of things to do today so I will give brief details. sorry :(


The base is very vanilla. The solid paper is pink pirouette. The designer series papers are parisian summer. (so elegant) I cut the four large scallops on the left had side with the colluzzle ( a little measuring, a little pencil marking...and voila! scallops!). The flowers are cut with the flower layers die and the big shot. Their centers are buttons from the designer series buttons pack. I tied a piece of linen thread through the centers of the buttons and actually through the entire flower before adhering them to the page with pop up glue dots. The scallop circles around the pictures were made with the 3/16th inch corner rounder with the guard taken off after a circle is cut from the colluzzle. I also used my scalloped edge punch for the straight scalloped edges. My title was cut with my VERY neglected cricut machine. I have had mine for over 2 years and used it a handful of times...what a waste of money! I just don't get it out. oh well...here are the shots of these pages:


Friday, December 5, 2008

Blogger's Challenge - week 76

Hi All!
I have a really quick post this morning.

This week we were to do a color challenge. The colors were tangerine tango, bashful blue, kiwi kiss, close to cocoa and whisper white. Perfect colors for frosty day designer series papers!!!


The first thing we made at my last giftable stamp camp. It is a box made sort of like a pizza box with the top note die used for the lid and base! These were so fun to make! The sentiment stamp is from the country living set, only available until December 31st....you won't want to miss out on this one!


My next thing in these colors is a home made bow. I have been working on holiday packaging and I whipped this up last night. It is from the frosty days designer series papers.


**Retirement list is coming Tuesday! Be sure to check back here for the details! :)

Wednesday, December 3, 2008

A Sketchy Thank You

LOL!!! I have been up since 4:00 am....so bear with me. lol! I participated in today's online sketch challenge. I made a thank you card....hence, "a sketchy thank you"....oh my. Let's just get to it!

I was working on a project with Parisian Summer designer series papers....such an elegant pack of paper. I had some scraps laying there and thought I will use one of the larger pieces for my card today. The card base is very vanilla. You can only see 1/8th of an inch on the front though. The designer series panels are a toile print from parisian summer, I told you they were very pretty papers! lol! I layed them with a thin mat of close to cocoa. Those three panels are adhered to pink pirouette. I then took the kraft taffeta ribbon and wrapped it around the layers and tied a bow instead of my usual knot. Then the whole panel was adhered to the card base. My sentiment comes from Say it with Scallops, the Ronald McDonald House Charity set. I really think this set is a must have for simple to put together cards. It was for me anyway. It was stamped with close to cocoa ink on very vanilla. I punched it with my square scallop punch and adhered it to the card with stampin' dimensionals. I bet you thought I wasn't going to use stampin' dimensionals, huh? I probably could not do a project without them.....I don't care for one dimension.....
Hey! You didn't forget about the retirement list coming did you????? It comes out next Tuesday, the 9th of December! Hard to believe it is retirement time again!

Tuesday, December 2, 2008

Elegant Neutrals

Hi Stampers!

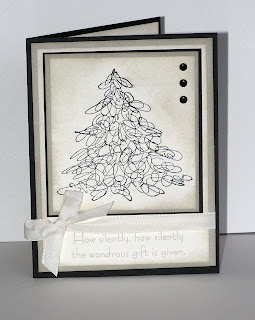
Guess what??? I was up still prepping for my big shot clubs Sunday and the kiddo was in my room watching tv and I thought.....maybe I could get a card in today! I cut and cut and cut for the big shot club (that is a hint for you clubbers....lol!) and then thought I need to get inky! So I pulled out some neutrals that were in the color challenge today and thought hummmmm..... what will I do with basic black, sahara sand and very vanilla?!??!?! That's why it is a challenge, huh? So I got to it......here is what I came up with!


What do you think? Six layers???? Oh My!!


The main image is the beautiful tree from wonderous gift. I stamped it onto very vanilla with black craft ink. I then embossed it with irredescent ice embossing powder and my heat tool. I then sponged all around the tree with sahara sand leaving a halo of very vanilla around the tree. It is matted with sahara sand with sponged edges and then matted onto basic black. Next, I pulled out my matt pack and piercer to get the holes lined up for my black brads from the vintage pack of brads. That whole panel is mounted up on stampin' dimensionals onto the next three layers.


The sentiment, also from wonderous gift, is stamped in sahara sand onto very vanilla. That entire layer is sponged before layering onto sahara sand, which is also sponged. I took very vanilla tafetta ribbon and tied a bow very close to the sentiment, leaving room for the tree panel. I actually tied this box and then adhered the tree panel.


Now with cards that have a dark base...
this one is basic black....can't get any darker than that, huh? I cut a layer for the inside. wanna see that?


Here is a closer look at that embossed tree...isn't it sparkly????


Don't forget about the retirement list....it comes out in one week!!! OH MY!!!!

Monday, December 1, 2008

Wow...I got to stamp...a little!

First, we have some business matters to tend to today. :)
1. The last day for the Holiday Extravaganza is TODAY!!! Wow...what a sale??!?!?!

2. Today starts the sale in the Catalog Sampler. (Buy $20 in merchandise and get 20% off any stamp set in the sampler!!!)

3. Drum roll........


Can you believe it is retirement time already???? Oh My!!!


Well, I was up in my stamp room getting the project together for my Big Shot Clubs on Sunday and decided that I needed to whip out a card real quick! For you Big Shot club members....I sure hope you love what we are going to be doing this month!!! We are only doing one project instead of two....but it is a big one! Intrigued???? You will see on Sunday..... :)


So back to the card I got to whip out. I puled out my Home for Christmas set that has never seem air let alone ink. lol! I really wanted to watercolor it but I had the little one under toe and knew that wasn't going to happen easliy....or sanely, on my end! lol!


The base is baja breeze. I stamped the door front tone on tone. I drew in some snow with my white gel pen and sketched in some of the bow with a real red stampin' write marker. I also colored in some decorations on the pine around the door. The sentiment is stamped with chocolate chip along the bottom. The designer series paper is from Ski Slope. I ran a piece of whisper white card stock that had been punched with the scallop edge punch along the bottom. I tied a piece of chocolate chip 1/4 inch grosgrain ribbon around the panel.


Here is a closer look at the snow on the tree....I'm not sure if you can see....but i blinged up the snow and the red with dazzling diamonds and a two way glue pen. It really makes the card....bling!!!!