Monday, November 17, 2008

Giftable Stamp Camp Projects

Hi Stampers!


We had the first of two giftabel stamp camps this year yeasterday. Each "camper" made three of each of the following gifts.


A Notebook portfolio with a pocket...one of my personal favorites!


A gift card holder with the top note die


A box of chocolates....who doesn't love a box of chocolate????


A 2 year pocket calendar/planner...sorry for the glare! lol!


And, what I think was my absolute favorite, a wall hanging with sticky notes and tear off calendars.


There is another giftable Stamp Camp coming on the 30th...I can't wait!

Saturday, November 15, 2008

Scrappin' Saturday 8

It is still Saturday, right??? So this still counts! lol!!! This week has kicked my tuckus...so it felt good to get a scrappin' saturday in, that's for sure!

I'll get right to it.

This is the double page spread. The bases are more mustard. I stamped the grass stamp from Inspired by Nature. This stamp set is so versatile!! I just love it! Anyway, I stamped it with creamy caramel ink. The designer series paper here is from autumn vine.


On this side, I used the slit punch to add scallops to the chocolate layer. It is in pumpkin pie. I really love the scallop edge punch...but sometimes I want a larger scallop...know what I mean? This was one of those times...so I pulled out my slit punch! My journaling block is the Stampin' Up! exclusive die, top note. I cut it with whisper white card stock. After I journaled on it with the chocolate chip stampin' write marker....it looked too stark. So I took my creamy caramel ink and a stampin sponge and just pounced it around the edges to soften it a little. It is hard to see in the pictures, but in real life it makes a big difference. It is one of those things someone would never notice....but if you laid the two side by side...there is a definite difference.

The right hand page was fun to put together. It all sort of evolved really...while I was making the page. Not very often do things go how I have them in my head while scrap booking. I'm not sure why....when I sit down to make a card...mostly it goes exactly how I had it layed out or envisioned...but scrap booking....another story! The three pumpkin elements were so much fun!!! For each one, I cut a square of autumn vine designer series paper for the background. I wanted to pull the chocolate designer series paper from the other side, so that is how I picked the background paper. For each pumpkin I punched five ovals with the small oval punch out of pumpkin pie card stock. I stamped each oval with the small flourish from priceless before sponging all of the edges. The curlies coming out of the top of the pumpkins are cut with the big shot and the swirls scribbles sizzlet. I cut it with sage shadow card stock and pounced the sponge with creamy caramel ink to soften the color a bit. The pumpkins are mounted up on stampin' dimensionals. The title was also cut with the big shot using the go-go boots alphabet die set. I adhered it to the page with a 2 way glue pen.


Here is a closer look at those pumpkins. I think they are soooo cute!


Doing these scrappin' saturdays sure have upped my creative outlet...and I sure am enjoying it!!!

Thursday, November 13, 2008

Playing with the retirees

HI stampers!


I won't have a chance to stamp anything for you today. We are off to a kindermusik class with our play group. My little one is feeling so much better today so I didn't want her to miss it! I made a card for my nephew, he turns eight at the end of the month. My niece and nephew's birthday parties are together since they are both in November. You know...I don't really have any age appropriate stamps for an eight year old. I could have used loads of love, but I used that for him last year. He is into Star Wars and Bakugan...definitely do not have the stamps for that....lol!!! So I pulled out party harty! I really wanted to use the cupcake image...but I knew I would "girl" it up too much with beads or glitter...you know I couldn't resist! lol!!! So, here is what I came up with.

Now....a lot of the products here are retired...but you could easily substitute current papers and colors for your cards! I didn't want to not have anything to show you.....

The card base is pumpkin pie. I stamped the candle from party harty across the bottom just for fun! Again...my current designer series paper is pretty girly...so I pulled out a retired pack, jersey shore. I loved the geometric prints in this pack. I cut four squares out of the prints and matted them on a piece of wild wasabi - also retired. sorry ;( I loved all of the In Colors last year...so I stocked up! Just because it is retired doesn't mean you can't use what you have, right? The main image is stamped onto whisper white. I stamped the center with pumpkin pie onto scrap paper and punched it out with my 1/2 inch circle punch and then mounted it up on stampin' dimensionals. I matted that entire panel onto brilliant blue and adhered that with stampin, dimensionals...no shocker there, huh? lol! Last, but certainly not least....the sentiment is stamped in brilliant blue. All of the stamps are from party harty - what a fun stamp set!!!


Well....off to kindermusik! My little one loves to sing and dance...i hope she can focus on the class! lol!!

Wednesday, November 12, 2008

Another Season of Joy

I went to this set again today. I didn't set out to make a "country" themed card...it just sort of evolved as I was working on it. I had to stamp fast. My little one woke up with a high fever this morning and she is sleeping so I thought I would crank out a card real fast. It is sooooo unlike her to nap, let alone sleep all morning so she must not be feeling too good. Poor sweetie! She wanted me to hold her both times she fell asleep....I picked her up, she put her little hand around my neck and went off to dream land. You didn't come here to listen about my mommy moments though...so here is your eye candy for the day:


The card base is riding hood red. I stamped it with twill background stamp with riding hood red ink. I {luv} this background stamp....it really gives a subtle fabric looking texture to plain card stock. Everything is sponged with stamping sponges in basic brown ink, by the way...lol! Basic brown, you ask??? Well...my chocolate chip was in a bag downstairs...I was upstairs...do the math! I wasn't leaving my stamp land to get an ink pad...when basic brown would do just fine...lol!!!
My three panels along the bottom are from holiday treasures designer series paper. I punched it with the 1 1/4 inch square punch and matted it with the 1 3/8 inch square punch in chocolate chip.
My main image panel is whisper white. I stamped the poinsettia flower from season of joy in the center with riding hood red ink and then again on a scrap of whisper white. I cut the flower out on the scrap. I then laid a piece of scrap writing paper over the flower petals and stamped the flourish, also from season of joy, with old olive ink....cute huh? I then stamped my sentiment with basic brown. That entire panel is mounted on stampin dimensionals. ( no surprise there, huh?)
Wanna get a closer look at the flower? I mounted the second flower on stampin dimensionals at an angle. For the flower center, I pulled out my hoarded stampin' up button collection....lol! I used a small round close to cocoa button from the earth elements and neutrals buttons. I tied a knot of linen thread through it before adhering it with a mini glue dot.


I usually try to make the same card to mail out to family and friends...but I think this year, I will mail out mostly different ones. I need to stop hoarding!!!!! lol!!!
How do you send your cards out? Do you mass produce or do you make all different ones?

Tuesday, November 11, 2008

I first want to thank you!!!

Before I get into this card...be sure to thank a veteran today for your freedom...it comes with a very high price!

Sorry I am so late posting today...I have been getting ready for my club tonight. I hope you girls love what we are doing this month! I really love the technique!!!!


This card is a result of a color challenge. we were to use pacific point, certainly celery and basic gray...WHAT?!?!??!?!? I love all of the in colors this year except pacific point...I like it...I am definitely warming up to it...but I don't love it...YET! It will happen...I'm sure. remember last year...I didn't love river rock...and by the end of the year....everything was river rock. How I miss my river rock being current.... :( Speaking of current, I did use some retired ds here. I used certainly celery designer series prints from the last cattie...But I like it here. this card is pretty much self explanatory....all three colors used here...lots of dimension going on! I do love the pacific point ribbon though. To be honest, I was not going to do this challenge...I just didn't think I could pull it off. I went to one of my shelves...and my poor Season of Joy has been sadly neglected this Holiday season. I used it to death last year, I guess. But I pulled it out, gave it a "missed you" hug....and went to town.


What do you think? Did I do this color challenge justice? I hope so. I am happy with my final results.

Monday, November 10, 2008

Don't hate me....

For what I am about to do! I have a deep love for Stampin' Up stamps...but I broke down. I bought contraband stamps!!!! I did it a while ago, too. I just never let anyone know! lol!! It happened so innocently. I was browsing Target....and you have to look at all of there outside isle end caps....that is where the clearance stuff is! Well, at the end of their craft isle....there they were....hanging there....one set of each only.....Disney Stamp Sets!!!! There was a set with Hannah Montana, Cars movie, general Mickey Mouse and PRINCESS!!!! And they were only $20 for each set!!! Being the mom of a toddler girl....I had to have the princess set. You know I would need it sooner or later, right??? And to get all the princesses for $20???? Even if I never need it for my daughter...she will have friends that will love princesses, right???

Well....she has relatives that love princesses...my niece, to be exact. And yesterday was her birthday. For our family party, her mom orders a small round cake and gets a small figurine for on it. She ordered the cake from me and said she bought a "Little Mermaid" figurine for on it. She wanted a white round cake with green lettering to match The Little Mermaid. So I made just that. Now.... I will take you back a couple of months. Both my niece and nephew love to dress up in costumes to play....so I scored a Disney Little Mermaid costume for her on sale at Toys 'R Us for a song. So I had that...and to think she was having a little mermaid cake...I bought a little mermaid costume as part of her gift....AND I had that set laying on my desk...with a little mermaid stamp in it!!! I felt on top of the world...I am going to totally score with my niece, right!??!??! WRONG!!!! I get there and she pulls out the cake toppers....it was Tinkerbell! Ho hum.....story of my life...lol!!! I began to panic!! The icing isn't going to match tinkerbell...it is mermaid green....I spent an hour watercoloring the little mermaid...not tinkerbell....oh no!! I said to my step sister...that's tinkerbell...not the little mermaid....she shrugged her shoulders and said, oh well! The heaviness was immediately lifted! I felt like I had done something totally wrong and it was no big deal to her...so that made me feel much better! At least, for her cake order for next week's party with my niece's school friends...it will be tinkerbell green. As a mater of fact...my niece wants the whole cake to be green...so green it is! lol!!! I get so fussed up about the dumbest things! Tired of reading me ramble already???? Want some eye candy????


Here is her card. Forgive me that it isn't stampin' up stamps...everything else is stampin up! There were cool things I wanted to show you on this card, that is the only reason I am posting it. I could have not even brought it up...you would have never known I had these contraband stamps in my possession....lol!!! The card base is tempting turquoise. The horizontal panel is taken with teal matted with whisper white punched with the scalloped edge punch. My main image is stamped with jet black staz on onto stampin up watercolor paper. I have tried sooooo many brands of watercolor paper...and I have to tell you....I love Stampin' Up!'s the best! I have even bought the same weight and cold press....but it isn't the same...at all! The store brands DO NOT blend as well. Anyway...I watercolored her with my aquapainter and ink refills. I was very happy with the way she turned out...not to toot my own horn! I matted her on ruby red. Then...the sentiment....I couldn't pick sentiment for the card front that I liked that looked right with Ariel. What to do....what to do????
She turned four...so I will put a four on it! I pulled out my chipboard letters. My 4 came from the On Board Lots of Letters. This picture DOES NOT DO THE SPARKLE FACTOR JUSTICE!!!!! I wanted to give my niece bling!! So I pulled out the cosmo glitter pack and picked the teal glitter. One problem...our chipboard is brown...I wanted a "true" teal color. No biggie! I inked it up with whisper white craft ink first, heat set that to dry. Then, inked it with versamark...poured on the heat and stick powder...heat set just until shiney...poured on the glitter...heat set again to "set" the glitter...and voila!!! A beautiful...true color...drop dead gorgeous sparkly 4!!!! I adhered that to a 1 1/4 inch whisper white circle. The ruby red is 1 3/8 circle matted with a scallop circle punch of taken with teal.
What do you think???? My niece was very excited when she got a "mermaid card!!!!" And when she opened her mermaid suit...she had to put it on right away. She didn't care it was tinkerbell on her cake and mermaid in her gift. It just goes to show that we, the adults, worry about everything being "just right." Kids could care less...they are happy with everything they love...not just one thing in particular! I am soooo guilty of this! I agonize over every event I have. things have to be perfect. When I have my daughter's birthday parties, I turn into a Nazi wedding planner....I get so fussed up! Every ribbon has to be just so....every table has to be in line with the tiles on the floor....the food has to be placed in just the right spots....Are you getting the picture here? And fortunately, my entire family...except my husband....knows I just get like this, that I can't help it.....they sit back and do what I want done, watch me move the food 1 inch from where it was sitting, fuss with curly ribbon, measure balloon strings and never say a word...and at the end of the day everyone is happy. Now if my hubby would just learn that I haven't turned into a Nazi...it will go away as soon as the party is over....lol!! Or, better yet....maybe I could take something from my little niece...."things" don't really matter, just have fun!
Boy, oh boy...I have divulged toooo much information today, huh? Sorry for that! I need to get going and get some laundry done, or move to a nudist colony. Hmmm....to never have to do laundry again......I might be onto something...lol!!! Just kiddin', I better get to sorting!!!

Saturday, November 8, 2008

Scrappin' Saturday 7

ETA: i have added the info about these pages now....
Ok...here is the run down....

I have two million things to accomplish in the time that you could do 1/2 of a million things....so I am posting the pictures and I will update the info later this weekend. I didn't want to "cash in" my overpayment of a scrapbook layout just yet....lol!!! I am not going to let you forget I have over payed you....lol!!!

There are some details that I want to share with you on this layout...I just can't do it right now...gotta dash!

Here it is:

The page bases are bashful blue. The designer series papers are from frosty day with accents of close to cocoa, whisper white and tangerine tango.
The title is cut with my big shot and the go go boots alphabet dies in tangerine tango. The snowflakes aren't felt flurries....they are also cut from the snowflake dies and the big shot. You will have to pull the big shot from my cold dying hands to get me to let go of it!! I love it!! The close to cocoa strip is pierced with the matt pack and piercer and then I put in stitch lines with my white gel pen.

See those brackets around the snowflake??? I made those with the curvy label punch. I punched a label out and moved my punch over slightly and punched it out...a perfect little bracket!!! Our punched are sooo versatile! I mean...brackets out of a label punch?? Who knew???

I really am having fun with scrappin' saturday, are you? leave me comments when I do a page that wow's you...let me know what you enjoy seeing.

Friday, November 7, 2008

Blogger's Challenge - week 72

Well....technically it still is Friday. This week's blogger's challenge was "two of the same." We could go into two directions with this. First, we could do the same layout and use different stamps or second, we could use the same stamps on two different layouts. I chose the latter. I have a warm spot in my heart for Mr. Twigster...which is why it was included in the Christmas Card Stamp Camp I had a few weeks ago. I haven't had the chance to use him as much as I would like to....so I used him for this challenge.

For this one I started with a card base of old olive. The designer series paper is from Holiday Treasures. I LOVE this polka dot paper...I want it in bulk!!! I need it in bulk!!! I accented the edge of it with a piece of riding hood red punched with the scallop edge punch. I then put little dots with my white gel pen in the scallops. I tied a simple knot with the striped baja breeze grosgrain ribbon. My main image panel has Mr. Twigster stamped with basic black ink. I colored him in with ink refills and a blender pen. And it is hard to see in the picture...but he is blinged up with dazling diamonds and a two way glue pen. {luv it!} The J and Y are cut with my big shot and my serif essential dies in riding hood red. It is a real "joy" to use these dies and my big shot! Pun intended! lol!!! Isn't he cute?????
Well, next I used him with a card base of bashful blue. The designer series paper is from Banbury. Doesn't this plaid make a sweet holiday card? I think so. (not to toot my own horn....)
See that scalloped edge? It was made from a scrap strip of close to cocoa. I layed it on the edge of the pennant die and just cut the scallop edge. If you zoom in on the picture, you can see the perforation line where you can take the scallops off of the pennants if you want. I like the look....so I left it. I stamped the sentiment, from cardinal Christmas, onto whisper white with close to cocoa ink. I tied a piece of 1/4 inch grosgrain ribbon in bashful blue around that entire panel and tied a simple knot. I did adhere it down with a mini glue dot under the knot to keep it from shifting. Then the entire panel was adhered to the card base.
Did you see this sweet, sweet snowman??? He was stamped onto whisper white with basic black ink and colored with reinkers and a blender pen. I then punched him out with the 1 3/4 inch circle punch. Then he got his well deserved dose of dazzling diamonds. oooo.....sweet bling!!! Did you catch that he has a scallop circle around him and he was punched with the 1 3/4 inch circle punch??? Remember that the 1 3/4 circle punch matts the scallop circle punch..... this was cut with the pennant die also!! Isn't this wonderful!??!?!? With these dies...we have sooooo many options that we can't get from punches!!! i {luv} it!!!
Well, folks...there it is....my take on the same stamp set, different layouts. You need to try this. It was fun!!!

Wednesday, November 5, 2008

What a challenge!

Well....I should be prepping for my stamp clubs next week and my two giftable stamp camps that will be here before I know it...but I stamp for fun...lol!


This week, Kristina's color challenge was just that....A CHALLENGE!!!!! I do like my final outcome, though. I could not get a good picture of the eggplant panel though...argh!!! It is the one with the ribbon tied around it. Wanna see the color challenge?

That is right....the colors are pacific point, taken with teal, elegant eggplant, pumpkin pie, and whisper white. OH MY!!!! lol!!

Well...this is what I came up with. The base is pacific point. My bottom panel is taken with teal matted with 1/8th inch whisper white. I stamped the circle/dot stamp from priceless randomly, but you can hardly see it anywhere because of the other panels. The upper panel is elegant eggplant...honestly....I just couldn't get a good picture of it with out blinding you with the white..lol! It is stamped with the tiny flower in priceless. I tied a simple knot around it with pumpkin pie striped grosgrain ribbon. I mounted that entire panel on stampin' dimensionals...are you surprised? lol! My main image panel is whisper white stamped with both flourishes from priceless in pacific point. The sentiment, from fundamental phrases, is stamped with taken with teal. The pumpkin pie flower is from the die cut blooms...these are soo pretty! I love the textured card stock!!! See the little purple flower in the center??? That is from flower power card element kit....i love this kit! I took my embossing buddy and rubbed it all over the back since it is an adhesive die cut and I didn't want it to be "adhesive." I mounted it in the flower center with a stampin' dimensional.


Here is a closer look at all of that dimension!


Monday, November 3, 2008

Oh, sweet half an hour....

....before my daughter woke up today!! My eyes were the first ones to pop open this morning....I rolled over to look at the clock....it was 6:22......I CAN STAMP!!!! My little one is still sleeping soundly in her room.....I CAN STAMP!!!!! This time change has her little body a little confused.....I CAN STAMP!!!!! WHOOOHOOOO........I CAN STAMP!!!!!! (for fun, that is....) :)


I have been wanting to make a sunset card with Inspired by Nature arrived at my door step via Mr. Brown....and it has been a while, let me tell you. I have had this set since my first order of this catalog...and this is the first I have used it. It is a stamping sin, I know! Please don't beat me!!! I have wanted to use it.....honestly, I have! I am so embarrased...{blush} You know...I don't even have to tell you this?!?!? LOL!


Anyway...wanna see it????


I first punched a 1 3/8th inch circle on a sticky note, being careful to punch where there was "sticky." I layed my sun where I wanted it and started to sponge!!! And I mean sponge!!! A lot of sponging!!!! Get the picture??? lol! Here are the colors I used, in this order: summer sun, more mustard, tangerine tango, riding hood red. I got that looking just how I wanted it and then took off my sun mask. Holy bright sun dinah!!! A stark white sun in a sun set wasn't cutting it!!! So I pulled out another sponge....lol.....and sponged barely banana over the sun to tone it down. OK....I'm happy now.... Next, I stamped the tall grass with basic black...here is where the card lost depth. Hmmm.... So I pulled out another sponge and sponged basic black around the edges, heavier on the bottom.....Oh yeah....there it is! That is better!


Now for the sentiment??? Where would I put that? I don't want to cover any of my sunset. I don't want to cover my sun...lol!! What about ribbon....gotta have ribbon, right??? Well, I decided against all of that stuff! I am a total rebel today! I will use this card as a general greeting card...I can stamp a sentiment inside when I need it. Or I will use it just as a note card to send to friends that live out of state. Or I will hoard it...because that is usually what I do...LOL!!!


Oh yeah...I forgot to mention. I matted the main image with a 1/8th inch mat of basic black and had a card base of tangerine tango.


Now...I have to use that gorgeous cone flower.....Did I mention that I love this set? Now that it has seen ink...I may never put it down! LOL!!!


Ok...you stampers out there...GO STAMP!

Saturday, November 1, 2008

Scrappin' Saturday 6

Week 6??? Wow...I am impressed!!! lol!
I sure hope you aren't tired of Felt Flurries....because I can't stop using them!! As a matter of fact, I got these pictures reprinted in black and white because I wanted to scrap with the flurries....do you think I have a sickness???? lol!

Here is the spread:


The base is baja breeze textured card stock....Now....If you aren't using our textured card stock in scrapping or card making, you don't know what you are missing! I didn't warm up to it when Stampin' Up! first released it....but now....I {luv} it!!! The designer series paper is from Ski Slope...beautiful!!!! And of course, the felt flurries from the holiday mini catalog. I used both the Big Felt Flurries and layered them with the largest flake in the Little Felt Flurries. There are three different sizes in the little Felt Flurries....can't go wrong with these!!


This is the left hand page. I matted the pictures with riding hood red card stock. I also stamped "winter" from everyday flexible phrases in whisper white craft ink across the top of my designer series paper panel.


You have to get a better picture at the felt flurries layer....
I adhered them together with the large clear rhinestone brads from the pretties kit...love this!!! this gives you a closer look at the "winter" also. What a cute little way to add color in a small way! There are so many phrases in that set...I will definitely do this a lot more!!! Why hadn't I thought of this in the past????


Now....The right hand page. I double matted the larger picture with riding hood red and baja blue. This is one of my most favorite pictures of her that I have taken. I don't know why.....I just love this picture....her little facial expression is just priceless. Sorry you can't see it....I am paranoid that way. Call me old fashioned....lol!! I also stamped "winter" down the right hand side of the page like I did on the other side. My journaling block is whisper white. It is butted up against the inner edge of this page. My hand writing isn't the best but I am an "old school scrapper" I guess. Someday, I hope my daughter can appreciate my hand writing in her scrapbooks and in my recipe box. More felt flurries....surprise, surprise! lol!
See my title? It is so sparkly in real life. These are chipboard letters from On Board Lots of Letters. I sure hope that Stampin' Up! gives us a letter die set this size. Are you reading this Stampin' Up!???? lol!!! I took a sponge dauber and inked the letters up with whisper white craft ink and embossed them with irredescent ice embossing powder and my heat tool. I then adhered them with tombo mono multi adhesive.
Well....another day in my daughter's album and out of my "box." I do have a terrible fear that I will meet my demise and be so far behind in her scrapbooks. To me, this is one of the best material gifts I can ever give her....I want her to realize her simple day to day things as well as holidays and birthdays. Now...if I would just remember to get the camera out when she is sassing me or screaming about something....LOL!!!


Friday, October 31, 2008

Blogger's Challenge - week 71

Hi Stampers!!

This week's blogger's challenge was Halloween. Fitting, huh??? lol!

As I mentioned before, my daughter is on a pee-wee bowling league. Unlike regular bowling leagues, the kiddos do not rotate lanes or the teams they bowl with. It isn't that competitive, thank goodness! My little one has always bowled on lane 1, which is a good thing....a wall on one side makes half of the distractions. LOL!!! Anyway...wondering where I am going here???? I always try to make some kind of treat for her team on the team on lane 2 for the Holidays.

I found these little cups at wal-mart 5/$1.00....what???..... .20 cents each???? I had to get them! I was pondering many ways to give them a halloween treat...this solved that problem! So I bought these cups and filled them with candies. The one little boy on lane 2 has a little brother that doesn't bowl. I doubt he eats candy yet, my daughter didn't at that age....so I made him a treat cup with animal crackers and stuff like that.

Aren't they cute? I was happy how they turned out. I made a personalized tag for each one.

I started with a layer on whisper white and stamped "to: from:" from the Holiday Collection Artwork stamp set that will be in the Country Living Promotion beginning in November. I stamped it in pumpkin pie. I also stamped Happy Halloween from All Holidays in pumpkin pie. I layered the tag with pumpkin pie as well. I punched the two top corners with the tag corner punch. Did you happen to see the bat on the tag????

I made that out of punches to coordinate with the little bats on the cup. The body is a 1 1/4 circle punch. The ears are one point from the large star punch. I colored the eyes on with a white gel pen. The wings are a large oval punch. I then punched one edge of the oval punch with the 1/2 inch circle punch to create the wings. I adhered it all together with tombo momo multi adhesive and mounted it on stampin' dimensionals to the tag. I punched a hole in the top of the tag with the 1/4 circle punch. The cup is in a cello bag. I wrapped black polka dot ribbon around it and through the hole in the tag to tie a bow. The ribbon isn't stampin' up....I have no idea who is the manufacturer....I had it in my ribbon box, off the spool.

Happy Halloween to each of you!!!!

Wednesday, October 29, 2008

I got to stamp.....Just for fun!!!

Hi Stampers!!!

I got to stamp a little this morning,just for my pleasure. So I pulled out today's online sketch challenge. Doesn't it look fun???? I really liked the three square elements.


Wanna see my take on this layout?


But, before I got to stamp....My daughter saw the snow!!! She said she had to go out and eat some! Gross, huh? oh well..... So we bundled up and went out so she could frolic in it. Yes...at 7:30 in the morning...we are outside tossing snow around!!!! She threw a few snowballs...ate a few snowballs....tried to catch some flakes...and just plain walked around in it! She doesn't even have her winter boots yet...we just put on her mud boots and had at it!


Even though I liked the square elements...I used round!!! LOL!!! My card base is kiwi kiss. The bottom panle is from the Patterns Designer Series Papers in Riding hood Red. I won an assortment of 6x6 designer series papers from my up-up-up-upline, Janet Wakeland, and this is where this paper came from. I recently offered a 6x6 assortment of designer series papers with a purchase at a stamp camp because I loved getting this package myself. It gave me an opportunity to use papers that I don't have...yet! ;) lol!

My sentiment is from Cardinal Christmas and it was stamped with chocolate chip ink. I wrapped riding hood red satin ribbon around the edge of the designer sreies paper and tied it in a simple knot with a snipit of the double sided satin ribbon - kiwi kiss/vanilla. I love the edges on both of these ribbons!!!

My deer friends medallions are four layers thick. Starting in the back: a chocolate chip scallop circle from the scallop circle punch; a kiwi kiss 1 3/8 inch circle punch; deer friends stamp, from dear friends, stamped in riding hood red and punched with the 1 1/4 circle punch; next is the same stamp in chocolate chip punched with the 1 inch circle punch. I mounted up the chocolate chip deer on stampin' dimensionals. To add a little sparkle, I used my tombo mono multi adhesive to adhere some red chunky glitter to the nose. It is more sparkly in real life.


Don't you just love this little stamp??? The deer is soooo cute!! If you would like 2 chances to win this stamp set...register for my giftable stamp camps. I will be giving away one at each camp!!!

Tuesday, October 28, 2008

I'm cleaning out!!!

THIS POST WILL REMAIN AT THE TOP FOR A WHILE....PLEASE SCROLL DOWN FOR NEWER POSTS!!!

Here is a list below of what I have put aside to sell out of my craft space. If you are long distance, I ship flat rate priority only. Depending on your order, I will ship in the smallest size flat rate available to me. If you are local and can pick your order up - great!! No Shipping for you :)

$40 Cuttlebug machine and cutting plates - hardly used
$20 Original Sizzix red die cutting machine, cutting plate used
$15 Sizzix sidekick - red, no cutting plates but can be bought for about $3 at craft stores


Here is a list of Stampin' up goodies:
N/UM- new, unmounted
N - new, mounted
M - mounted
$15 - stamp set from Simply Sent Remembering You - mounted
$15 Stampin' Up! Pure Color pencils - new, not used
$10 Birthday Whimsey N/UM - have 2
$10 So Very, N/UM
$15 Event Full, N/UM
$15 From the Garden, N/UM - have 2
$20 Cause for Celebration N/UM
$10 Lots of Thoughts, N/UM - have 4
$10 Sprintime Stems N/UM
$25 Time Well Spent N/UM
$25 Office Accoutment - minor staining on one wood block
$20 Serene Sunflower - minor rubber staining
$7 Birthday Best - minor rubber staining
$8 Petite Patterns, N/M
$8 Fresh Fillers
$15 Polka Dots and Petals
$13 Circle of Friendship
$10 Fun Filled
$15 Polka Dots and Paisley
$12 Flannel Plaid Background stamp
$10 Soft Swirls Background Stamp - no box
$18 In My Thoughts - 1 wood block stained
$25 Stamp of Authenticity
$25 Year After Year - minor staining on rubber
$7 Uninked spectrum pad - New, unopened

I used to scrap with Creative Memories albums, So I have some of that too: ALL CM SOLD
$12 - 12x12 blank refill pages (15) - have 5
$8 - 8x10 Holiday Pages - have 2
$5 - 12x12 page protectors - have 3
$15 - 12x12 The Wedding Pages and blank wedding pages refills (1 pack of each)
$10 - The Baby Pages - Girl, pink ribbon border
$15 the Baby Pages - Girl, purple ribbon border, and 1 set of blank purple ribbon refills ( 1 pack of each)
$20 12x12 Holiday pages and 2 packs of Holiday Pages border refills
$10 - 2- 12x12 square corner border pages (get 2 packs)
$25 12x12 sapphire premiere albums, 1 unopened, 1 opened but new
$15 8x10 premiere sapphire album
$15 8x10 premiere sapphire album embossed with 10th anniversary logo in silver

If you are interested in any of these products, contact me (regcorn@zoominternet.net) right away. I will try to update when items are sold.

Where is she????

Wondering where I am???


I am busy prepping the samples for the annual Giftable Stamp Camps!


The registration deadline is this Saturday...don't miss out on getting your spot reserved....I am only taking 15 registrants for each one. We will be doing different gifts at each camp, so you won't want to miss either one of them!


You will receive a free gift for attending both camps...an did I mention doorprize???? I don't think I did....BUT....you will have the chance to win a heavily sought after Level 2 set - Deer Friends!!!


Email me right away to reserve your spot!

Saturday, October 25, 2008

Scrappin' Saturday 5

Hey Stampers!!
I have been cranking out scrapbook pages this week amidst all my other prepping for last night's stamp camp. Well....2 2-page spreads actually...but that is "cranking out" to me. I am a slow scrapper. I do too much fussing I guess, but it probably doesn't show that I work hours on a spread to the common person. I will show you both 2 page spreads this week....and if I have to skip a week...consider yourself paid in advance! LOL!!!!!

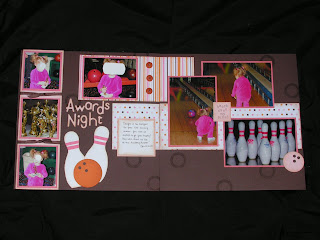
Here is the first spread that I completed this week....I am really happy with it!!! Most of you are full into football season, cheer leading, soccer....we are in full swing with my daughter's bowling league. This layout uses pictures from January ( it was her banquet for the first season - Oct-Dec 2007). We put her into bowling for several reasons....but my main reasons, personally, was I wanted her to have something that made her learn to take turns with their kids, and to have more interaction with kids. The first season was pretty painful for me...I must admit. She really didn't get it - how to roll the ball down the lane. Almost every ball had to be pushed down for her...she really was all over the place with her thoughts, it was hard to keep her focused on the bowling lanes. But she is in her third session (2nd year) this year and so far, it has been so much better. She was only two her first two sessions....so I shouldn't have expected too much. Let me tell you..this year is so much better, we don't even have to walk up to the alley with her...she takes her ball and walks up there and gives it a heave. Now, it isn't the fastest ball that rolls down the alley, but it gets there on its own, mostly. Well, I am getting really off track here....I wanted to keep this post short because there are so many pictures to share.


It is hard to see in these pictures...the base is textured chocolate chip. I guess I shouldn't have taken it on a black background. Also hard to see in the pictures are what I stamped on the background. I wanted a round element...you know to "roll" with the bowling ball thing. I don't have any circle stamps...I have lots of flowers....but I didn't really want a flower. And then, like it was meant to be, my eyes went down to my big deal alphabet and the "O" stamp was the first thing I saw. PERFECT!!! The O in that alphabet is a perfect circle!!! I stamped it a few times randomly on the bases with chocolate chip ink. The patterned paper is from the designer series pack, Sweet Always. What is not to like about pink, brown and orange????

Here is a closer look at the left hand side:
I made the bowling pins and bowling balls myself. I was going to buy some "J-Boutique 3 Dimensional" bowling pins a few weeks ago at Mike's...but then thought for $4 I can make my own...they will match my project and I can make them any size I want to...and for pennies!!!


How did I do? I hand drew one bowling pin and cut it out and used it as a stencil to cut these out. The bowling ball was cut with the colluzzle and I punched three holes in it with my 1/4 inch circle punch and backed it with chocolate chip card stock to fill the finger holes. The title was cut with my big shot and the go-go boots alphabet. I accented the left panel with two knots of chocolate chip ribbon. The pumpkin pie buttons are "threaded" with slivers of chocolate chip card stock. Everything on both pages is sponged with creamy carmel ink.

Here is the right hand page:

One thing she and I have always said towards the ball while bowling is "knock down my pins!!!" So I stamped that out with a retired mini alphabet set, rough edges alphabet, and put it in the center of her bowling.

Ok....Now onto the next layout....my "paying you in advance" layout! LOL!!!

The whole family, practically, camped where my Grandma and Aunt camp during the summer one weekend. It was a real nice family get together weekend. . It happened to be the weekend that the campground was celebrating Halloween. So all of the kids dressed up and went trick or treating around the camp sites. My daughter loved it!! We were the last ones back to the camp site...she didn't want to quit!

The bases are tangerine twist textured card stock. The upper panels of designer series paper is from ghostly greetings. Kiwi kiss and tangerine twist couldn't have been a better match for my daughter's clown suit! I stamped along the bottom with the trio of stars from just jawing. Let's get right to it...
Here is the left hand page:

The date is adhered to a key tag punch of confetti cream. The date is cut from go-go boots alphabet die set and the big shot. I punched holes in it to thread my 1/4 inch basic black grosgrain ribbon through it. The candies, from tasty sweet, are stamped with lavender lace, tangerine twist and kiwi kiss. I embossed the candy centers with iridescent ice embossing powder...it gives them just a hint or sparkle.
the right hand page:
I used the same candy as I did on the other side. I adhered a piece of tangerine twist striped grosgrain ribbon to the picture with a black brad from the vintage brad set. See that adorable skull and cross bones??? I don't know what it is about the set just jawing....but I love it!! I stamped it with basic black onto whisper white and cut it out. I then took tombo mono multi adhesive and filled in the eyes and one tooth and then poured on the clear chunky glitter. A skeleton must have a blinged sweet tooth on Halloween, I think. To "girl" it up a little....I stamped the bow, also from just jawing, with tangerine twist. I cut it out and adhered it with stampin dimensionals.
Well, tell me...have I out done myself this week? lol!


Friday, October 24, 2008

Stamp Camp Preview

Be Sure to scroll down to see this week's Blogger's Challenge.

Hi Stampers!


I don't usually post the stamp camp projects before the camp...but I am feeling frisky today! If you are registered for tonight's camp.....these are the cards we will be making! You will leave the camp with three of each of these cuties as well as Mr Twigster!!!


Blogger's Challenge - week 70

Hi Stampers!

This week's Blogger's Challenge was to create something that you would give as a gift. I saw this candle the other day while picking up picture that I was getting developed and I knew what I wanted to do with it. I know I just said last week that I wasn't going to get any more pictures developed until I had the ones scrapped that were already developed....but I couldn't help myself! I really wanted to use my brand new just jawing stamp set and do a Halloween layout....I am so weak!! But that isn't why were are here today.... Let's deal with the task at hand.


The candle smells so good....my craft space smells so good just having the wrapper in the garbage!
My Join in the Cheer decorative strip die has been sadly neglected. I have a bunch of ideas, I just don't seem to get them executed. This die is a perfect border for scrapbook pages, it will make a really nice framed accent for the holidays - I will try to make that next. You can cut the words apart to use on your cards, scrapbooks or tags.
Anyway, I cut a strip of very vanilla, I backed that with a piece of baja breeze that had been scalloped on one side with my scallop edge punch. I wrapped those pieces around the candle and adhered them to each other. hint: adhesive does not stick well to candle wax...lol! I ran the join in the cheer die through my big shot cutting a perfect sentiment out of kiwi kiss. I did have to cut the word "cheer" off of the back though, it was too long for this candle. I adhered that to the vanilla panel with tombo mono multi adhesive. What did I do before this stuff???? I wanted to scatter some felt flurries around the panel so I pierced a hole through the layers into the candle with my piercing tool. I placed gold brads through the felt flurries and just pierced the brad into the candle. So easy to remove and reuse! I really love these felt flurries!!!

Thursday, October 23, 2008

I can't believe the stamp camp is tomorrow....

I have another sneak peek for you.....
What could this be???? Do I happen to see a card made with something that may have been cut by the Big Shot??? hmmmmmm.......


I didn't get anything new stamped for you today....I'm sorry :( But I do want to remind you of the Birthday Celebration going - 20% off select birthday sets!!!! Click on the icon on the left hand side of my blog to view the flyer. In honor of the sale, though, I do have a picture from the Stampin' up! web site. Isn't it awesome that a small jar of candy can be transformed into a wonder ful gift with some handmade accents like a tag????

This candy jar uses crazy for cupcakes. I just love this!!! It sure does help that it is a jar of jelly belly jelly beans.....there is no jelly bean like a jelly belly....yummmmm...........

Wednesday, October 22, 2008

It has been so cold......

It has felt like the snow has swirled.....lol!!


I was really drawn to this stamp set, Snow Swirled, as soon as I saw it in the catalog...and then it went on sale....it was destiny!! I was really initially drawn to the swirliness - I know...that is not a really word - lol! The snowflakes are gorgeous! The sentiments are beautiful!


The card base is old olive. I stamped the largest snowflake in old olive ink in a random fashion.

The background panel of designer series paper is from Ski Slope, it is in the mini catalog. There are so many beautiful papers in this pack of paper!


Now skipping to the main panel....I stamped the tree from snow swirled with old olive ink. I used the smallest snowflake from the same set to create a tree topper with real red. I matted that panel with chocolate chip.

The sentiment is from cute and curvy,
the stamp set that is art of the curvy label punch bundle. I stamped it with real red ink and punched it with the curvy label punch. But before adhering the sentiment down, I wrapped a piece of felt ribbon, from alpine originals, around the designer series paper that extends just under the tree panel. I adhered the tree panel down with stampin dimensionals and then the sentiment over that with stampin dimensionals. What do you think of the felt ribbon up close....it really is nice ribbon!!!


Now for your sneak peek for Friday's camp......


Do you like the sneak peeks?? A big tease, huh???? I can't help myself...lol!!!