Thursday, January 31, 2008

Celebrate....or is it Sale A Brate?


Tomorrow is the big day....the beginning of Sale A Bration! It is such an exciting time of the year. Stampin' Up! rewards us with free stamps for making purchases that we make!


Today's card comes because I am trying to build up my card stash that can be used for anybody, inculding men and teen boys. I tried to keep the design simple without a lot of frills...I think I accomplished that task.


The card base it old olive. I stamped the dots from Big Bold Birthday along one edge in old olive. I find myself pulling out that stamp set more and more for the "extra" elements in it, above and beyond the cupcake.

The panel on the left was taken right from Bali Breezes Designer Series Papers. I really like the patterns in this set of papers...very versatile. The scallop edge was made by using my corner rounder and chocolate chip card stock. Even though it is scallops...it is in chocolate chip...so it can still me manly, right? hehe!


My main image panel was stamped with the word "celebrate" from Celebrate Everything. I used my stampin write markers in old olive, pumpkin pie and brocade blue to ink up each letter. "time to" is also in that same set, I inked it up in chocolate chip and lined it up with my stamp a ma jig to ensure good alignment. That panel was matted in brocade blue.


This was very simple...this card could be modified in any color scheme and frilled up if you so choose.


I could see the card done in pinks, browns and vanilla with wide grosgrain ribbon tied around the side panel with a stick pin beaded up through the knot to girly it up.


To bling it up...maybe take the two way glue pen and use the new cosmo glitter to bring out each letter in the sentiment in a plum, celery and pink color family.


Get the picture???? Make this same exact card lots of ways. Did I mention that I used my cosmo glitter last night for the first time? That glitter is so fine and silky. It is absolutely gorgeous! I can't show you the project just yet...it is my door prize for my stamp camp this Friday...we are making cook books. I really love my sample book! I'll post that too after the camp.

Wednesday, January 30, 2008

Thanks for new goodies!

Can you believe Sale A Bration is in 2 days....2 DAYS!!!!!


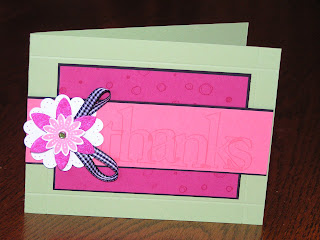
My card today isn't from a Sale A Bration set, though. I made today's card for an online sketch challenge. I have been wanting to use my Jumbo Outline Alphabet in this style since I bought them...last catalog. They were screaming for me long enough...today was the day we would play!


I started with a base of certainly celery and I took my paper trimmer and bone folder and scored in 1/2 inch from the edges to create a frame. I don't know if you can see it in the picture...but it looks really neat in real life. my next panel is rose red card stock wheeled with my See You Around Jumbo Wheel with rose red ink. I matted that onto basic black. I know what you are thinking....I was thinking it myself when I was creating this card...."Now she is stuck on matting everything in basic black"....I guess I am. I seem to take cycles in what I like to do....do you do that when you make your projects?


My next panel is cameo coral. I stamped "thanks" from Jumbo Outline Alphabet with cameo coral. To fill in the overlapping space on the letters (I did do this on purpose), I took my blender pen and colored in those spaces with cameo coral ink. That was matted on basic black also. I adhered that to my card front with stampin' dimensionals.


Here is where I go back to my resolution this year - to use my accessories and not hoard them! I created this flower medallion one layer at a time. I started with a piece of whisper white card stock punched with my scallop circle punch and then I pierced the scallops. I never did this before...but I do like it. Maybe my next "thing???" The next layer is two loops of black gingham ribbon adhered to the scallop with mini glue dots. Here is where the "fun" starts. I took out one of my new rose red felt flowers from the Flower Fusion Accents & Elements tin. OH MY......I LOVE THESE FLOWERS!!!!! They were on my first order from this cattie and I have to come clean...I was hoarding them. I am like a hoarding addict that had to get a little bit more hoarding in with out anybody knowing. hehehehe! Anyway...enough making fun of me. lol! I stamped the flower trio from One of a Kind in cameo coral and punched them out with my new Boho Blossoms Punch. My next hoarded supply comes from the Ice Rhinestone Round Brads....a celery brad for the center. I held my two flowers together with that brad and then adhered that bunch to the ribbon layer with a pop up glue dot. I took that entire medallion and adhered it to my sentiment panel with...you guessed it...stampin' dimensionals.


Leave me a comment below and let me know what you think of today's card. Be gentle...I have "soft feelings." hahaha! I don't really.... :)


edited to add: One of a Kind is not availabe for purchase at this time, I will post a memo as soon as Stampin' Up! has it available. Sorry if this has unconvenienced you in any way. The punch is also great by itself, without stamping the flowers.

Tuesday, January 29, 2008

More to Sale a Brate!


Wow...I can't believe that Sale A Bration starts on Friday! I can not wait...I luv to earn free stamps!!!!!


Here is another card with Birthday Whimsy.


Where to start......


My color combo is old olive, purely pomegranate, pumpkin pie and whisper white. I really like these colors together...I picked them from Bali Breezes Designer Series Paper but instead of rose red I used purely pomegranate.


Ever stuck on a color combo and are tired of using the same old thing???? Go to your catalog and pick a paper collection or a Style Watch and start from there!


The cake was pieced together by inking it up with my stampin' write markers and stamping it on to the main panel. I cleaned the stamp and then inked it with purely pomegranate and then stamped onto a scrap of whisper white. I cut out the cake only and adhered it to the main image cake with stampin' dimensionals. I don't feel real chatty today and I think this card is pretty straight forward....so I guess that is it.
The balloons have a lot of dimension.....see? lol!


recipe:
card stock: old olive, purely pomegranate, chocolate chip, whisper white, bali designer series printed paper
ink: old olive, summer sum, purely pomegranate, pumpkin pie,
accessories: oval punch, ticket corner punch, antique copper brads, linen thread, mat pack and piercer, stampin' dimensionals and more stampin' dimensionals!

Monday, January 28, 2008

Are you ready to Sale a Brate?


I know I sure am! I made a few cards today using the Sale A Bration set - Birthday Whimsy. I really think this set is extremely versatile! You can earn it absolutely free by making a $50 purchase of Stampin' Up! products from February 1 - March 17. I love free stamps!!!! :)


Anywho...back to the card...hehe!


I started with a base of sage shadow card stock....I really neglect this color. And you know what??? When I finished this card, I was like "I really like this color!" Funny how that happens, huh? I sponged the base with sage shadow ink to give it depth.


The vertical panel is rose red, sponged...of course. And I matted that with basic black. When you layout your projects and the colors seem to be "blah" (for a lack of better words....lol!) try to layer them in basic black or chocolate chip. I do both of those a lot. I then tied a simple knot around that with basic black 1/4 inch grosgrain ribbon...but wait....here is you tip for the day: before tying the second knot to secure it, lay a piece of coordinating ribbon in the knot. Here - black gingham ribbon. What an awesome way to use little scraps. Did I ever tell you that I do not throw away ANY ribbon bigger than around 1 1/2 inch? This is a great use for those little scraps. I am a hoarder, I tell you!


The main image panel was created by stamping the present from Birthday Whimsy in sage shadow, rose red and apricot appeal in a random sort of row on whisper white card stock and then stamping each of those again on whisper white scraps. I cut out the gifts only on the scrap gifts and adhered them to the main panel with stampin' dimensionals. And I matted that in basic black also.


For the sentiment, I stamped "happy birthday" from Birthday Whimsy in basic black onto apricot appeal and matted that on basic black. (see a pattern here...haha!) I adhered that to my main image panel.


Want two tips today?????

I adhered that main image panel using two different adhesives. WHAT??!??!?! I know what you are thinking...."she did what????"

I used SNAIL on the right side and stampin' dimensionals on the right. This is soooooo subtle but it will make your main image panel straighter since there are two layers of card stock on the left and none on the right......are you beginning to think I have real problems here? Maybe a little ocd? Only in my creating...I promise! lol!

Saturday, January 26, 2008

Sale a Bration on it's way!!!!!

Sale A Bration begins in just 7 short days!


If you aren't familiar with Sale a Bration.....You will earn a free stamp set from Stampin' Up! each time you spend $50 in merchandise in the catalog or mini catalog. These stamp sets are exclusive to this event and will not ever be available again.


There are some really great stamp sets this year as well as a 4 sheet set of exclusive rub ons! Unbelievable!!!


A set that coordinates with our scallop circle punch....a set that coordinates with the rub ons...a set to watercolor... a set of sentiments.....what is a girl to do????

Friday, January 25, 2008

Blogger's challenge - week 31

I joined in on a blogger's challenge group. This week we were to case the "Welcome Baby" card on page 141 of the Spring/Summer Catalog. When I first started out, I thought that this would be easy....not so much. It was much harder to recreate an exact layout than I thought. I also wanted to use my new rubber. :):)
Here it is:


I started with a base of 3x6 in pretty in pink. I made my own faux wide ribbon by taking a piece of creamy caramel card stock and using my mat pack and piercer to create holes and my white gel pen to create the stitches. Like it?


My sentiment, "Thinking of You" is from Sincere Salutations. I find myself reaching for these sentiments quite often. I like the variety of sentiments in that set. I stamped it in mellow moss onto mellow moss card stock and then pierced the top with the mat pack and piercer. The whisper white strip was created by stamping the row of dots from One of a Kind in creamy caramel.


The medallion was is layered first with the larger circle background stamp from Boho Backgrounds in creamy caramel punched out with my beloved scallop circle punch. I don't know what I would do with out that punch...I use it all of the time! The next two layers are created from my new Boho Blossoms Punch.....I LOVE this new punch!!!!!!! My pink flower was made from stamping the trio of flowers from One of a Kind in pretty in pink onto pretty in pink card stock. That's right....that stamp set is designed to coordinate with this punch as well as the Berry Bliss Designer Series Paper. Can you believe it??????? Anyway...back to the task at hand. The top flower was made by using that same stamp and punch stamping creamy caramel ink onto whisper white card stock. I adhered the two upper flowers together with a pink brad from the soft subtles brad set. That was mounted up on stampin' dimensionals in the center of the medallion.


That should about do it for today....what do you think?

Thursday, January 24, 2008

Birthday Wishes for a special little boy!


I made this card for a birthday party that we are going to this weekend. It is my cousin's little boy. He will be turning two.


I think everything is pretty straight forward with this card. I stamped the cupcake and the candles from Big Bold Birthday on the whisper white card stock and then stamped the icing in pumpkin pie onto a piece of scrap whisper white and cut it out. I mounted that up on stampin' dimensionals. On the old olive panel, I stamped the "2" in old olive and then over stamped "wish big" from Warmest Regards. The added dots at the bottom are also from Big Bold Birthday.


I got my color scheme directly from the Color Coach.


recipe:
stamps: big bold birthday, warmest regards, big deal numbers
card stock: brocade blue, chocolate chip, pumpkin pie, old olive, whisper white
ink: brocade blue, chocolate chip, old olive, pumpkin pie, summer sun stampin write marker
accessories: stampin' dimensionals

Tuesday, January 22, 2008

Sail on in for some bithday fun!

I made this card for three reasons...one for a color challenge that was posted for today:

1. to use real red, blue bayou and soft sky

2. I need a birthday card for my cousin's little boy that will be turning one

3. I wanted to use a nursery set to make something other than baby cards.

What do you think? Did I meet all of my criteria?


We'll start with the card base...real red. That was easy, right? lol!

Next I took piece of blue bayou and stamped the little star from Nursery Necessities in blue bayou all over in a random pattern. I next stamped my sentiment "happy birthday" from Stem Sayings in basic black. I used this sentiment because it is a wavy design.


Now for that main image:

I inked up the sail boat from Nursery Necessities in blue bayou and before stamping I took my real red stampin' write marker and inked up the little flag. After stamping that on to whisper white I stamped the boat again on a piece of scrap whisper white in soft sky and cut out the two sails in one piece. To make some definition on the image, I took my basic black stampin' write journaler and used the 0.6 side to draw lines around the image and make little stitch marks. I adhered the sails up on stampin' dimensionals. I matted that entire piece onto real red and then soft sky. i wanted to off set the upper corner so I pulled the black from the stitching and made a simple knot and adhered it to the back of the main image panel with mini glue dots. I mounted the main panel onto stampin' dimensionals also.


I also think this card could be easily transformed into a little boy's valentine card by simply changing the sentiment and using the small heart stamp from the Big Bold Birthday stamp set. What do you think?

Friday, January 18, 2008

I made this card last week for an online challenge. The challenge was to "keep it in the family." That simply means to make a card using card stock, ink and accessories in the same color family. As simple as it sounds...it was really hard for me not to add just one more color...one more accessory....one more embellishment that "wasn't in the family." I did use black though..I consider it a "neutral" and neutrals are almost always allowed. :)

This is a much simpler card than I usually make, in my opinion. I was so fixated on the "in the family" I just couldn't get my mojo but all in all I think it turned out ok. A simple masculine card...how many men want fru fru and bling on their cards? right?
Here it is:

I love these two blues....I know what you all are thinking...."she "loves" everything...." well....I do, really. I love everything in my stamp supplies...that is why they are in my stamping supplies...haha! :) See, there is a reason for me loving everything. :):):)


recipe:
card stock and ink: soft sky, blue bayou, basic black
stamp sets: winds of grace
accessories: black twine, black eyelets, crop a dile, mat pack, stampin dimensionals

Edited to add: the sentiment looks crooked in the picture...rest assured in real life it is straight. (I even used my stamp a ma jig to ensure proper alignment....) It must have been the angle that I took the picture. ;)

Wednesday, January 16, 2008

Happy Birthday!!

Today is my Aunt's birthday and she is off cruising the Caribbean....is there a better way to spend your birthday???? She, my other aunt and grandma all went together, I hope they have a wonderful time! I love to go on a cruise...I think there is no vacation like it, in my opinion. Their travel agent had arranged for them to get champagne and chocolate on their trip. Both of my aunts are diabetic so they will not be able to indulge.....there is a point to this rambling...I promise.


I sent a bag of sugar free turtles and this card with my grandma to give her today, on her birthday. I just wanted to give her a tiny celebration on her vacation. This card was made with a retired stamp set from last year's winter mini, Like it a Latte. My aunt loves coffee, she always liked this set, she loves pink and brown...so I hope she likes this card. (I think I covered the bases here :) )


recipe:
card stock: very vanilla, close to cocoa, purely pomegranate, regal rose
ink: chocolate chip, close to cocoa, creamy caramel, purely pomegranate
stamps: like it a latte, they say it's your birthday
accessories: sponges, dimensionals, dazzling diamonds, purely pomegranate double stitched ribbon (with stitches taken out), linen thread, ticket corner punch, 1/8th inch handheld punch

Monday, January 14, 2008

Spreadin' the love......

Hi All!!!
Thank you for stopping by! I created two cards to show you today. I intended for both to be used for Valentine's Day but they both could be modified with various sentiments for any occasion really.

This first card was done for an online challenge to create a card with a heart pocket. I initially wanted to leave the pocket open to use for a gift card to be slid into but then I got to stamping...then punching...then sponging....and well...you know what happens next! I decided to fill that pocket with a bouquet of flowers. I stamped the five petal flower from Ginormous Flowers in pretty in pink, rose red, and purely pomegranate. I then punched them out with my 5 Petal Flower Punch.

What did you ask????
When did Stampin' Up! start selling white brads?

Well...they don't! So I dug in......I pulled out a gold brad...but really wanted to use a white one. (I am stomping my feet, huffing and puffing.....) I inked that gold brad with versamark ink and dipped it into my white detail emboss powder and held the prongs with a pair or tweezers (VERY IMPORTANT!!!!! brad gets very hot when embossed!) and embossed it with my heat tool...while it was still warm, I dipped it again in the emboss powder and embossed again, repeat. I was soooo proud of myself.....I love white brads and now I can make my own! The heart pocket was made from Designer Series Paper in Rose Red. All of my pieces are sponged with stampin' sponges in close to cocoa ink.

See all that dimension in those flowers...I used a combination of SNAIL adhesive, stampin' dimensionals and pop up glue dots (the really thick sticky ones). For the lower portion of the heart pocket, I took a pop up glue dot and folded it in half and adhered the lower flap so it would hold the dimension.

The card base is purely pomegranate layered with pretty in pink and then close to cocoa. I punched the close to cocoa layer with my beloved ticket corner punch...can't hardly get enough of that punch! On the fold side, I ran a piece of double stitched purely pomegranate ribbon with the double stitch pulled out around it and tied in a simple knot.

The sentiment is from Holiday's and Wishes stamped in purely pomegranate.

On for the next card today....after I created that one with so many layers I wanted to prove to myself that I could do a card with no layers.....I can do it! Right?
Here it is:
The card base is kraft...I love that card stock, I don't know why I don't use it more!
I then took the sentiment from Wonderful Words and stamped it in purely pomegranate. I really like the cursive font...maybe someone will think I actually write like that. Well, a girl can hope can't she????? (grin)

I want to show you the piercing up close....
I took my piercing tool from the tool kit and my thick mat from the mat pack and freehand pierced my own vine design.
I then pulled out my very neglected Three For You Punch Box and punched some flowers in pretty in pink, rose red, and purely pomegranate. I then put a silver brad in each one of those and adhered then to the vine with mini glue dots. To finish it off, I decided on a bundle of ribbon instead of a bunch of flowers in the corner. I adhered that ribbon with pop up glue dots.

Well...that is all I have for you today....what do you think?

Saturday, January 12, 2008

Wild Lions.....and another punch tip!

I made this card to show you another use for that round tab punch we talked about yesterday, but that will come a little later.

The card base is really rust with a top fold. I stamped the background first with flannel plaid background stamp in really rust and then with weathered background stamp in chocolate chip. After I stamped the weathered background you really can't see the flannel plaid background unless you are really looking for it...that is ok though....it is a subtle coloring in real life. I then took out my trusty stampin' sponge and sponged it and everything on this card with chocolate chip. I keep a sponge, well a few actually, just for chocolate chip....I use it all of the time for sponging edges. The sentiment is from the Wild About You stamp set stamped on very vanilla with chocolate chip ink. I rounded the corners with my corner rounder before sponging. I then made my own "slider" out of the sentiment. I took my rectangle hand held punch and punched along the edges, ran my more mustard 1/4 inch grosgrain ribbon through it and around the card and tied it in a simple knot with a piece of retired 1/4 inch chocolate chip grosgrain ribbon in the knot. I don't very ofter use retired things on this blog but I couldn't resist putting a small piece of it through the knot.

Now for the main image:

The base is more mustard. I stamped the lion from wild About You onto very vanilla for the focal image and them again on scrap paper in more mustard and really rust. I cut out the entire mane of the really rust lion and mounted it on top of the main lion on a stampin' dimensional turned slightly at an angle to show the more mustard lion mane underneath. (wow...that was a lengthy statement.....) I then took my more mustard lion on the scrap and colored in his nose and mouth outline with my stampin' write chocolate chip marker before cutting out the face. I mounted that face on to the really rust mane on a stampin' dimensional too. Looking at it in real life...the lion pops out at you...really cute, in my opinion!


Now for your punch tip:

See that window the lion is looking through? I took a piece of chocolate chip and punched my round tab punch in the middle and then rotated my punch 90 degrees and lined up the tabs and punched again creating a perfect circle! For this card....I wouldn't have really had to do the circle that way but imagine you made a card with the main image (here - lion) being on a scallop circle punch....your scallop punch would fit perfectly in this circle! Remember the donut cards we made at the Season of Joy stamp camp???? you could do a donut card with this circle and the scallop punch! Are your wheels turning yet?


ok....back to this card and enough of my visions of future cards!

I took that chocolate chip frame and stamped it with weathered background stamp in chocolate chip. Next, I took the mat pack and piercing tool and marked where I wanted my brads to go. I then took brads from my Antique Copper Hodgepodge Hardware and adorned the corners. I mounted that window up on stampin' dimensionals.


what do you think? leave a comment below and give me your thoughts an the card and the tips with the round tab punch.

Friday, January 11, 2008

A valentine for a special boy....and a punch tip!

When I sat down to make this card...to be honest...I wasn't sure where I wanted it to go. I wanted to do something for a little boy...maybe a birthday....maybe a valentine...maybe a "no reason card".....


I pulled out Wild About You. I really like this set for kiddos. I think it makes nice baby cards as well as nice cards for older kids. It can be birthday or another holiday if used with the right accessories, I think. For what I know about it ;).


Sometimes I put lots of "stuff" on a card, use lots of techniques, use tons of stamps, use designer series papers and on this one I just wanted to do some straight stamping, not to overdo anything. With all that said...here it is:


The card base is wild wasabi (This color is growing on me very quick!!!!!! I am really liking it!) I stamped the upper portion of the card base with the larger random dot stamp from Itty Bitty Backgrounds and the circle/dot from Priceless randomly in wild wasabi ink. I stamped "wild about you" in basic black in the lower corner. The horizontal panel is so saffron matted in basic black. the so saffron layer in wheeled with See You Around Jumbo Wheel in so saffron. The main image is the cute alligator from Wild About You stamped on whisper white in wild wasabi ink. I pulled out my 1 3/8 inch circle punch and I know....that poor alligator! I punched his head off! See those wiggly eyes? I had them laying around from some other craft project. I adhered them to the alligator's eyes with crystal effects. Cute, huh? I then pulled out my beloved scallop circle punch and punched a piece of blue bayou.


See that black matt under the scallop circle?


Here is your tip: The circle was made out of punching two tabs from the round tab punch and layering them perpendicular to each other forming a perfect circle! That punch was meant to frame that scallop punch, I just know it! :) You all know I love to make the most uses out of my tools....like scalloping with my 3/16 inch corner rounder....hehehe!.......and here is another use for this wonderful punch!


Before I adhered the main image to the horizontal panel I took two pieces of black gingham ribbon and folded them in half and adhered them to the card forming 2 v shapes. Mount the alligator circle stack and you're done!

Thursday, January 10, 2008

Ride 'em Cowboy!

Here is the card I did for the challenge of using leather on your card. hmmm.....

I used some leather/suede shoelace type thingies in place of ribbon. Notice me sticking to my resolution...Antique Copper Hodgepodge Hardware buckle in the knot. I'm really trying to stick to my resolution! I have stamped everyday for a little bit and used my hoarded goodies!


I wanted the main image to really pop off of the card so it wouldn't be competing with the dimension of the suede knot so I went to my trusty bag of rubber to use instead of dimensionals because I wanted lots of depth.


recipe:
stamps: bronc buster, wanted, sanded, all holidays
ink: creamy caramel, close to cocoa, chocolate chip
paper: ds blue bayou prints, blue bayou, close to cocoa, chocolate chip, very vanilla
accessories: sponge, hodgepodge hardware, suede strip

Tuesday, January 8, 2008

Get well in the Bayou

I made this card for today's color challenge: Wild Wasabi, Blue Bayou and Barely Banana. I wanted to use stamps I have had a while that have never seen ink....can you believe it???? Stamps that have never been inked up?????


What do you think?

I started by inking up the flower vase from Fun and Fast Notes. I mounted the sentiments from this entire set on the sides of the blocks so I could stamp the image separately from the sentiment with ease. I love to do this with stamps that are combined with sentiments.

Anyway...back to the task at hand. I inked up the flowers in black staz-on ink and stamped it on to whisper white. I water colored it with my aquapainters using ink refills. you can watercolor on whisper white, you just have to be very careful not to get the paper too saturated. When I was in the middle of coloring this image...I had a "duh!" moment that I should have used my watercolor paper. I don't know what I was thinking! Oh well...i was very careful when placing color down. Notice the shadowing around the vase and flowers? I used my barely banana ink to shadow around the image. I think that is where a lot of water coloring looks flat, not putting shadows around the image. I always wondered why my images looked "flat" and then another "duh!" moment came to me. I need shadows! lol!

I matted the main image with barely banana on one side only. I then took my 3/16th inch corner rounder and popped off that guard and scalloped the edge of my main image. I matted that entire piece on blue bayou.

The card base is barely banana. The upper background panel is wild wasabi wheeled with Fast Flowers in wild wasabi ink. Then to give the flowers a little something, I used my white gel pen to highlight the flower centers.

The lower background panel starts with a base of blue bayou. I then cut a piece of Designer Series Prints in Porcelain Prints a quarter inch smaller that the blue bayou and punched the bottom two corners with my beloved ticket corner punch and adorned that quarter circle with a brad from the antique brass hodgepodge hardware.

The sentiment was stamped in black staz-on. I punched the corners with the ticket corner punch and matted that on barely banana. Do you see more hardware? I am making good on my resolution to use my accessories and I must say I love the cards with hardware on them! I pulled out a semi-circle holder thingy from my hodgepodge hardware and adhered it to my sentiment panel with another brad. I tied some double stitched wild wasabi ribbon through the semi-circle and then adhered the other end of the ribbon around the back of the card.
To finish off...my main image is adhered with stampin' dimensionals.

Right now, fortunately, I don't know anyone who needs a get well card but it sure will be nice to have one on hand when it is needed.

I have club that meets tonight so off to pack up my goodies....

Happy stampin' to you!

Monday, January 7, 2008

Sweet 16!

I want to share this project with you...I made it to give a gift of money for a sweet 16 birthday party. I wanted to do something different than just putting money in a card. You know what I mean? Don't get me wrong...I just put the money in plenty of times but I wanted to do something different this time so I created a purse/wallet combo.
See a closeup of the flap that keeps the "purse" closed. I secured it with a piece of adhesive velcro. Notice the scalloped circle. I did that by using the same technique as I told in this post: http://stampsalot.blogspot.com/2007/11/we-have-winnerkaren-again.html


I love to do this with my 3/16th inch corner rounder punch. I never tried it with the older corner rounder that retired before the Fall Winter 2007 Catalog came out...I really think the scallops would be too big...maybe not...just my opinion.

Here are some closeups of the wallet, inside and out.


Happy Stampin' Everyone!!!!

Friday, January 4, 2008

I'm Embracing Life....again :)

Here is another creation using my new favorite...Embrace Life. I love using this set and I hope you love it too!


The main image and side panel were created in the same format as this card: http://stampsalot.blogspot.com/2008/01/embrace-meyou-sweet-embrace-able-you.html


Then they were both matted onto Groovy Guava and Basic Black. I'm telling you....this Groovy Guava is really becoming a favorite of mine!


The card base is...you guessed it...Groovy Guava. The background panel is from the new Designer Series Prints....Ginger Blossom....LOVE IT! I matted that onto Basic Black. When I was laying out this card the colors were all kind of getting lost in each other. Do you ever feel that way? That your colors just aren't "popping out" as much as you were thinking they would? Try small mats of Basic Black...I always fall back on it and love it every time!


I tied my ribbon around my background panel before I adhered it to the card base. What to you ask? "Is that new ribbon?" No...It is Double Stitched Groovy Guava Ribbon with the white stitches pulled out. I really like the texture that this gives...the tiny little holes remain in the ribbon without any white coloring.


Here it is close up:


I then adhered the long panel over the ribbon and put my main image up onto Stampin' Dimensionals.


That's it....what do you think? I was pleased with my final result.

Thursday, January 3, 2008

Embrace me...You sweet embrace-able you!!!

Oh my!!! I need more sleep! lol!


Today's card is brought to you by...you guessed it....Embrace Life. I was able to pre-order this set as one of my perks of being a demo and I absolutely love it! Don't get me wrong, I do like the stamps that let me just ink 'em up and stamp 'em out but I really love to get a great set that allows me to color it it....we have so many ways to color our stamped images and make them our own. Do I have a control issue here???? lol!


Anyway...here it is:


I started with a base of River Rock. Let me tell you when this color first came out...I liked it but didn't love it....now I am addicted to it and am sad to see it go into retirement in just six short months. "I'll never let go..... Don't ever let go River Rock...." I digress again with a silly movie "misquote." What is wrong with me today??? ;) lol!


Next I cut a mat panel out of Ruby Red and cut three panels out of the new designer series paper - Ginger Blossom. Did I mention that this new paper is gorgeous? It is! The outer two panels were punched with my beloved Ticket Corner Punch. I then punched the corners with my 1/16th inch Handheld Punch to create holes for my brads. I then went to my stash of hoarded supplies...and I mean STASH...and pulled out the tin of Antique Copper Hodgepodge Hardware and pulled out four brads. What??!?!!!? you ask....Is she using her hoarded supplies like she resolved to on New Year's Day? I am, and I used another piece of it here too...you'll see.


For my I stamped with images, masking carefully the center flower, with White Craft Ink and the embossed with White Detail Embossing powder using my Heat Tool onto Whisper White. I then took out my trusty Aquapainters and water colored the images with reinkers. (do you see a trend here with me and those Aquapainters???? lol!) I then matted that image with a piece of River Rock and then.....what is that?....another piece of Hodgepodge Hardware? Yes, I used another piece. I adhered it with a brad and then tied a piece of Double Stitched River Rock Ribbon in a simple knot. I matted that entire main image panel onto Stampin' Dimensionals to give it some depth.


There you have it! I hope you enjoy my creation as much as I did creating it. I challenge you to get something out you have been hoarding and put it to use!


Until then.....Happy Stampin'!

Tuesday, January 1, 2008

Valentine Sale for you...January only!

Purchase the Valentine's Day Bundle (item #111903) for just $33.40 and get Regal Rose wide grosgrain ribbon-FREE!

Hostesses - Hold a workshop of $350 or more, and choose any one stamp set from the Spring-Summer Preview 2008 Brochure for FREE!

The Valentine's Day Bundle includes:Happy Heart Day stamp set $20.95
Real Red wide grosgrain ribbon $7.95
Medium cellophane bags $4.50
Regal Rose wide grosgrain ribbon FREE!
Valentine's Day Bundle $33.40

click on link below to see the flyer!
https://blogger.googleusercontent.com/img/b/R29vZ2xl/AVvXsEguVM3JNiSxqD86it2bmHN-aZGJH7sBkyaWyDt-sFKFFFHI34Epkh7KHevYaRjHY9WEuLQvsM2yLYr8lidX6BB8Hw9FYX-uZyzcF4SStAk4nr_ehPuZMFvvSXZK3_oPk003AVzRXSaeLC0/s1600-h/Valentine+special.jpg

More new rubbah!!!!

Hi All!


HAPPY NEW YEAR!!!!!!


Have you made your resolutions? I have made a few I hope to abide to. One is to make more "creative time" for myself. I feel like I don't get to create just because I want to as much as I create because I have to. I am tired of cranking out a birthday card while my family waits for me in the kitchen with their coats on while I am upstairs trying to crank out a card for the party we are on our way to. It isn't really that bad...but you get the picture! lol!


Another resolution is to use my cool accessories that I buy and then hoard. Last catalog, I bought the Build a Brad and Pretties Kit and then stashed them away on my shelf. I do this all the time...buy stuff i love and then I am afraid to use it because I don't want to use it up....what is up with that?!?!??!? Anyhow....I am using it all this year! you'll see....I'm gonna use it! :)


Here is today's new rubbah card:


Like yesterday's card, I used the a new set called Embrace Life that is in the new catalog that starts tomorrow. Can you believe the new cattie starts tomorrow????


The main panel is a long stem flower stamped in Black Staz-On Permanent ink. I then water colored it using ruby red ink refills and creamy caramel with my Aquapainter. I can't say enough about the Aquapainters....I LUV 'EM!!!!!! that panel was matted onto ruby red and creamy caramel. I pulled out some ribbon that I have hoarded because I think it is gorgeous....Kraft Taffeta. I have to tell myself....If you run out....order some more! You know what...it felt great to see some of that ribbon that I love on a project! It was liberating! I challenge you to get your stuff out that you are hoarding and use it. You know you have something.....right?....tell me it isn't just me....please......


I digress.....wow!


My next stamped image "happy" is from It's All Good. They are excellent for using punches! And everyone that knows me knows I love punches! I inked up the stamp up in Creamy Caramel and then took my Ruby Red Stampin' Write Marker and colored in the outside edge of the stamp. I stamped it onto whisper White card stock and punched it with my 1 inch circle punch. Then to follow the main image I punched out circles with ruby red card stock and creamy caramel card stock with 1 1/4 and 1 3/8 inch circle punches, respectively. The Designer Series Printed Paper is also from a brand new pack...Ginger Blossom...LOVE IT! I matted it onto Creamy caramel. Did I mention that the Ginger Blossom coordinates beautifully with Embrace Life? It does. It is beautiful!


The card base is Ruby Red stamped randomly with a flower from Embrace Life in Ruby Red ink.


That's it.....let me know what you think....leave a comment below.