Tuesday, April 29, 2008

Scrappin' afternoon style~

Hi all! I have a scrapbook layout to share with you today! I started my inspiration with a scrapbook layout challenge. Here is that layout:


I have been itching to do a layout with the papers with the Afternoon Tea DS Papers. I had a layout in mind with pictures of my grandma. I'll give you a little background on the pictures (that aren't on the page yet...I'll add those later today...). They are pictures of my grandma on her birthday two years ago...I know...that is how far behind I am. (Well...I am further behind than that but I am telling myself that scrappin' started when my little one was born now. lol!!). She was wearing a light peach sweater with a few small flowers on the front so I thought the guava with a touch of wasabi would be perfect. Wanna see it?


First off, I gotta tell you...all of the edges were distress by swiping them across my chocolate chip ink pad to kind of antique them a bit. The base is all the same piece of ds paper. The three photos are matted onto chocolate chip. Where my forth photo was supposed to be (according to the sketch), I used for a journaling block. I still can't get into the mindset to scrap without journaling. I see lots of layouts that really don't have journaling....I just can't do it. The half oval on the right is also from the afternoon tea ds paper pack. The flower accents are two different sizes punched with the boho blossoms punch adhered with an antique copper brad mounted up on stampin' dimensionals. The title isn't stampin' up. They are thickers. I have soooooo much scrapbooking stuff already, you will probably see some of it infiltrate into my scrapbooking posts. I hope you don't mind. ;)

Saturday, April 26, 2008

NEWS FLASH!!!!!!!

Stampin' Up! has just released the following information:

"We are pleased to announce that we are extending the sales period of the Occasions Mini Collection 2008 through June 30."

WHOOOOHOOOOO!!! How exciting is that???? So instead of May 31 being the last day to order...we have an extra month!!!!!

Thanks for dropping by!

Friday, April 25, 2008

Blogger's Challenge - week 44

Howdy! I come to you today with another blogger's challenge group card. This week we were to use certainly celery, brocade blue, so saffron and chocolate chip......so up my alley! I bought pun fun last month and can you believe this is the first time inking it up????? The images in this set are soooooo cute!!!! So this would be the time it would see ink!

Here is my creation this week:


The card base is brocade blue. I punched stars with stampin' up!'s star punch and adhered them to my card base with tombo mono multi glue. This really gave the base dimension, I think. What an easy way to adorn a card.

The bottom panel is certainly celery wheeled with see you around in certainly celery. This month is Free Wheelin' month....if you buy pun fun you get a free jumbo wheel - sweet stars which I love but didn't want stars on the top and bottom so I used the free jumbo wheel that comes with year after year in the Free Wheelin' promotion. I really like the fact that the wheel images are interchangeable with different sets but blend seamlessly! I put a thin piece of chocolate chip where I would have normally put ribbon. I intend this card to go to a little boy so I didn't want to use ribbon. I know.....I hear what you are saying....two cards this week without ribbon?!?!?!??!? I don't know what has gotten into me. I gotta get back to the ribbon and bling!!! I miss it!!!!!


The cute rocket was inked up with jet black staz on ink. Notice the sentiment wasn't stamped right under it...where it is intended to be on the stamp. Usually I cut the sentiments apart from the images but this set I didn't so that. Every once in a while I throw myself a wrench and do something unexpected....like this. So what I did was took a piece of blue painter's tape (any piece of tape would work....painter's tape was closest in my reach....LOL!) and taped over the sentiment and then inked it up. Now this is the IMPORTANT part......remove the tape before stamping!!! (trust me...if you forget to remove the tape good things will not happen! :) )Voila! Stamped without the sentiment! I water colored it with my aquapainter and ink refills. I did some shadow coloring around the rocket with going grey. Don't forget to shadow around images to give them some dimension. I did put crystal effects on the little window...I couldn't get a good picture of that...but trust me it's there and it looks super cute! I matted that onto so saffron and then chocolate chip. I adhered that with stampin' dimensionals. (big shock there, huh?)


I then cleaned my rocket stamp with staz on stamp cleaner. This stuff is amazing!!!! For the sentiment I inked it up with my black stampin' write marker and stamped it onto whisper white. I punched it with the word window punch and adorned it with two stars in brocade blue and so saffron.


That's it for today. Now....go stamp! hehehehe!

Thursday, April 24, 2008

I won! I won! I won!!!!!!

Can you believe I won???? I can't...I don't win anything very often. but I won this from Jaime's blog:

She had a week long blog candy a while back and I won this set of Stampin' Up!'s Flower Fusion!!! WHOOOOHOOOOO!!!!!!! I was so excited to win. let alone win something so awesome....I love these flowers!!!!! And you wanna know what???? They fit perfectly into Kristina Werner's color challenge today. Pumpkin Pie, Wild Wasabi, So Saffron and Sahara Sand.


I was soooooo excited!!!!!!

Anyway....Here is what I did: (sorry the card look crooked......)


Kristina's cards are so "clean and fresh." She has inspired me to "clean up my act."

Card base is Sahara Sand. My sentiment is from All in a Row inked in wild wasabi. I used my stamp a ma jig to position it. The background panel is pumpkin pie stamped with polka dot background stamp. I rounded the two bottom corners and all four card base corners with my 3/16th inch corner rounder. I cut a slit in the fold of the card to slip the pumpkin pie striped grosgrain ribbon through and tied it in a simple knot. I layered a wild wasabi scalloped circle with a so saffron 1 3/8 inch circle and a pumpkin pie felt flower from my new flower fusion flower tin!!!!! I really do love these flowers! I adhered those layers together with a brad out of the ice collection of circle rhinestone brads. Bling and felt all together......sweet harmony!


What do you think? I must say...I really like it. It is so fresh from my normal water coloring and sponging. I like to get myself out of a rut and go a total new direction with my creations.....challenge yourself to do the same thing.....I dare ya!

Wednesday, April 23, 2008

Stand Tall

This card is for my husband's birthday tomorrow. I used today's online sketch challenge as a starting place for it. I have been soooo busy this past week and I have to go to the car dealer today and I wasn't sure when I would get home so I got up extra early today to give you some eye candy. Sorry I have been a bad blogger lately.....please forgive me!!!!

I wanted today's card to have a masculine feel without fluff.....so no ribbon or bling :(


Here it is:


I have to be super quick today...sorry ;)

All edges are sponged with whisper white craft ink.

recipe:

cardstock: always artichoke, sahara sand, so saffron

ink: always artichoke, chocolate chip stampin write marker, whisper white craft

stamps: lovely as a tree, sanded background, big bold birthday candle (sentiment)

accessories: mat pack and piercer, aged copper brads, stampin sponges

By the way......I now accept Mastercard, Visa or Discover for your orders. I am only able to accept them for the orders that are placed through Stampin' Up!. (meaning I don't accept them for class or camp fees or sale of retired stamps.)

If there is anything you want to order through Sunday, let me know. The Free Wheelin' sale ends soon and I don't want you to miss out on that sale. I will be placing my final order for this month Sunday afternoon.

Happy stampin!!!!!

Friday, April 18, 2008

Blogger's Challenge - week 43

This week's blogger's challenge was to use chipboard.


I do have a confession, though! I have been so busy this week taking care of other things that I haven't stamped barely at all. This book wasn't made this week but I haven't shared it here yet and it does qualify for this week's challenge. Now don't get me wrong....I know challenges aren't meant to find things that you have done already that fit the challenge....we are to create new things. Honestly....I wish I had time this week to fulfill that challenge. If I get time this weekend I will create something new and post it. But for now I have this to show you:


This is the book I use to keep the technique and card folds that I teach all my club members. They also have their own version of a technique book. One club is using the retired chipboard ATC album and my other club made books out of these chipboard board basics from Stampin' Up!. All of my club members have seen this book but all of you wonderful blogging friends have not. That's why I still decided to share it with you.


Quick run down....have tons of stuff to accomplish today too. Covered in fall flowers designer series papers. Flowers are from Pretties Kit held together by build a brad. Scalloped semi circle was done with colluzzle and 3/16th inch corner rounder. Sentiment "inspire" is stamped on confetti cream with jumbo outline alphabet. I colored the letters in with stampin' write markers or a blender pen (soft sky). My ring holes are adorned with jumbo eyelets set with a crop o dile. Ribbon tie was made with round tab punch and there are various stampin' up ribbons adorning the rings that hold the book together. (some of the ribbons are retired...I wanted to have the color and texture of different ribbons......)


There you have it! Hopefully you will get some more to look at this weekend.....

I thought being a stay at home mom would give me more time.....not the case at all! hehehe!


Happy Stampin' All!!!!!!

Thursday, April 17, 2008

A quickie!

Get you minds out of the gutter!!!! I mean a quick card!!!

I used the new sticky cuts letters on this one. The sticky cuts are letters and shapes cut from the same type of adhesive that our sticky tape is....how cool is that???? I used the new chunky sprinkles glitter from the spring mini catalog on the letter "h." I'm keeping it simple today because I gotta run! I have been so busy this week and I need to get some more blood work today but I didn't want you to go another day without some eye candy.


Here it is:


I scalloped the edge with my 3/16th inch corner rounder after cutting a little off with my paper trimmer. I adhered some certainly celery designer series prints paper to the right hand edge to accentuate that edge. Card base is close to cocoa. My sentiment comes from fundamental phrases....told you it was versatile! :)


Until later my stampin' buddies......happy stampin'!

Wednesday, April 16, 2008

Upcoming Stamp Camp

Hi!

NOTE: THIS POST WILL REMAIN ON THE TOP OF MY BLOG UNTIL THE REGISTRATION DATE!! PLEASE SCROLL DOWN TO SEE NEWER POSTS! :)

I sent this camp information out to all of you that are on my email list but it has been brought to my attention that the pictures opened sometimes, but not all times. So I thought I would post the information here.

Date: Sunday April 27th, 2008
Where: McDonald's Big Mac Board Room
When: 2:00 pm
Limited to the first 10 registrants only!!!!!!
REGISTRATION DEADLINE: WEDNESDAY APRIL 16th
email me directly if you have any questions. regcorn@zoominternet.net

This would make an excellent gift for any woman in your life or for yourself! (Think Mother's Day!!!)

Tuesday, April 15, 2008

Deadline approaching!!!

Hey everyone.....the deadline to register for the camp is approaching....call or email me today to reserve your spot!

I can't wait to see you there!!!

I wanna be a cowboy baby......

lol!!!!! Sorry I haven't posted in a few days! I went to a play date yesterday morning and had an appointment yesterday afternoon.. When I got home from all of that....I got a phone call that I forgot my camera at the play date. I am so sad!!! I don't like to be without my camera at all!!!!!! I can't take pictures of new stuff to post let alone not being able to take a picture of my little one if a "cute moment" occurs! I checked my picture folder on my computer and realized that the stuff I did last week and already mailed out are on here already!!! no camera necessary!!!! So you shouldn't have to be punished for my inability to keep track of a simple camera, right????


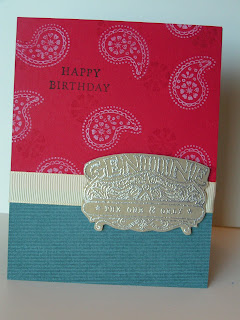
A friend of the family had a birthday Sunday and he likes western stuff, so I used this a perfect opportunity to execute something I have had swimming in my little head for a long time!


So...here it is:


Does it look like an outfit? hehehe!!! Ever since I bought this set, a while ago......, I have envisioned a belt buckle out of this stamp. oh my! I need help, I know! I am starting to envision clothing pieces looking at stamps or pulling inspiration from our stamps when I am in town......sickness, I know! ;)


The base is blue bayou with a top fold. I stamped it with my brand new twill background.....I can tell already I am going to have a very deep connection with this background stamp....kinda like me and my sanded background....some stamps just mean more to you than others....while you love them all...some hold special places in your stamping heart...this is one of them. Anyway...it was stamped with blue bayou ink. The top (shirt) is real red stamped with the small flower medallion from Wanted in real red then stamped with the paisley stamp, also from Wanted, in whisper white craft ink. I dried that with my heat tool....way too impatient to let it dry alone. lol! I stamped the "happy birthday" sentiment using my stamp a ma jig with fundamental phrases. This set is a very valuable set....the words are all separate so you can combine them in many ways. Love versatility!!!


I made the belt from 5/8 inch wide vanilla grosgrain ribbon. I wanted to use the 5/8 inch chocolate chip grosgrain but I am all out....can you believe it????
not having chocolate chip ribbon??????
what?!?!??!?!??
I know!!!!!
It is already on it's way from Stampin' Up!, don't worry. Now for that little...or not so little...belt buckle. I stamped the large medallion from Bronc Buster in encore silver ink onto brushed gold card stock and embossed it with silver embossing powder and my heat tool. Wanna see it closer????
After cutting it out, following the outline of the stamp, the buckle was adhered with stampin' dimensionals.

Well....that is about it today....go stamp!

Thursday, April 10, 2008

Solitude

Have you ever participated in a challenge that I have participated in and then posted here? Well...if you haven't, here is your chance! This card was inspired from a color inspiration over at Kristina Werner's blog. Weekly, she posts a picture she has found inspiration in and then translates the colors into Stampin' Up! colors.....how great is that?????


Here is the inspiration picture:


Isn't it serene? Oh, how I could go there!!!!


These are the colors that was inspired from this beautiful picture:


very vanilla, tempting turquoise, taken with teal, old olive, chocolate chip, close to cocoa


The Chocolate chip, cocoa, vanilla and old olive are right up my alley....I don't use the others very much. I like the colors...believe me...I just don't instantly "go to" them when creating. Often I find myself in a mode that I only use two colors and then white or vanilla....so I wanted to use all of these beauties on my card for today. (Well, actually I made it yesterday....I just didn't have the chance to post it....sorry!)

Here it is:

My base is chocolate chip...can't go wrong there, right? hehehehe!!! My background panel is mainly tempting turquoise stamped with taken with teal ink. I used the flower trio in the level 2 hostess set, Spring Solitude. I love this little branch and bird. CUTE!!!! I flanked the long edges with a piece of close to cocoa and then a scalloped piece of taken with teal. I scalloped it with my slit punch...easy peasy!!!!

My main panel is vanilla stamped with the branch numerous times from Spring Solitude. I inked it up with stampin' write markers - chocolate chip and old olive. I stamped it generation style to give color variance with the branch. Next I inked up that cute little bird with tempting turquoise and then took my taken with teal stampin write marker and inked up his belly. Did you notice the difference in color? I matted that onto old olive with the bottom portion much longer than the rest. I used the mat pack to align three holes for brads. I made washers for my brads like I did HERE and put them behind three blue rhinestone brads from the ice rhinestone brad pack. That was mounted on stampin' dimensionals....I know...big surprise, huh? luv my dimensionals!

If you do follow this inspiration...I would love to see it! post a link to your creation here in the comment section of this post.

Tuesday, April 8, 2008

Accepting credit cards.....

Hi all you stamp clubbers! I did tell you last month that I would be able to start accepting credit cards in April...Stampin' Up! hasn't rolled out that program yet. Sorry for any inconvenience...I will let you know as soon as I am able to accept them. I was told they are going to start sometime this month.....I'll keep you posted!

On a different note.....I will be bringing some different retired sets this week to club that I have put in my "sell bin." These are cash and carry, not to be included in club sales.

I'll see you all at 6:30 tonight and Thursday night!

Want more scrapbbooking?

I have two pages to show you today. I started them last week and just finished up last night. This weekend was a busy one to say the least so I didn't get to even look at my desk! (insert sad face here.....) My little one has been wanting her "big girl bed" so she finally got it! She wanted her room to be decorated in...are you ready for this???.....Hello Kitty! Let me tell you...decorating a bedroom on a non-hello-kitty-collector budget wasn't easy! I don't know how she got that in her head!!! They had sheets and blankets at Target and she picked it there....I tried to get her to change into something easier to decorate around....Princess...Dora....Sesame Street.....she wouldn't budge! I wanted her transition into a new bed to be positive....so hello kitty it was! With all of that going on and my husband spending all weekend building a vinyl shed kit for all of her outside stuff so her could get his space back we had a jam packed weekend!!! That is why it took me a two week spread to get these pages done...don't get me wrong...it does take me a very long time to make decisions on scrapbooking...it usually doesn't take me two weeks! LOL!!!!!

Anyway...here they are:


The base is barely banana with flowers from Ginormous Flowers stamped all over the background. I inked them in barely banana and rock and rolled them in summer sun. my patterned paper is from Flowers From You. The two pinks are pretty in pink and pixie pink. I made scallops with my slit punch and accented them with my white gel pen. my title "Sweet Cheeks" is stamped with a retired alphabet - Letterpress. I inked then in pretty on pink and rocked the top and bottom with pixie pink onto whisper white card stock. I then cut them out with my hobby blade and cutting mat. Let me tell you...this was a bit labor intensive but I could have NEVER done it with scissors!!!! I love to cut things out with my hobby knife and cutting mat. All the flowers were cut out with the hobby blade as well (unless they were flowers from a punch.....).


My tags on the left hand page are stamped with sentiments from Warm Words. I punched their edges with my 3/16th inch corner rounder and tag corner punch. I then punched a hole for the ribbon with my 1/8th inch handheld punch and threaded pink gingham ribbon through. The flower adornments are two layer. The bottom flower is from the boho flower punch and the upper flower is from three for you. They are adhered together and to the tags with gold brads. Those are mounted up on stampin' dimensionals.


The flowers that accent the larger picture on the left and the journaling block on the right are stamped with various flowers from ginormous flowers and layered with a fire rhinestone brad holding them together. Gotta have bling in the scrapbook, right? They are mounted up on stampin' dimensionals as well.


My journaling is done with my pixie pink stampin' write marker.


Wanna hear something about these pictures? When my little one was not on the go...I would lay out a sheet or something and just snap pictures of her at least weekly...the pictures from this are from one of those sittings. I also had her picture taken professionally once a month for her first year...so needless to say I have a ton to scrap of her! These pictures really had nothing to do with her cheeks....but when I was deciding what to title these pages...her smile and her cheeks (which she has grown into :) ) just radiated from the pictures. And I tell you....I never took her anywhere (and I ahve taken her everywhere with me...I don't like to leave her behind.) that someone didn't comment on her cheeks and her eyes! Perfect strangers would approach us and make comments on how beautiful her eyes were and how cute her cheeks were! So I decided to scrap about that. Isn't that really what scrapbooks are about?? The day to day stuff that would eventually be lost in time....not really just the big stuff like birthdays or graduations. Making my daughter's scrapbooks have taken me into a place with journaling I never thought I would go....deep! I want her to know "stuff" not just dates of snapshots....you know what I mean? This is why I am sooooooo very far behind! That is ok...I will catch up....someday...hopefully....maybe.....but if I never do...you know what....what she will have will mean something to her...her story...her life. I hope anyway.....maybe she won't give 2 craps about it....who knows???


Oh well..enough rambling.....I tend to go into great lengths when I get up early and post, don't I? Maybe because I don't have anyone chattering in my ear for a snack....drink....movie change....a new dvd.....dress my baby......another snack.....play a game on your computer mom?.......can i paint?......what else is on my channels?...... Now I see why it takes me two weeks to get 2 pages done! hehehehe!!! Oh well...I wouldn't trade it. I'm not saying I wouldn't like a minutes peace once in a while...but I wouldn't trade it!


Now....dig deep and go stamp a scrapbook page! You heard me...go! lol!!!!

Friday, April 4, 2008

Blogger's Challenge - week 41

Hi all!

This card is for blogger's challenge. We were to case the card on page 65 in the catalog. The long and low card. Here's mine!


The base is groovy guava. It was cut to 6 3/8 x 6 folded in half to form a 6 3/8 x 3 card. I stamped the leaf branch from Embrace Life in groovy guava and then stamped my sentiment in jet black staz on with my stamp a ma jig. The background to my main image was a rectangle of saffron designer series prints paper that I rounded off with my culuzzle circle cutter. I also cut a piece of white with the same circle and scalloped the edges with my 3/16th inch corner rounder with the guard popped off. LOVE to make these scallops with my corner rounder!!!!!


My flowers were stamped three times on whisper white with jet black staz on ink. I used my sponge daubers to color them. Can you believe it????? No aquapainters?!!?!!??!!??? Here is what I did......used so saffron in the centers, finished off the entire flower with blush blossom and then hit the edges with groovy guava. I purposely went "outside the lines" when I colored them so when I cut them out if I didn't cut exactly on the line...you would see no white! I always do this if it is something I am going to silhouette. I then took my white gel pen and colored in the stamen ends....what ever those are called.... :) Here's a close up of those beauties (if I can say so myself....):


I adhered them with lots if dimension. I started by curling some of the petals around my fingers to give the petals a more realistic look. The I pulled out the stampin' dimensionals and went to town!!!!! After they were mounted in place where I wanted them, I adhered flat backed pearls from The Pretties Kit with mini glue dots. I really love those pearls and since I am out of flowers in my pretties kit...I can STOP HOARDING those beautiful pearls, right???? I don't know why I keep doing this...not like I can't order another pretties box!!!!! ARGH!!!! Wanna see all of that dimension?


Oh yeah!!!! Before I mounted the flowers down, I tied a piece of 5/8 inch old olive grosgrain ribbon around the top.


Need some inspiration to stamp today...play along and case the same card.


Wednesday, April 2, 2008

Balloon's up!

Hey! A second post in one day????? What is up with that? Well....I can tell you my union benefits have kicked in this week and my little one has taken two naps so far. Today....nap number 2!

This card is for today's online sketch challenge. I must admit, though, that when I saw the long main image panel...I couldn't get balloons out of my head! So I decided to use my Sale A Bration set - Birthday Whimsey. I didn't really get the chance to use my sale a bration sets like I would have liked to because I was cramming in Artisian Award entries. So still today...even though Sale A Bration is over....they feel so neglected!!! I don't very often post projects using retired stuff...but today I could resist. I wanted to create a masculine card that wasn't too "over the top" manly....maybe I could use it for a young man or an older "little" boy. Don't get me wrong, I love to do cards that are strictly for an older man...but today I wanted to get a different feel. I hope you agree that I met that goal of mine.


Here it is:


It's pretty straight forward....base is kraft, horizontal panel is wild wasabi matted in chocolate chip. present stamp is stamped in certainly celery so it would be more muted than if I did tone on tone with wild wasabi. See those brads???? Did you read my earlier post today that showed you how to do that? If not scroll down one post....there is a tutorial on how to make washers for you brads.


The vertical panel is confetti white matted with not quite navy. I really like to use confetti white or confetti cream when I am going to have a big open space that will not be sponged or distressed in any way. The flecks of color in both really set off the panels. My balloons are done using an older technique - rock 'n' roll. The colors were bashful blue and not quite navy for the blue ones and certainly celery with wild wasabi for the green one. The strings are natural twine adhered to the back. Two of the balloons are adhered with stampin' dimensionals.


What do you think? It's a pretty plain card for me....I usually sponge, distress, ink edges, color, etc...etc...etc....and I really enjoy stepping back and making a card that has clean lines and straight forward stamping.

My Shooting Star! (and a mini tutorial)

Hey all!!!

If you are reading this....you have scrolled down past my camp information...thanks! That doesn't mean I don't want you to read that information....I just want you to read this too. :):):)

A little bit about this card.....

I have a customer that is relatively new to stamping and we were talking the other night about her daughter being in a play. She said she wanted to make her a card....something with her star punch....(little did she know I had an idea of a shooting star in my mind since I bought this punch when it first came out and never put it out......by chance, I don't thin so! :) )

On another note...I really wanted to do the online color challenge from yesterday: creamy caramel, mellow moss, apricot appeal, and cameo coral. When I read those colors...I thought "How feminine...but still keeping a shade of brown...(you all know I love chocolate chip!!!!)." I really wanted to do it....I just ran out of time yesterday. I woke up before my little one....so I jumped out of bed and ran into my studio with hopes of pulling this together before she woke up! Guess what????? I did it! If you read my blog daily, you would have read a while back that I get into "insomnia modes" and have stamped through the night or gotten up with my husband at unGodly times in the morning when he went to work to stamp......let me tell you.....lately isn't those times!!! I could sleep the clock through, I think! That is another story! lol!!!

A third thing about this card.....When she (customer) was telling me about going to her daughter's play every night...it really warmed my heart! ***To all of you with children out there - your kids want you at all of their functions if they tell you that or not!!!! OK.....enough of my preachy-ness!!!!! sorry..... So anyway.....I was thinking..."If my little one were in high school and participating in a school event, such as a play or concert of some kind, what would I want a card to say to her????" (Can you believe I went here with my thoughts???? My little one is only 2!!!) My mind kept going to the sentiment in the set Live Your Dream from the Occasions Mini Catalog...... "Go CONFIDENTLY in the direction of your DREAMS." by Henry David Thoreau. What an awesome quote for your children!!!! A great quote for anyone, indeed. Anyone who has a dream of something.....if that dream is something earth changing or as small as a personal goal.

Boy I am getting deep this morning, huh???? HEY!!!! I meant deep in meaning, not deep in *#it! hehehe!!


Without further adieu.......


Can you see the dazzling diamond "Shooting star trail?"

Card base is creamy caramel....4 1/4 inch square (cut card stock to 4 1/4 x 8 1/2 and fold in half). My main panel is whisper white with score marks 1/4 inch in from the ends. Do this with your bone folder along a ruler or in the groove of your paper trimmer. I matted that onto cameo coral. My sentiment from Live Your Dream is stamped in cameo coral.


I lined up the brads using my mat pack and piercer. Punched large star punch three times....mellow moss, apricot appeal and cameo coral...arranged them like they were shooting off of the card. I used my 2 way glue pen to adhere dazzling diamonds to the star trail. The stars are adhered with stampin' dimensionals.


Oh yeah!!!! Did you see those brads??? Did you notice???? I did promise you a mini tutorial, didn't I??????


here is another look:


Well.....Anyone that attends any of my classes, and now those of you that don't, know I am a miser when it comes to wasting card stock. Don't get me wrong...I use tons of layers....I'm not a miser like that. I hate to throw it into the garbage can, I don't hate to use it! So when ever I have small scraps, I create my own prima flower jar. I take the scraps and punch flowers from my Three for You Punch Box and my Boho Blossom punch. I keep all of those flowers in a little jar. Not only am I not wasting card stock, but I have something pretty to look at in my room! When I need a flower...I pull out my jar and it is already for me!


Well....I took that "miser-y" one more step. I haven't started a jar for this...but I can see one coming on! If you have a scrap that is bigger that 1/4 inch...you can do this!!!!


First: punch a hole with your 1/8 th inch hand held punch. (any old scrap will do......)

next: turn over your 1/4 inch circle punch and center it over the 1/8th inch hole and center it.

see?


and punch it out.


There you have it.....A BRAD WASHER!!!!!!! Now Washers aren't just for the hardware store (or the laundry room....hehehe!) anymore!

Slip that washer over your brad prongs and place it through your card.

What do you think about that?????? hehehe!!!!

WOW!!!!!! I was a regular chatter box this morning, huh?????

If I get time to stamp some more, I'll be back!


Monday, March 31, 2008

My Sweet Love......

Hello!!!!


I will start this post with some background that made me get scrappin' again. I have been a scrapper for over 10 years and since I started card making I have done very few scrapbook layouts...so needless to say I am so far behind I may never see the light of day! I did do some scrapbook layouts for the Artisian Award and loved seeing them come to completion. There is something very rewarding scraping your memories and seeing them all layed out on paper. I can't explain it but if you are a scrapper....you know what I mean. So anyhow....


Janet Wakeland, a Stampin' Up! demo four generations above me, has what is called DIVA days once a month for those in her downline that meet certain criteria. She lives across Pennsylvania so I can't really actually attend these meetings. I have earned DIVA status several times before realizing she had DIVA long distance. What this entails on my end is to create a project under the category she provides and email a picture of it and she in turn emails all of the "long distance" DIVAs pictures off all other submissions. clear as mud???? So three months ago I caught on to the long distance thing and joined in. This month's category was anything to do with photos.....a card with photos.....a photo cube......scrapbook layout.....just anything you can use current Stampin' Up! merchandise and incorporate a photo theme.


I thought...I can do this! And it is due tomorrow ( April 1st). So yesterday I went to it. If I don't scrap in chronological order.....it takes me forever to decide which pictures to use. I am so far behind, I didn't scrap my daughter's first Valentine's Day. So I pulled out those pictures and went to it.


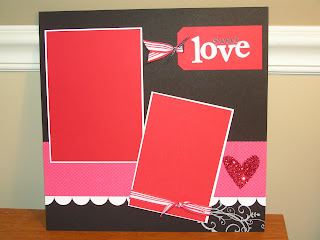
I didn't include her pictures on the layout to submit but (I have a thing about her picture being on the web...even though I don't think anything of other's kids online.....I actually look forward to seeing other's children over and over...to know what they are up to and to see how they are growing! I am weird, I know!) I can give you the deets of them. She is in a red dress with a white apron thing over it and I took all of her pictures with a black backdrop so she really pops in the pictures. So my layout colors were predetermined, in my head. Black, red, and white.


Well...after all that.....wanna see them?


Here is a closer look at the page on the left:


Here is a closer look at the right:

Wanna know the deets of them?

Base is basic black. The red horizontal stripe is from Summer Picnic DS Paper in the Occasions Mini. I made the scallops for the border by using my 1 inch circle punch and punching it a bunch of times and adhering it to the back of my red strip. LOVE SCALLOPS!!!!! I stamped the swirl from Baroque Motifs in Whisper White Craft ink and heat set it with my Heat Tool (I'm too impatient to let it dry on it's own....). The hearts scattered on the pages are from the Sticky Cuts Letters (pg 186 in spring cattie), they are shapes cut from the same thing as our sticky strip...love 'em! I covered them with the red chunky essentials glitter (also on page 186). They really sparkle and add alot to these pages in real life!!!!

My journaling block on the left page is stamped with the lined stamp from Live Your Dream in the Occasions mini catalog with real red ink. My journaling was done with my black Stampin' Write Journaler. I matted that onto real red and tied a knot around the end with black gingham ribbon before matting the entire thing onto basic black. All the pictures are matted with 1/4 inch mat of real red and then a 1/8 inch mat of whisper white.

The one picture on the right is for a close up of my little one and I tied a piece of red striped ribbon around it at the bottom. My tag is real red punched with the tag corner punch and slot punch for the ribbon hole. I threaded a piece of red striped ribbon through it and secured it by tying as knot of black gingham ribbon around it. My title is "Sweet Love." The "love" is the jumbo outline alphabet stamped with black staz on ink onto whisper white and I then took my Hobby Knife and them out. The "Sweet" comes from a sentiment "You're so sweet" in the A Perfect Day rub ons in the Occasions Mini Catalog. This is hard to see in the picture but it is there.....trust me. What I did was use my Hobby Knife to cut out the word "Sweet" from the middle of the rub on sheet...keeping the rest of the sheet in tact.

That should about wrap this layout up. Sorry if I bored you with the ramblings with the background that even led to this page...I thought some of you might want to know...or maybe not ;).

Until later....Go stamp!!!!! Or....Go Scrap!!!!

hehehe!!!

Thursday, March 27, 2008

Blogger's Challenge - week 40

edited to add.....i thought today was friday! oh my! well...i guess i am a day early. i am usually a day late so i guess this makes up for that, right? lol!

Well...can you believe it???? I am posting my blogger's challenge on time! whooohooo!!!!


This week we were to use spring flowers...that's it...spring flowers. So I thought....and I thought....and you know what??? I haven't even mounted or inked my From the Garden Level 1 Hostess stamp. I wanted this right away because I enjoy doing a little water coloring....this is a lot of water coloring!!! I earned this stamp right when this catalog started and haven't used it yet. What is wrong with me???? My poor lonely, clean - uninked stamps!


The card base is mellow moss. I stamped the entire flower with always artichoke ink and then twice more onto watercolor paper with jet black staz on. I stamped my sentiment from It's Your Birthday in jet black staz on also. I watercolored the whole flower with my aquapainter and classic ink refills - so saffron, more mustard, blush blossom, apricot appeal, groovy guava, and ruby red.


I cut out the whole flower and just three petals of the other. I put the three extra petals on the card with stampin' diemnsionals to give it a more 3 d look. see:


I tied a simple knot with vanilla 5/8th inch grosgrain and 1/4 inch mustard grosgrain ribbons stacked on top of each other.


Let me know what you think.....I really like this flower stamp but it is very large!

Wednesday, March 26, 2008

Want more tea?

I am coming to you later than normal today, but better late than never, right???? I got my sketch inspiration from today's online sketch challenge. And I had to use my afternoon tea and Live Your Dream set again today. I have to tell you...I have probably 30 sets that aren't even mounted yet and I had to use this set again! I absolutely love these papers!!! Wait until you see what I am planning for next month's stamp camp.......


Anywho......I started with a base of groovy guava and I stamped a few butterflies from Live Your Dream around the top area flying off the card. My background panels are from ...... you guessed it.....Afternoon Tea. Aren't they beautiful??????? I matted both of those in chocolate chip.


Do you see those stitches?????? Well...they are not! They are the argyle stamp from All in a Row. I really like to use this stamp for this purpose....faux stitches.


I stamped my main flower onto confetti white with groovy guava for the flower, wild wasabi for the stems and colored in the centers with my chocolate chip stampin' write marker. You can only barely see the chocolate chip centers around my pearls but I know they are there. I cut out that panel being careful not to cut through the flower on the right hand side. I trimmed around it with my scissors. I matted that onto chocolate chip as well. I adhered that panel to the card with my beloved stampin' dimensionals. I tied a single knot with a scrap of groovy guava double stitched ribbon with the stitches pulled out and adhered that with a stampin' dimensional where the flower stems intersect.


Now for my "pretties." I took out flat backed pearls for the flower centers and my wasabi panel from my pretties kit. (luv that kit!!!) I adhered them with mini glue dots.


I purposely left out the sentiment on the front. I do this quite often so I can stamp an appropriate sentiment in the inside or use it as a note card.

Tuesday, March 25, 2008

Thanks!

Well....I filed a grievance with my union department about not getting any "lunch breaks".....and you know what???? Today I got one! hehehehe!!!!! My little one who has been protesting naps with a vengeance has a little cold and she is wore out....so guess what???? nap today! A very small one, but none the less, it is still a nap!

So I thought I would take advantage of today's online color challenge of soft sky, basic gray and whisper white. And not to mention I have rubber that hasn't even felt air outside of their little plastic box that they come in! So the stamp set that "got out" today is Live you Dream from the Occasions Mini Catalog that is current right now. this set also has a coordinating paper pack called Afternoon Tea....Let me tell you....If you haven't bought this paper pack yet...it is a must!!!! The papers look soooo much like fabric and they are so "soft" looking! Beauties...each and everyone of them!


Anyway...Wanna see it????


Here it is:


Card base is basic gray stamped with Sanded in Basic Gray and also sponged on the edges. The background sky panel is that lovely paper I was talking about...Afternoon Tea...matted in whisper white. My Flower panel was made by stamping the flower stems from Live Your Dream in whisper white craft ink and embossing with white stampin' emboss powder with the heat tool. The I took my soft sky sponge dauber (cause any of you that know me knows I have a separate dauber for every color......) and highlighted around the entire flower to give it depth.


And do you know what else????? I went out on a limb and put those flowers on their side....What do you think of that? I thought they looked pretty good laying down instead of standing up.....but what do I know?????


Any way...back to the task at hand...I matted that onto whisper white also. Both white mats were "daubed" with soft sky before adhering to the card.


My sentiment, "Thanks" was stamped with basic gray and then I stamped the little butterfly ( both stamps are in this same set....can you believe it? So diverse) in soft sky before punching with the 1 1/4 inch circle punch. Mat that onto a circle punched with 1 3/8 inch circle punch. I punched a scallop circle out of basic gray and used the foam mat that comes in the mat pack and pierced holes around it before sponging with basic gray.


Here is a close up of that tag sentiment:


oh yeah.....did you notice that I took out the stitches from my Soft Sky Double Stitched Ribbon? I really like to do this when I don't want my ribbon to look so casual.


There is one more thing! I know you are saying..."But what else could there be????"

Well......I couldn't not "bling" up my ribbon slide from the Styled Silver Hodgepodge Hardware set that is available in the Occasions mini catalog!!!! I did the same thing that I did Here. Only this time I used Dazzling Diamonds!!! Oh how I love to bling!!!!!
This looks so much better in real life...I promise!

Well...that is about it today. I'm glad you stopped by to see me!


Until later....Happy Stampin'!

Monday, March 24, 2008

I need your help!!!!!

HI everyone!


I come today with nothing newly stamped to post.....but with a plea for your help!


Get out your troll dolls.....rub their hair in circular motion and then pull it straight up into a nice point.


Wear your socks inside out...rolled down instead of folded down....two different colors if that strikes you!


Line up your bingo daubers in alphabetical order......


Sort your pennies by date.....and then take out all wheat pennies and frame them for the dashboard of your car......


what ever you do......DO NOT step on any cracks......DO NOT walk under any ladders.....play all numbers in you fortune cookies for the lottery.......throw a whole salt shaker over your right shoulder (don't take a chance with a pinch!).......look feverishly through your yard for a four leaf clover.....


get the picture????? hehehehe!!!!!


Now in all seriousness....I am mailing out my Artisian Award projects today, so think of me and throw me any lucky thing you do my way! I wasn't going to even tell anyone that I was going to submit anything...but I thought it would keep me accountable. I am now accountable to all of you. I won't find out the winners until June so fingers will be crossed.....tightly.....until then. lol!


Here it is.....rub your computer monitor for luck over the entire box. I know....enough already with the luck stuff. I really don't even believe in luck....but it is fun to talk about, huh?


Now....go stamp! ;)

Friday, March 21, 2008

Blogger's Challenge - week 39.... and a mini book review :)

edited to add: this color challenge was supposed to be soft sky, blue bayou, chocolate chip and real red....i totally left out the real red!!!!!! sorry :( i saw chocolate (chip) and got all excited! :):):)

I can't believe I am getting this posted on time...and early in the morning at that!


This week we were to use the color combo of soft sky, blue bayou and chocolate chip. Easy peasy, right? I love all three colors! I needed a card for a birthday next week, so I thought this color combo was perfect! But what stamp to use?????? hhhmmmmm........... What do I have in my stash (very large stash...mind you....) that would be good for a 14 year old boy. I never bought the new teenage stuff in our Spring Cattie so what would I use??????? I stare at my stamp shelves in wonder....... And then, like a baby learning to reach for you, I saw mini stamp arms reaching out at me. pick me...pick me.... (like a school kid who really new the answer in class) you haven't inked me in a long while......pick me......come on......here....here....here i am...... I knew I wanted to use numbers, that decision was already made. Still scanning my shelves......


Aahhhh.....Good old Stamp of Authenticity!!!!!


This set gets over looked a good bit by everyone, I think. It makes a great set to scrapbook with....built in journaling block with that library card stamp. I love all the other smaller stamps that can be used as background stamps or on tags. I have made masculine and feminine cards alike with this set. I'll have to post my feminine card with this stamp set later. Maybe the first of next week. When we come down off of our sugar buzz from Easter we can get back down to business, right? Any way...I really do like this stamp set for a variety of reasons for card making and scrapbooking.


Wanna see it? Are you sitting there saying...Come on...show me the card already!!!!


ok...ok....


I will start with the card base. Remember all of those stamps I said that make a great background???? Well...do you see them? How easy is that? Soft sky card stock and ink by the way. Next for my library card that has been torn out of a notebook.....Do they even use library cards anymore???? I doubt it. Am I giving away my age?


The last time I checked out a library book was when I was pregnant. I had sleep issues....I never did it! So I read a lot and watched a ton of 80's reruns on Nick at Night. Any way the book was "Night" by Ellie Wiesel (spelling???), pronounced "vi (vi as in victor)-sell, The author was a survivor of Auschwitz concentration camp in Germany under Hitler. Ellie can tell a story that makes you feel like you are there. He captures emotion like I have never read. I had a hard time putting the book down when I picked it up. Any way...wondering why I am going into this???? I am trying to remember if it had library cards in it. Know what? I think it did...don't know why though....the lady checked it out and in on a computer. Hmmmm......


Well...back to the task at hand. The library card is stamped in blue bayou onto confetti white and punched with the spiral punch. I then stamped "14" with my big deal numbers in chocolate chip. I made a similar card (minus the stamping) with blue bayou and off set it a little. Oh yeah...I distressed the edges with my Cutter Kit. Very handy little tool to have hanging out on my desk.


Remember me saying lots of these stamps could be tags????? Well.....my main focal image is just that. I stamped it in chocolate chip and stamped "happy birthday" from amazing to zany in blue bayou. I made my tag out of soft sky. Punched the corners with the tag corner punch. Punched the hole with the slot punch. Pulled a piece of double stitched blue bayou ribbon through and secured it by tying it together with natural twine. I mounted that up on stampin' dimensionals.


Well..there you have it! A card...a book review (go read that book...it is very good)....and a little more of my rambling! What better way to start your Holiday weekend that with a lengthy post with me rambling, right? hehehehe!!!!


Have a wonderful Easter weekend for all of you celebrating!

Thursday, March 20, 2008

A Door Prize for.........

Cindy!!!


This is a late congrats to Cindy for winning the door prize at my Birthday Stamp Camp on March 9th. I have to be quick today...I hear the little one awake upstairs. Do you think she has a camera on me? When I sit down to do something....it's like she knows! It's freeky, I tell ya!


Any way.....I included a bit of chocolate in case the winner needed a little boost while stamping away! Here it is:


I thought it was just darling! But all of you know how much I LOVE my scallops made with my Stampin' Up! corner rounder and I couldn't resist using it on the edges of this little cutie!


I used the three flower stamp from One of a Kind and inked it up with my stampin write markers. You know the stamp....the one that coordinates with the Boho Blossom punch. And all of you know what I do with that punch, don't you? If you come to my classes...then you already know. If you haven't been to my classes or haven't been lately then I will let you in on a little tip. This is from my fingertips (typing) to your eyes.......


tip coming your way........


Any time I am working on a project and have small scraps of card stock left over, that couldn't be used for ANYthing else....cause you all know how I am with saving my stuff...it kills me to throw it away.......I punch out small flowers with my Three For You punch or my Boho Blossom punch (I even sometimes punch out with the photo corners punch) and keep a cute jar right by my desk full of 'em. It makes it so easy when I need a little pop of color on something to just dump out my "pretties" jar and pick something. This is probably not too much of a time saver, per say, but it is a money saver. And I could use that money to buy more goodies to work with. i luv goodies!!!!!!!


Any way...I hope you look at your scraps in a different light now. Punch 'em before tossing 'em! LOL!


Oh yeah.....On a side note. you will have me back now. I finally got my submissions for the Artisian Award done. I promise to post more often. Don't forget...I don't have the "union" protecting my lunch breaks anymore...... :( Everyone else that I talk to...their kiddos take these incredibly long naps and they can do anything while they are sleeping. Not mine...she has never been a kid that required a lot of sleep. If I knew then (when she was a tiny baby) what I know now....I would have been able to foresee this no napping very early. She, at a very young age, could go on a 15-20 minute nap. Which made me pretty happy at the time....not very often did I have to say "She's so fussy because she is tired...." I just had to say..."I don't know why she is fussing...." LOL! So anyway...you probably don't give a hoot about my "lunch break" so I will run.... Speaking of that..she is calling for me (in her usual perky self in the morning)...."Hey mommy.....can you come in here?...Mommy...." ( I can tell you she didn't get her morning perkiness from me!!!! hehehe!) So I better run!


Until later...Happy Stampin'!

Tuesday, March 18, 2008

Free Wheelin' and Free Merchandise!!!!!!!

Hi everyone!!!! I can't believe Sale A Bration is over.... :( But I have some more news for you that earns you FREE Stampin' Up! Stuff!!!!!!

WHAT?!??!?!?!??!

We can earn more free Stampin' Up! merchandise?????

I know....I know....I can't hardly believe it myself! This is Stampin' up!'s 20th anniversary year and I have a feeling we are in for some good times!

Anyway.....You wanna know what it is????

ok....ok.....here are the specs:

From March 18th - April 30th (on both promotions) you have two ways to get free stuff!

1. Hostess a show that has a total of $350 or more in sales (before shipping and tax) and get an EXTRA $25 in hostess merchandise!!!!! Can you believe it????? I know I sure could pick out anextra $25 in FREE merchandise, couldn't you?

and.....

2. The Free Wheelin' Promotion!
Buy the stamp set and get the coordinating wheel FREE! How cool is that????

Here they are:


112848 Wonderful You bundle
Includes Wonderful You stamp set and
free Stems & Silhouettes jumbo wheel
$33.95


112851 Life’s a Breeze bundle
Includes Life’s a Breeze stamp set and
free Something Fishy jumbo wheel
$29.95


112850 Pun Fun bundle
Includes Pun Fun stamp set and
free Sweet Stars jumbo wheel
$30.95


112847 Year after Year bundle
Includes Year after Year stamp set and
free See You Around jumbo wheel
$30.95


112849 Stitched Exotics bundle
Includes Stitched Exotics stamp set and
free It’s Beautiful jumbo wheel
$33.95


112853 Enjoy Every Moment bundle
Includes Enjoy Every Moment stamp set and free
Daisy Dash jumbo wheel
$29.95


Now if that isn't exciting.......I don't know what is!
Raise The Roof 1 Can I get a "woop...woop!"?


Monday, March 17, 2008

Blogger's Challenge - week 38

Hi All!


This was supposed to be posted on Friday but I have been crazy busy! I don't know where my days go...but they sure don't waste any time going if you know what I mean!


This card is for my online blogger's challenge group. We were to make a birthday card for any age. Here it is:


I will just post a recipe today....my little one has a St. Patrick's Day party today that we need to get ready for. You have all been so neglected by me that I needed to post a card today t make me feel better. Sorry I haven't been posting a lot lately.


Here is the scoop: First - I have been working on things for an award through Stampin' Up! I can't show you any of that and that is what I have been doing when I get up in my little room. Second - my little one doesn't hardly ever take a nap anymore...which is when I used to get a majority of my stuff done. I am losing my "lunch break!" (those of you who know me personally know I have always called my little one's nap time my lunch break since I don't work out of the home any more....now it looks like I just lost my union benefits and work straight through with no lunch! Hehehehehe!!!!!!)


Any way...I am starting to ramble about things that no one cares about, I'm sure, so I will give you the recipe and get on my merry way. Sorry if I bore you all with my ramblin'!


recipe:

stamps sets: big bold birthday ( I told you girls at my last camp how much I like this set!!!)

card stock: brocade blue, so saffron, old olive, whisper white

ink: brocade blue, so saffron, basic black

accessories: mat pack and piercer, corner punch, gold brads, 5/8th inch olive grosgrain ribbon (still didn't find that new roll...this was a left over scrap from another one....ARGH!!!!!), stampin' dimensionals


There you go! Now I challenge you to play along....go create a birthday card for any age. If you were at my Birthday Card Camp...those ones don't count....no cheating!Winky


Wednesday, March 12, 2008

A needed Sympathy....

Hi All! I did get to do some stamping today. yoooohoooooo!!

It felt so good to sit at my desk even though it is heaped to the sky trying to recover from my week's events. My poor space.....I pile stuff everywhere...I can usually find ti all because it is piled on my desk! Not the case this week though...I have lost a brand new roll of ribbon and today....I couldn't find a stamp set! WHAT?!?!?!? I know! one of these weeks, I don't say days because it is more than a day's job, I need to reorganize my goodies!


Anyway....back to my card. My cousin's wife's Grandmother passed away this past week and I wanted to send her a card.
I have been wanting to ink up my Level 2 Hostess Stamp set Infinite Goodness for a while and today would be the day. I got the sketch for it from the online challenge for the day. The bottom image was supposed to be a circle, but I made mine a rectangle....sue me. hehehe!


The card base is always artichoke. My two background panels are stamped with the leaf branch from Infinite Goodness in mellow moss onto mellow moss card stock. I then took my white gel pen to add highlights. I matted both of those onto whisper white. My sentiment "from the heart" is from Holidays and Wishes...I use that stamp sooo much! It was stamped with black staz on using my stamp-a-ma-jig. Before adhering those panels, i laid my 1/4 inch grosgrain ribbon in white down and adhered the panels over it. Then I tied a simple knot off set on the right panel.


My main image was the fruit branch from Infinite Goodness stamped with black staz on onto whisper white. Mat that onto close to cocoa and always artichoke. I colored in my branch with a blender pen and my ink pads. Today that branch is a blueberry branch. It could be an orange branch or even apples. I have no idea what it was truly meant to be.....but today, for this card, it is blueberries. lol!

The side was punched with my 1 inch circle punch and I used that "indent" to allow for the ribbon knot.


What do you think? I am pretty pleased with it....very clean lines.....no fuss or muss.....just simply "from the heart."